Lexus RX (RX 350L, RX450h) 2016-2026 Repair Manual: Check Mode Procedure
CHECK MODE PROCEDURE
HINT:
Compared to normal mode, check mode is more sensitive to malfunctions. Therefore, check mode can detect malfunctions that cannot be detected in normal mode.
NOTICE:
All the stored DTCs and freeze frame data are cleared if: 1) the ECM is changed from normal mode to check mode or vice versa; or 2) the engine switch is turned from on (IG) to on (ACC) or off while in check mode. Before changing modes, always check and note any DTCs and freeze frame data.
CHECK MODE PROCEDURE
(a) Check and ensure the following conditions:
(1) Battery voltage is 11 V or higher.
(2) Throttle valve is fully closed.
(3) Shift lever is in P or N.
(4) A/C switch is off.
(b) Turn the engine switch off.
(c) Connect the Techstream to the DLC3.
(d) Turn the engine switch on (IG).
(e) Turn the Techstream on.
(f) Enter the following menus: Powertrain / Engine / Utility / Check Mode.
Powertrain > Engine > Utility| Tester Display |
|---|
| Check Mode |
(g) Switch the ECM from normal mode to check mode.
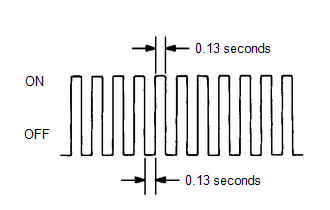
(h) Check that the MIL flashes as shown in the illustration.
(i) Start the engine.
(j) Check that the MIL turns off.
(k) Simulate the conditions of the malfunction described by the customer.
(l) Check the DTCs and freeze frame data using the Techstream.
 Terminals Of Ecm
TERMINALS OF ECM HINT: The standard voltage, resistance and waveform between each pair of the ECM terminals is shown in the table below. The appropriate conditions for checking each pair of the termi ...
 Fail-safe Chart
FAIL-SAFE CHART If any of the following DTCs are stored, the ECM enters fail-safe mode to allow the vehicle to be driven temporarily or stops fuel injection. DTC Code Component Fail-Safe Operat ...
Other materials:
Lexus RX (RX 350L, RX450h) 2016-2026 Repair Manual > Lighting System (w/o Automatic Headlight Beam Level Control System): Low Beam Headlight Circuit
DESCRIPTION The main body ECU (multiplex network body ECU) controls the low beam headlights. WIRING DIAGRAM CAUTION / NOTICE / HINT NOTICE:
Inspect the fuses for circuits related to this system before performing the following procedure.
Before replacing the main body ECU (multiplex network bod ...
Lexus RX (RX 350L, RX450h) 2016-2026 Repair Manual > Rear Power Outlet Socket (w/o Rear No. 2 Seat): Removal
REMOVAL CAUTION / NOTICE / HINT The necessary procedures (adjustment, calibration, initialization or registration) that must be performed after parts are removed and installed, or replaced during rear No. 1 power outlet socket removal/installation are shown below. Necessary Procedures After Parts Re ...
Lexus RX (RX 350L, RX450h) 2016-{YEAR} Owners Manual
- For your information
- Pictorial index
- For safety and security
- Instrument cluster
- Operation of each component
- Driving
- Lexus Display Audio system
- Interior features
- Maintenance and care
- When trouble arises
- Vehicle specifications
- For owners
Lexus RX (RX 350L, RX450h) 2016-{YEAR} Repair Manual

0.0128