
Lexus RX (RX 350L, RX450h) 2016-2026 Repair Manual: Rear Turn Signal Light Bulb
Replacement
REPLACEMENT
CAUTION / NOTICE / HINT
HINT:
- Use the same procedure for the RH side and LH side.
- The following procedure is for the LH side.
PROCEDURE
1. REMOVE REAR LIGHT COVER
Click here .gif)
2. DISCONNECT REAR COMBINATION LIGHT ASSEMBLY
(a) Apply protective tape around the rear combination light assembly as shown in the illustration.
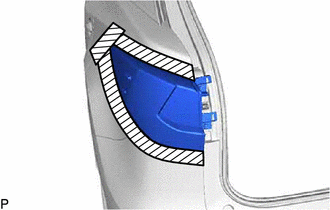
.png) | Protective Tape |
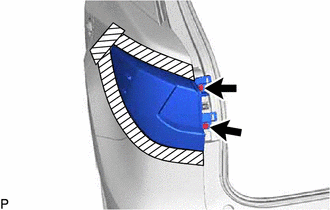
| (b) Remove the 2 screws. |
|
(c) Pull the rear combination light assembly toward the rear of the vehicle as shown in the illustration to disengage the pin and 3 guides and separate the rear combination light assembly.
NOTICE:
To prevent the rear combination light assembly from falling when disengaging the pin, lightly hold the rear combination light assembly.
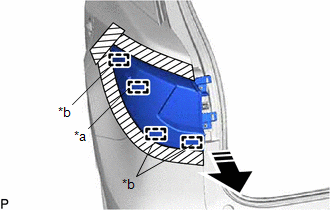
| *a | Pin |
| *b | Guide |
.png) | Remove in this Direction |
3. REMOVE REAR TURN SIGNAL LIGHT BULB
(a) Turn the rear light cord with the rear turn signal light bulb as shown in the illustration to disconnect them as a unit.
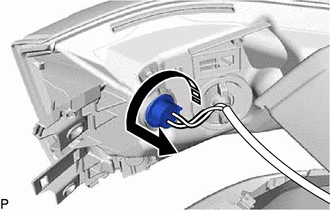
| | Remove in this Direction |
(b) Remove the rear turn signal light bulb from the rear light cord.
4. INSTALL REAR TURN SIGNAL LIGHT BULB
(a) Install a new rear turn signal light bulb to the rear light cord.
(b) Turn the rear light cord with the rear turn signal light bulb as shown in the illustration to connect them as a unit.
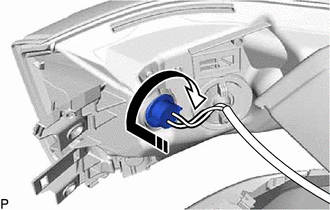
| | Install in this Direction |
5. INSTALL REAR COMBINATION LIGHT ASSEMBLY
(a) Engage the 3 guides and pin to temporarily install the rear combination light assembly as shown in the illustration.
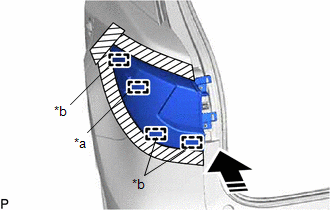
| *a | Pin |
| *b | Guide |
| | Install in this Direction |
(b) Install the rear combination light assembly with the 2 screws.
(c) Remove the protective tape.
6. INSTALL REAR LIGHT COVER
Click here
 Installation
INSTALLATION CAUTION / NOTICE / HINT HINT:
Use the same procedure for the RH side and LH side.
The following procedure is for the LH side.
PROCEDURE 1. INSTALL SIDE TURN SIGNAL LIGHT ASSEMBLY ...

Other materials:
Lexus RX (RX 350L, RX450h) 2016-2026 Repair Manual > Roof Drip Side Finish Moulding: Installation
INSTALLATION CAUTION / NOTICE / HINT HINT:
Use the same procedure for the RH side and LH side.
The following procedure is for the LH side.
PROCEDURE 1. INSTALL ROOF DRIP SIDE FINISH MOULDING CLIP NOTICE: When installing new roof drip side finish moulding clips, remove any double-sided tape r ...
Lexus RX (RX 350L, RX450h) 2016-2026 Repair Manual > Headup Display Switch: Installation
INSTALLATION PROCEDURE 1. INSTALL HEADUP DISPLAY SWITCH ASSEMBLY (INTEGRATION CONTROL AND PANEL ASSEMBLY) (a) Engage the 4 claws as shown in the illustration to install the headup display switch assembly (integration control and panel assembly). Install in this Direction 2. INSTALL LOWER I ...
Lexus RX (RX 350L, RX450h) 2016-{YEAR} Owners Manual
- For your information
- Pictorial index
- For safety and security
- Instrument cluster
- Operation of each component
- Driving
- Lexus Display Audio system
- Interior features
- Maintenance and care
- When trouble arises
- Vehicle specifications
- For owners
Lexus RX (RX 350L, RX450h) 2016-{YEAR} Repair Manual

0.0095