Lexus RX (RX 350L, RX450h) 2016-2026 Repair Manual: Operation Check
OPERATION CHECK
CHECK POWER SEAT FUNCTION
(a) Check the basic functions.
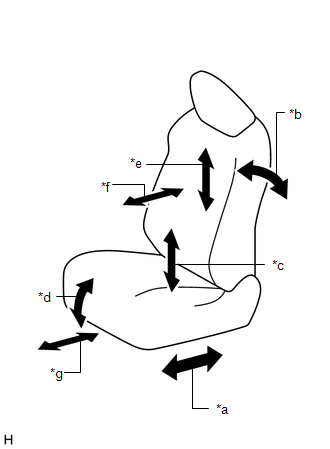
| *a | Slide Function |
| *b | Reclining Function |
| *c | Lifter Function |
| *d | Front Vertical Function |
| *e | Lumbar Support Adjustment Function (up - down) (w/ Seat Variable Cushion Switch) |
| *f | Lumbar Support Adjustment Function (forward - back) |
| *g | Cushion Length Function (w/ Seat Variable Cushion Switch) |
(1) Operate the power seat switches and check that each seat function operates properly:
- Slide function
- Reclining function
- Lifter function
- Front vertical function
- Lumbar support adjustment function
-
Cushion length function*
- *: w/ Seat Variable Cushion Switch
CHECK FRONT SEAT MOTOR (SLIDING, RECLINING, FRONT VERTICAL AND LIFTER FUNCTION)
HINT:
The front power seat switch is a collective term for the front power seat switch LH and the front power seat switch RH.
(a) Check the PTC operation inside the power seat motor.
HINT:
The resistance of the PTC thermistor increases when a switch of the front power seat switch is held down even after the seat has been moved to the farthest possible position in one direction. If the resistance increases beyond a specified level, the current is shut off to prevent a short circuit.
NOTICE:
- The inspection should be performed with the seat installed in the vehicle.
- Perform the 4 steps below to check the full range of motion for each power seat function.
(1) Choose a power seat function. Operate a switch of the front power seat switch and move the seat to the farthest possible position in one direction. Keep the seat in that position for approximately 60 seconds.
(2) Operate the switch of the front power seat switch again and continue to try to move the seat in the same direction as in the previous step. Measure the time until the current is shut off (motor operation sound will stop).
Standard:
4 to 90 seconds
(3) After the current is shut off, release the switch of the front power seat switch and wait for approximately 60 seconds.
(4) Operate the same switch of the front power seat switch and move the seat in the opposite direction. Check that the motor operates.
CHECK LUMBAR SUPPORT ADJUSTMENT MOTOR
HINT:
The front lumbar power seat switch is a collective term for the front lumbar power seat switch (driver seat) and the front lumbar power seat switch (front passenger seat).
(a) Check the PTC operation inside the lumbar support adjustment motor.
NOTICE:
The inspection should be performed with the seat installed in the vehicle.
(1) Operate the front lumbar power seat switch and move the lumbar support to either the foremost or rearmost position. Keep the seat in that position for approximately 60 seconds.
(2) Operate the front lumbar power seat switch again and continue to try to move the lumbar support in the same direction as in the previous step. Measure the time until the current is shut off (motor operation sound will stop).
Standard:
4 to 90 seconds
(3) After the current is shut off, release the front lumbar power seat switch and wait for approximately 60 seconds.
(4) Operate the front lumbar power seat switch and move the lumbar support in the opposite direction. Check that the motor operates.
(b) Check the PTC operation inside the lumbar support adjustment motor (up - down) (w/ Seat Variable Cushion Switch).
NOTICE:
The inspection should be performed with the seat installed to the vehicle.
(1) Operate the front lumbar power seat switch and move the lumbar support to either the foremost or rearmost position. Keep the seat in that position for approximately 60 seconds.
(2) Operate the front lumbar power seat switch again and continue to try to move the lumbar support in the same direction as in the previous step. Measure the time until the current is shut off (motor operation sound stops).
Standard:
4 to 90 seconds
(3) After the current is shut off, release the front lumbar power seat switch and wait for approximately 60 seconds.
(4) Operate the front lumbar power seat switch and move the lumbar support in the opposite direction. Check that the motor operates.
CHECK SEAT LENGTH MOTOR (w/ Seat Variable Cushion Switch)
HINT:
The seat variable cushion switch is a collective term for the seat variable cushion switch (driver seat) and the seat variable cushion switch (front passenger seat).
(a) Check the PTC operation inside the seat length motor.
NOTICE:
The inspection should be performed with the seat installed in the vehicle.
(1) Operate the seat variable cushion switch and move the seat cushion to either the foremost or rearmost position. Keep the seat in that position for approximately 60 seconds.
(2) Operate the seat variable cushion switch again and continue to try to move the seat cushion in the same direction as in the previous step. Measure the time until the current is shut off (motor operation sound will stop).
Standard:
4 to 90 seconds
(3) After the current is shut off, release the seat variable cushion switch and wait for approximately 60 seconds.
(4) Operate the seat variable cushion switch and move the seat cushion in the opposite direction. Check that the motor operates.
 Parts Location
PARTS LOCATION ILLUSTRATION *1 INSTRUMENT PANEL JUNCTION BLOCK ASSEMBLY - P/SEAT F/R FUSE - P/SEAT F/L FUSE - - ILLUSTRATION *A for Driver Seat - - *1 FRONT SEATBACK FRAME ...
 System Diagram
SYSTEM DIAGRAM Driver Seat Front Passenger Seat ...
Other materials:
Lexus RX (RX 350L, RX450h) 2016-2026 Repair Manual > Curtain Shield Airbag Assembly (w/ Rear No. 2 Seat): Installation
INSTALLATION CAUTION / NOTICE / HINT HINT:
Use the same procedure for the RH side and LH side.
The following procedure is for the LH side.
PROCEDURE 1. INSTALL CURTAIN SHIELD AIRBAG ASSEMBLY NOTICE: When installing a curtain shield airbag assembly, have assistants hold it to prevent it from ...
Lexus RX (RX 350L, RX450h) 2016-2026 Repair Manual > Intelligent Clearance Sonar System: ENG / EHV Device (C1A40)
DESCRIPTION When an EFI system malfunction signal sent by the ECM is detected by the clearance warning ECU assembly, DTC C1A40 is stored. DTC No. Detection Item DTC Detection Condition Trouble Area C1A40 ENG / EHV Device When the engine switch is on (IG), an EFI system malfunction s ...
Lexus RX (RX 350L, RX450h) 2016-{YEAR} Owners Manual
- For your information
- Pictorial index
- For safety and security
- Instrument cluster
- Operation of each component
- Driving
- Lexus Display Audio system
- Interior features
- Maintenance and care
- When trouble arises
- Vehicle specifications
- For owners
Lexus RX (RX 350L, RX450h) 2016-{YEAR} Repair Manual

0.0108