Lexus RX (RX 350L, RX450h) 2016-2026 Repair Manual: Back-up Battery
Components
COMPONENTS
ILLUSTRATION
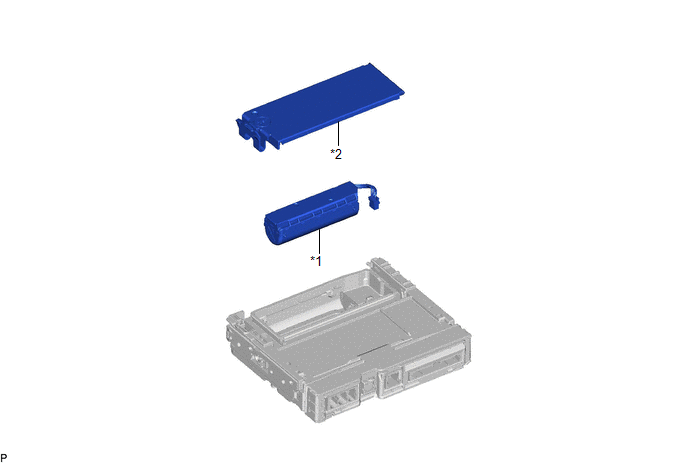
| *1 | BACK-UP BATTERY | *2 | TRANSCEIVER COVER |
Removal
REMOVAL
CAUTION / NOTICE / HINT
The necessary procedures (adjustment, calibration, initialization, or registration) that must be performed after parts are removed and installed, or replaced during back-up battery removal/installation are shown below.
Necessary Procedure After Parts Removed/Installed/Replaced| Replaced Part or Performed Procedure | Necessary Procedure | Effect/Inoperative Function when Necessary Procedure not Performed | Link |
|---|---|---|---|
| BUB (Back-up battery) | Perform backup battery replacement reset | Safety connect system | |
PROCEDURE
1. REMOVE DCM (TELEMATICS TRANSCEIVER) WITH BRACKET
Click here .gif)
2. REMOVE BACK-UP BATTERY
(a) Disengage the claw and 2 guides as shown in the illustration to remove the transceiver cover.
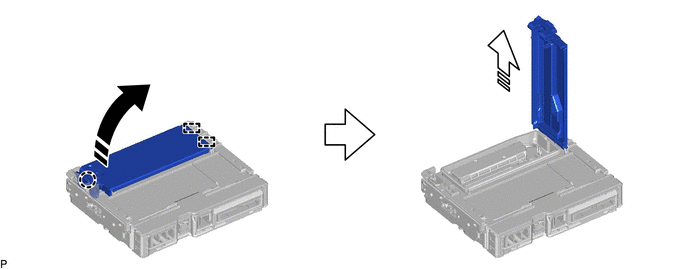
.png) | Remove in this Direction (1) | .png) | Remove in this Direction (2) |
(b) Disconnect the connector.
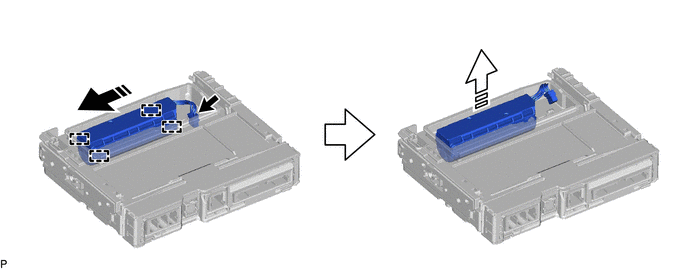
| | Remove in this Direction (1) | | Remove in this Direction (2) |
(c) Disengage the 4 guides and remove the back-up battery as shown in the illustration.
Installation
INSTALLATION
PROCEDURE
1. INSTALL BACK-UP BATTERY
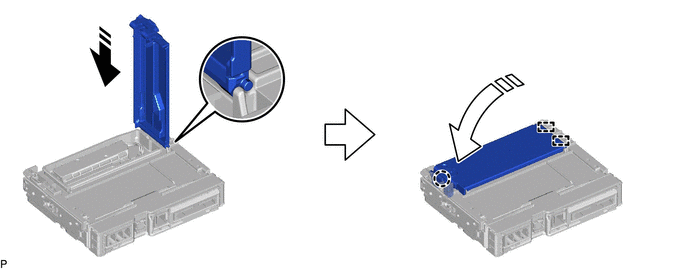
(a) Move the back-up battery in the direction indicated by the arrow (1) shown in the illustration to temporarily install it.
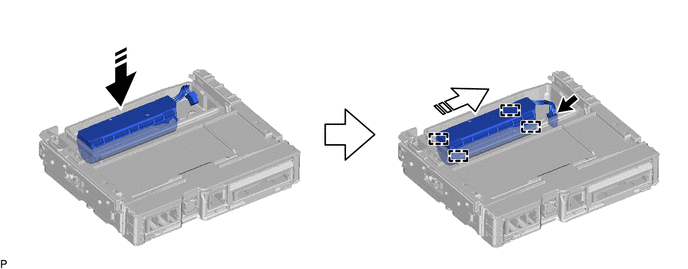
.png) | Install in this Direction (1) | .png) | Install in this Direction (2) |
(b) Push the back-up battery in the direction indicated by the arrow (2) shown in the illustration to engage the 4 guides and install the back-up battery.
(c) Connect the connector.
NOTICE:
Make sure that the connector is connected securely.
(d) Engage the 2 guides and claw to install the transceiver cover as shown in the illustration.
| | Install in this Direction (1) | | Install in this Direction (2) |
NOTICE:
Make sure that the transceiver cover is securely installed.
2. INSTALL DCM (TELEMATICS TRANSCEIVER) WITH BRACKET
Click here .gif)
3. PERFORM INITIALIZATION
Click here


Other materials:
Lexus RX (RX 350L, RX450h) 2016-2026 Repair Manual > Repair Instruction: Vehicle Lift And Support Locations
VEHICLE LIFT AND SUPPORT LOCATIONS NOTICE ABOUT VEHICLE CONDITION WHEN RAISING VEHICLE (a) The vehicle must be unloaded before jacking up or raising the vehicle. Never jack up or raise a heavily loaded vehicle. (b) When removing any heavy components like the engine or transmission, the vehicle cente ...
Lexus RX (RX 350L, RX450h) 2016-2026 Repair Manual > Front Camera System: How To Proceed With Troubleshooting
CAUTION / NOTICE / HINT HINT:
Before performing troubleshooting for the front camera system, perform troubleshooting for the pre-collision system.
Click here
If a pre-collision system related warning message is displayed on the multi-information display, refer to How to Proceed with Troublesh ...
Lexus RX (RX 350L, RX450h) 2016-{YEAR} Owners Manual
- For your information
- Pictorial index
- For safety and security
- Instrument cluster
- Operation of each component
- Driving
- Lexus Display Audio system
- Interior features
- Maintenance and care
- When trouble arises
- Vehicle specifications
- For owners
Lexus RX (RX 350L, RX450h) 2016-{YEAR} Repair Manual

0.0089