Lexus RX (RX 350L, RX450h) 2016-2026 Repair Manual: Removal
REMOVAL
CAUTION / NOTICE / HINT
The necessary procedures (adjustment, calibration, initialization, or registration) that must be performed after parts are removed, installed, or replaced during brake booster assembly removal/installation are shown below.
Necessary Procedure After Parts Removed/Installed/Replaced| Replacement Part or Procedure | Necessary Procedures | Effects/Inoperative when not Performed | Link |
|---|---|---|---|
| Disconnect cable from negative battery terminal | Memorize steering angle neutral point | Lane control system | |
| Pre-collision system | |||
| Intelligent clearance sonar system | |||
| Lighting system (w/ Automatic Headlight Beam Level Control System) | | ||
| Parking assist monitor system | | ||
| Panoramic view monitor system | | ||
| Initialize back door lock | Power door lock control system | | |
| Reset back door close position | Power back door system (w/ Outside Door Control Switch) | |
CAUTION / NOTICE / HINT
NOTICE:
Make sure to release vacuum from the brake booster assembly before removing the brake master cylinder sub-assembly from the brake booster assembly.
PROCEDURE
1. PRECAUTION
NOTICE:
After turning the engine switch off, waiting time may be required before disconnecting the cable from the negative (-) battery terminal. Therefore, make sure to read the disconnecting the cable from the negative (-) battery terminal notices before proceeding with work.
Click here .gif)
2. DISCONNECT CABLE FROM NEGATIVE BATTERY TERMINAL
NOTICE:
When disconnecting the cable, some systems need to be initialized after the cable is reconnected.
Click here
3. REMOVE BRAKE MASTER CYLINDER SUB-ASSEMBLY WITH WAY
Click here
4. REMOVE FRONT DOOR SCUFF PLATE LH
w/o Rear No. 2 Seat: Click here
w/ Rear No. 2 Seat: Click here
5. REMOVE COWL SIDE TRIM BOARD LH
Click here
6. REMOVE NO. 1 INSTRUMENT PANEL UNDER COVER SUB-ASSEMBLY
Click here
7. REMOVE FRONT WIPER MOTOR AND LINK ASSEMBLY
Click here
8. REMOVE OUTER COWL TOP PANEL SUB-ASSEMBLY
Click here
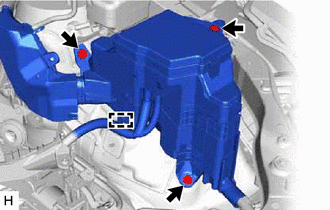
9. REMOVE BRAKE MASTER CYLINDER RESERVOIR ASSEMBLY
| (a) Disconnect the reservoir level switch connector and remove the bolt from the brake master cylinder reservoir assembly. |
|
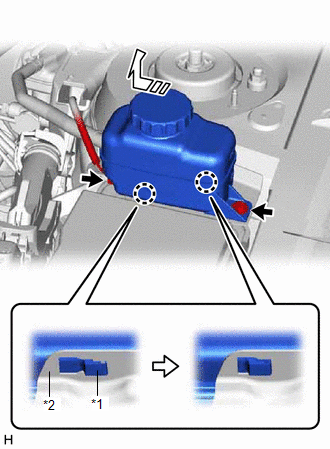
(b) Move the brake master cylinder reservoir assembly as shown in the illustration to disengage the 2 claws, and remove it.
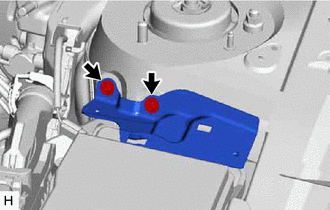
10. REMOVE RESERVOIR BRACKET
| (a) Remove the 2 bolts and reservoir bracket. |
|
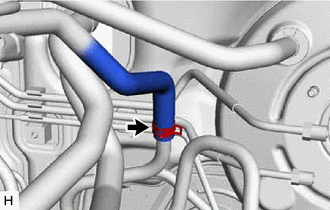
11. DISCONNECT UNION TO CHECK VALVE HOSE
(a) w/o Rear Air Conditioning System:
| (1) Slide the clip and disconnect the union to check valve hose from the brake booster assembly. |
|
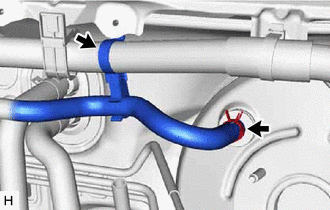
(2) Separate the union to check valve hose from the engine room main wire.
(b) w/ Rear Air Conditioning System:
| (1) Slide the clip and disconnect the union to check valve hose from the brake booster assembly. |
|
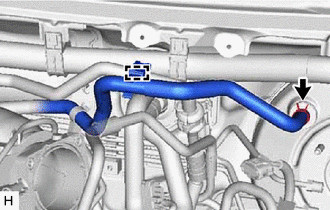
(2) Disengage the clamp and separate the union to check valve hose from the suction pipe sub-assembly.
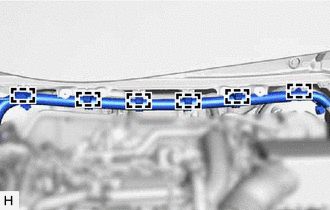
12. SEPARATE ENGINE ROOM MAIN WIRE (for TMC Made)
| (a) Disengage the 6 clamps to separate the engine room main wire. |
|
| (b) Disconnect the connector from the security horn assembly. |
|
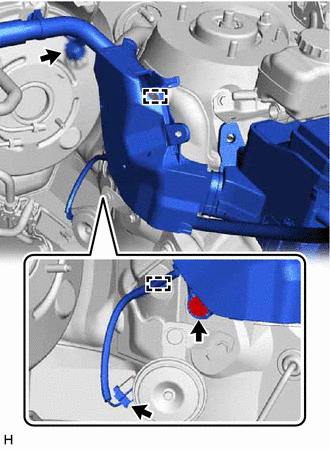
(c) Disconnect the connector from the vacuum warning switch assembly.
(d) Remove the bolt.
(e) Disengage the clamp and pin to separate the wire harness protector.
| (f) Disengage the clamp. |
|
(g) Remove the 3 bolts to separate the engine room relay block assembly.
13. SEPARATE ENGINE ROOM MAIN WIRE (for TMMC Made)
| (a) Disengage the 6 clamps to separate the engine room main wire. |
|
| (b) w/ Security Horn Assembly: (1) Disconnect the connector from the security horn assembly. |
|
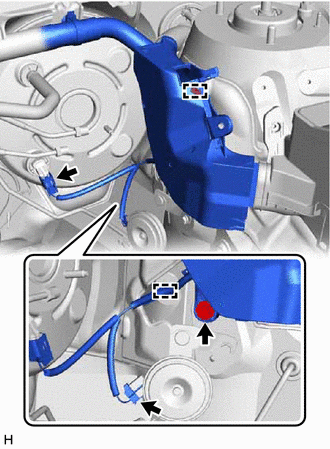
(c) Disconnect the connector from the vacuum warning switch assembly.
(d) Remove the bolt.
(e) Disengage the clamp and pin to separate the wire harness protector.
| (f) Disengage the clamp. |
|
(g) Remove the 3 bolts to separate the engine room relay block assembly.
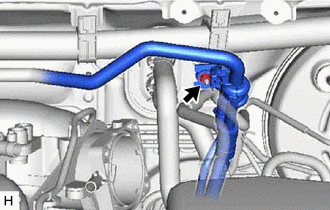
14. DISCONNECT FUEL VAPOR FEED HOSE ASSEMBLY
| (a) Slide the clip and disconnect the fuel vapor feed hose assembly. |
|
15. SEPARATE AIR CONDITIONING HOSE AND ACCESSORY (w/ Rear Air Conditioning System)
| (a) Remove the nut and separate the air conditioning hose and accessory. NOTICE:
|
|
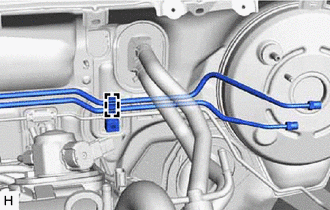
16. SEPARATE BRAKE LINE
| (a) Disengage the brake tube clamp to separate the 2 brake lines. NOTICE:
|
|
17. REMOVE BRAKE PEDAL RETURN SPRING
Click here
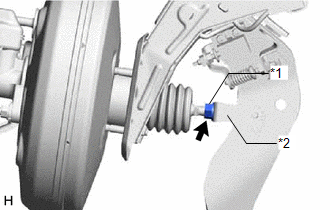
18. LOOSEN LOCK NUT
| (a) Loosen the lock nut of the brake master cylinder push rod clevis. |
|
19. REMOVE PUSH ROD PIN
Click here
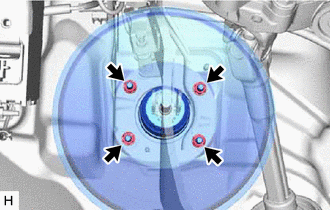
20. REMOVE BRAKE BOOSTER ASSEMBLY
| (a) Remove the 4 nuts and push the brake booster assembly toward the engine compartment. NOTICE: Do not apply excessive force to the brake lines. |
|
(b) Remove the brake master cylinder push rod clevis and lock nut from the brake booster assembly.
(c) Remove the brake booster assembly from the vehicle body.
NOTICE:
Do not apply excessive force to the brake lines.
21. REMOVE BRAKE BOOSTER GASKET
 Inspection
INSPECTION PROCEDURE 1. INSPECT BRAKE VACUUM CHECK VALVE ASSEMBLY (a) Check that there is ventilation from the booster side to the engine side, and no ventilation from the engine side to the booste ...
 Reassembly
REASSEMBLY PROCEDURE 1. INSTALL VACUUM WARNING SWITCH ASSEMBLY (for TMC Made) (a) Install a new check valve grommet to the brake booster assembly. (b) Install the vacuum warning switch assembly to the ...
Other materials:
Lexus RX (RX 350L, RX450h) 2016-2026 Repair Manual > Drive Belt: Removal
REMOVAL PROCEDURE 1. REMOVE FRONT WHEEL RH Click here 2. REMOVE FRONT FENDER APRON SEAL RH Click here 3. REMOVE V-RIBBED BELT (a) Release the V-ribbed belt tension by turning the V-ribbed belt tensioner assembly counterclockwise. (b) Turn the V-ribbed belt tensioner assembly cou ...
Lexus RX (RX 350L, RX450h) 2016-2026 Repair Manual > Steering Lock System: Diagnostic Trouble Code Chart
DIAGNOSTIC TROUBLE CODE CHART Steering Lock System DTC No. Detection Item DTC Detection Condition Note Link B2781 Open / Short in Steering Lock ECU One of the following conditions is met (1-trip detection logic (Only output while a malfunction is present and the engine switch is o ...
Lexus RX (RX 350L, RX450h) 2016-{YEAR} Owners Manual
- For your information
- Pictorial index
- For safety and security
- Instrument cluster
- Operation of each component
- Driving
- Lexus Display Audio system
- Interior features
- Maintenance and care
- When trouble arises
- Vehicle specifications
- For owners
Lexus RX (RX 350L, RX450h) 2016-{YEAR} Repair Manual

0.0095