Lexus RX (RX 350L, RX450h) 2016-2026 Repair Manual: Reassembly
REASSEMBLY
PROCEDURE
1. INSTALL MASTER CYLINDER RESERVOIR GROMMET
(a) Apply a light layer of lithium soap base glycol grease to the entire circumference of 2 new master cylinder reservoir grommets.
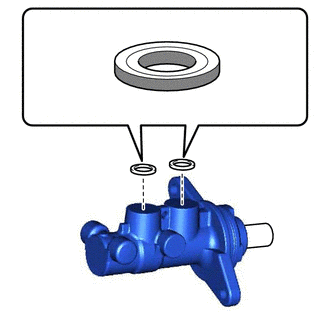
 | Lithium Soap Base Glycol Grease |
(b) Install the 2 master cylinder reservoir grommets to the brake master cylinder body.
2. INSTALL BRAKE MASTER CYLINDER RESERVOIR SUB-ASSEMBLY
(a) Secure the brake master cylinder body in a vise.
NOTICE:
Place aluminum plates on the vise to prevent damage to the brake master cylinder body.
(b) Install the brake master cylinder reservoir sub-assembly to the brake master cylinder body.
NOTICE:
Do not drop the brake master cylinder reservoir sub-assembly.
3. INSTALL BRAKE MASTER CYLINDER RING PIN
| (a) Using a 5 mm pin punch and a hammer, tap in the brake master cylinder ring pin to secure the brake master cylinder reservoir sub-assembly. |
|
.png)
(b) Remove the brake master cylinder sub-assembly from the vise.
4. INSTALL BRAKE MASTER CYLINDER SUB-ASSEMBLY
5. INSTALL NO. 2 BRAKE TUBE WAY
(a) Install the No. 2 brake tube way to the brake master cylinder sub-assembly.
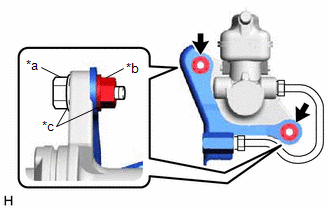
6. INSTALL BRAKE MASTER CYLINDER TO WAY TUBE
(a) Temporarily install the brake master cylinder to way tube to the brake master cylinder sub-assembly and No. 2 brake tube way.
NOTICE:
- Tighten the 2 flare nuts by hand.
- Do not kink or damage the brake line.
- Do not allow any foreign matter such as dirt or dust to enter the brake line from the connecting parts.
| (b) Secure the No. 2 brake tube way to the brake master cylinder sub-assembly with the 2 bolts, 2 nuts and 4 washers as shown in the illustration. Torque: 12.5 N·m {127 kgf·cm, 9 ft·lbf} |
|
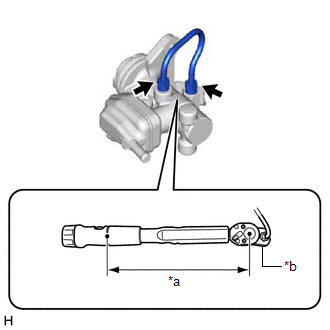
(c) Secure the brake master cylinder sub-assembly with way in a vise.
NOTICE:
Place aluminum plates on the vise to prevent damage to the brake master cylinder sub-assembly and No. 2 brake tube way.
| (d) Using a union nut wrench, fully tighten the brake master cylinder to way tube. Torque: Specified tightening torque : 19.6 N·m {200 kgf·cm, 14 ft·lbf} HINT:
|
|
.gif)
(e) Remove the brake master cylinder sub-assembly with way from the vise.
(f) Remove the 2 bolts, 2 nuts and 4 washers.
 Installation
INSTALLATION PROCEDURE 1. INSPECT AND ADJUST BRAKE BOOSTER PUSH ROD Click here 2. INSTALL BRAKE MASTER CYLINDER O-RING (a) Install a new brake master cylinder O-ring to the brake master cylinder sub ...
 Brake Pedal
...
Other materials:
Lexus RX (RX 350L, RX450h) 2016-2026 Repair Manual > Rear Power Seat Control System(for Second Row): Terminals Of Ecu
TERMINALS OF ECU CHECK FOLD SEAT CONTROL ECU RH (a) Disconnect the x3 and x4 fold seat control ECU RH connectors. (b) Measure the resistance and voltage according to the value(s) in the table below. Terminal No. (Symbol) Wiring Color Terminal Description Condition Specified Condition ...
Lexus RX (RX 350L, RX450h) 2016-2026 Repair Manual > Audio And Visual System (for 8 Inch Display): Switch Lights of Remote Touch do not Illuminate
DESCRIPTION Power is supplied to the remote touch (remote operation controller assembly) illumination when the light control switch is in the tail or head position. WIRING DIAGRAM CAUTION / NOTICE / HINT NOTICE: Inspect the fuse for circuits related to this system before performing the following pr ...
Lexus RX (RX 350L, RX450h) 2016-{YEAR} Owners Manual
- For your information
- Pictorial index
- For safety and security
- Instrument cluster
- Operation of each component
- Driving
- Lexus Display Audio system
- Interior features
- Maintenance and care
- When trouble arises
- Vehicle specifications
- For owners
Lexus RX (RX 350L, RX450h) 2016-{YEAR} Repair Manual

0.0098