Lexus RX (RX 350L, RX450h) 2016-2026 Repair Manual: Differential Oil
Replacement
REPLACEMENT
CAUTION / NOTICE / HINT
HINT:
Stop the vehicle on a level surface.
PROCEDURE
1. DRAIN DIFFERENTIAL OIL
| (a) Using a 10 mm hexagon wrench, remove the differential inspection plug and gasket. |
|
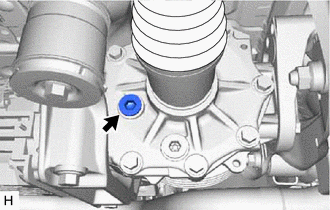
| (b) Using a 10 mm hexagon wrench, remove the rear differential drain plug and gasket to drain the differential oil. NOTICE: As the differential oil may be hot after driving, make sure that the differential is sufficiently cool before starting work. |
|

| (c) Using a 10 mm hexagon wrench, install a new gasket and the rear differential drain plug. Torque: 39 N·m {398 kgf·cm, 29 ft·lbf} |
|
2. ADD DIFFERENTIAL OIL
(a) Add differential oil.
Oil Type:
Toyota genuine differential gear oil LT 75W-85 GL-5 or equivalent
Standard Differential Oil Capacity:
0.45 to 0.55 liters (0.48 to 0.58 US qts., 0.40 to 0.48 Imp. qts.)
NOTICE:
- Add the differential oil in small quantities every few minutes.
- Too much or too little oil will lead to differential problems.
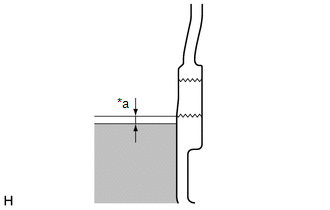
| (b) Check that the oil level is between 0 to 5 mm (0 and 0.196 in.) from the bottom lip of the differential inspection plug opening. |
|
(c) Inspect for oil leaks if the oil level is low.
| (d) Using a 10 mm hexagon wrench, install a new gasket and the differential inspection plug. Torque: 39 N·m {398 kgf·cm, 29 ft·lbf} NOTICE: After changing the oil, drive the vehicle and then check the oil level again. |
|
3. INSPECT FOR DIFFERENTIAL OIL LEAK
 Replacement
REPLACEMENT CAUTION / NOTICE / HINT The necessary procedures (adjustment, calibration, initialization, or registration) that must be performed after parts are removed and installed, or replaced during ...

Other materials:
Lexus RX (RX 350L, RX450h) 2016-2026 Repair Manual > Park Assist / Monitoring: Television Camera (for Front)
ComponentsCOMPONENTS ILLUSTRATION *1 COOL AIR INTAKE DUCT SEAL *2 FRONT TELEVISION CAMERA ASSEMBLY *3 MILLIMETER WAVE RADAR SENSOR ASSEMBLY *4 TELEVISION CAMERA WIRE N*m (kgf*cm, ft.*lbf): Specified torque - - RemovalREMOVAL CAUTION / NOTICE / HINT The necessary pro ...
Lexus RX (RX 350L, RX450h) 2016-2026 Repair Manual > Wiper / Washer: Relay
On-vehicle InspectionON-VEHICLE INSPECTION PROCEDURE 1. INSPECT WIPER RELAY (a) Measure the resistance according to the value(s) in the table below. Standard Resistance: Tester Connection Condition Specified Condition 3 - 5 Battery voltage not applied between terminals 1 and 2 10 ...
Lexus RX (RX 350L, RX450h) 2016-{YEAR} Owners Manual
- For your information
- Pictorial index
- For safety and security
- Instrument cluster
- Operation of each component
- Driving
- Lexus Display Audio system
- Interior features
- Maintenance and care
- When trouble arises
- Vehicle specifications
- For owners
Lexus RX (RX 350L, RX450h) 2016-{YEAR} Repair Manual

0.0094