Lexus RX (RX 350L, RX450h) 2016-2026 Repair Manual: Replacement
REPLACEMENT
CAUTION / NOTICE / HINT
The necessary procedures (adjustment, calibration, initialization, or registration) that must be performed after parts are removed and installed, or replaced during rear No. 2 differential mount cushion replacement are shown below.
Necessary Procedures After Parts Removed/Installed/Replaced| Replaced Part or Performed Procedure | Necessary Procedure | Effect/Inoperative Function when Necessary Procedure not Performed | Link |
|---|---|---|---|
| Rear wheel alignment adjustment | Calibration |
| |
| Suspension, tires, etc. (The vehicle height changes because of suspension or tire replacement) |
|
| |
| Rear television camera assembly optical axis (Back camera position setting) | Parking assist monitor system | for Initialization: for Calibration: | |
| Panoramic view monitor system | for Initialization: for Calibration: | |
| Initialize No. 1 headlight ECU sub-assembly LH | Lighting System (w/ Automatic Headlight Beam Level Control System) | | |
| Gas leaks from exhaust system | Inspection after repair |
| |
PROCEDURE
1. REMOVE REAR DIFFERENTIAL CARRIER ASSEMBLY WITH DIFFERENTIAL SUPPORT
Click here .gif)
2. REMOVE REAR NO. 2 DIFFERENTIAL MOUNT CUSHION
(a) Using SST, remove the rear No. 2 differential mount cushion.
SST: 09570-48010
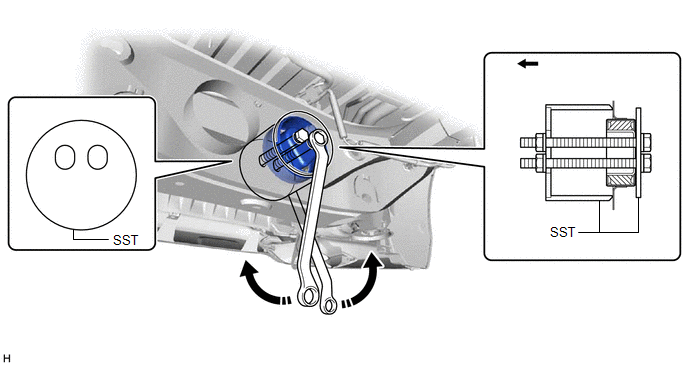
 | Rear of the Vehicle | - | - |
NOTICE:
- Before using SST, apply grease to the SST bolts.
- Be sure to use the correct combination of SST.
- Be sure to use the correct direction of SST.
- Make sure that SST contacts the entire circumference of the rear No. 2 differential mount cushion.
- Do not tilt the bolts of SST.
- Tighten the 2 bolts of SST so that they enter the 2 holes of the rear No. 2 differential mount cushion by an equal amount.
3. INSTALL REAR NO. 2 DIFFERENTIAL MOUNT CUSHION
(a) Using SST, install a new rear No. 2 differential mount cushion.
SST: 09570-48010
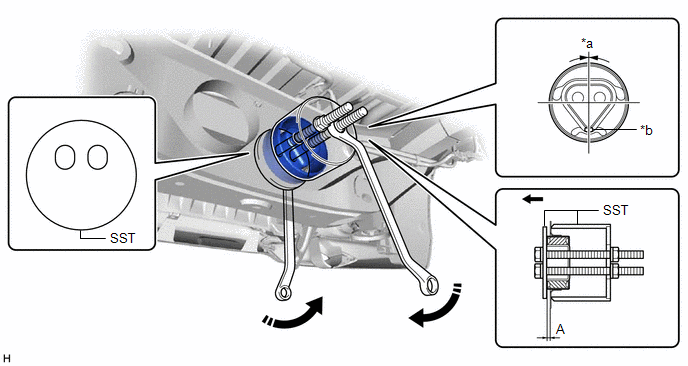
| *a | 0° +/- 3° | *b | Protrusion |
| | Rear of the Vehicle | - | - |
Standard Distance (A):
9.8 to 10.8 mm (0.386 to 0.425 in.)
NOTICE:
- Make sure that the rear No. 2 differential mount cushion is aligned within 3° from the center.
- Install the rear No. 2 differential mount cushion so that the protrusion is positioned as shown in the illustration.
- Temporarily install the rear No. 2 differential mount cushion to the rear suspension member sub-assembly in order to prevent it from tilting, and then install SST.
- Before using SST, apply grease to the SST bolt.
- Be sure to use the correct combination of SST.
- Be sure to use the correct direction of SST.
- Make sure that SST contacts the entire circumference of the rear No. 2 differential mount cushion.
- Do not tilt the bolts of SST.
- Tighten the 2 bolts of SST so that they enter the 2 holes of the rear No. 2 differential mount cushion by an equal amount.
4. TEMPORARILY INSTALL REAR DIFFERENTIAL CARRIER ASSEMBLY WITH DIFFERENTIAL SUPPORT
Click here
 Components
COMPONENTS ILLUSTRATION *1 REAR NO. 2 DIFFERENTIAL MOUNT CUSHION - - ● Non-reusable part - - ...
 Differential Oil
ReplacementREPLACEMENT CAUTION / NOTICE / HINT HINT: Stop the vehicle on a level surface. PROCEDURE 1. DRAIN DIFFERENTIAL OIL (a) Using a 10 mm hexagon wrench, remove the differential inspection pl ...
Other materials:
Lexus RX (RX 350L, RX450h) 2016-2026 Repair Manual > Navigation System: Data Signal Circuit between Radio Receiver and Stereo Jack Adapter
DESCRIPTION The No. 1 stereo jack adapter assembly sends the sound data signal or image data signal from a USB device to the radio receiver assembly via this circuit. WIRING DIAGRAM PROCEDURE 1. CHECK HARNESS AND CONNECTOR (RADIO RECEIVER ASSEMBLY - NO. 1 STEREO JACK ADAPTER ASSEMBLY) (a) ...
Lexus RX (RX 350L, RX450h) 2016-2026 Repair Manual > Engine Unit: Removal
REMOVAL CAUTION / NOTICE / HINT The necessary procedures (adjustment, calibration, initialization, or registration) that must be performed after parts are removed and installed, or replaced during engine unit removal/installation are shown below. Necessary Procedure After Parts Removed/Installed/Rep ...
Lexus RX (RX 350L, RX450h) 2016-{YEAR} Owners Manual
- For your information
- Pictorial index
- For safety and security
- Instrument cluster
- Operation of each component
- Driving
- Lexus Display Audio system
- Interior features
- Maintenance and care
- When trouble arises
- Vehicle specifications
- For owners
Lexus RX (RX 350L, RX450h) 2016-{YEAR} Repair Manual

0.0251