Lexus RX (RX 350L, RX450h) 2016-2026 Repair Manual: Replacement
REPLACEMENT
CAUTION / NOTICE / HINT
The necessary procedures (adjustment, calibration, initialization or registration) that must be performed after parts are removed and installed, or replaced during front drive shaft oil seal LH removal/installation are shown below.
Necessary Procedures After Parts Removed/Installed/Replaced| Replacement Part or Performed Procedure | Necessary Procedure | Effect/Inoperative Function when Necessary Procedure not Performed | Link |
|---|---|---|---|
| Front wheel alignment adjustment | Calibration |
| |
PROCEDURE
1. REMOVE FRONT WHEEL OPENING EXTENSION PAD LH
Click here .gif)
2. REMOVE NO. 3 ENGINE UNDER COVER
Click here
3. REMOVE FRONT FENDER APRON SEAL LH
Click here
4. DRAIN AUTOMATIC TRANSAXLE FLUID
| (a) Remove the refill plug and gasket from the automatic transaxle case sub-assembly. |
|
.png)
| (b) Using a T40 "TORX" socket wrench, remove the drain plug and O-ring from the transaxle housing. |
|
.png)
| (c) Using a 17 mm straight hexagon wrench, remove the overflow plug and O-ring from the transaxle housing and drain the automatic transaxle fluid. |
|
.png)
(d) Using a 17 mm straight hexagon wrench, install the overflow plug and a new O-ring to the transaxle housing.
Torque:
47 N·m {479 kgf·cm, 35 ft·lbf}
(e) Using a T40 "TORX" socket wrench, temporarily install the O-ring and drain plug to the transaxle housing.
HINT:
Reuse the old O-ring as the drain plug will be removed again to adjust the automatic transaxle fluid level.
(f) Temporarily install the gasket and refill plug to avoid automatic transaxle fluid spillage.
HINT:
Reuse the old gasket as the refill plug will be removed again to adjust the automatic transaxle fluid level.
5. REMOVE FRONT DRIVE SHAFT ASSEMBLY LH
Click here
6. REMOVE FRONT DRIVE SHAFT OIL SEAL LH
| (a) Using SST, remove the front drive shaft oil seal LH from the automatic transaxle case sub-assembly. SST: 09308-00010 NOTICE: Be careful not to damage the automatic transaxle case sub-assembly. |
|

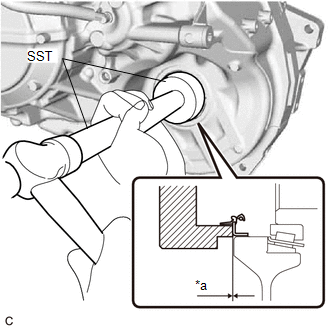
7. INSTALL FRONT DRIVE SHAFT OIL SEAL LH
| (a) Using SST and a hammer, install a new front drive shaft oil seal LH to the automatic transaxle case sub-assembly. SST: 09316-10010 SST: 09950-70010 09951-07100 Standard Depth: -0.5 to 0.5 mm (-0.0197 to 0.0197 in.) NOTICE:
|
|
(b) Coat the lip of the front drive shaft oil seal LH with MP grease.
8. INSTALL FRONT DRIVE SHAFT ASSEMBLY LH
Click here
9. ADJUST AUTOMATIC TRANSAXLE FLUID
Click here
10. INSPECT FOR FLUID LEAK
11. INSTALL FRONT FENDER APRON SEAL LH
Click here
12. INSTALL NO. 3 ENGINE UNDER COVER
Click here
13. INSTALL FRONT WHEEL OPENING EXTENSION PAD LH
Click here
 Components
COMPONENTS ILLUSTRATION *1 FRONT WHEEL OPENING EXTENSION PAD LH *2 NO. 3 ENGINE UNDER COVER *3 FRONT FENDER APRON SEAL LH - - ILLUSTRATION *1 FRONT DRIVE SHAFT OIL SEAL LH ...

Other materials:
Lexus RX (RX 350L, RX450h) 2016-2026 Repair Manual > Rear Seat Cushion Heater (for Captain Seat Type): Removal
REMOVAL CAUTION / NOTICE / HINT The necessary procedures (adjustment, calibration, initialization or registration) that must be performed after parts are removed and installed, or replaced during rear seat cushion heater removal/installation are shown below. Necessary Procedure After Parts Removed/I ...
Lexus RX (RX 350L, RX450h) 2016-2026 Repair Manual > Intelligent Clearance Sonar System: Precaution
PRECAUTION PRECAUTION FOR DISCONNECTING CABLE FROM NEGATIVE BATTERY TERMINAL NOTICE: When disconnecting the cable from the negative (-) battery terminal, initialize the following systems after the cable is reconnected. System Name See Procedure Lane Control System Pre-collision Sys ...
Lexus RX (RX 350L, RX450h) 2016-{YEAR} Owners Manual
- For your information
- Pictorial index
- For safety and security
- Instrument cluster
- Operation of each component
- Driving
- Lexus Display Audio system
- Interior features
- Maintenance and care
- When trouble arises
- Vehicle specifications
- For owners
Lexus RX (RX 350L, RX450h) 2016-{YEAR} Repair Manual

0.0097