Lexus RX (RX 350L, RX450h) 2016-2026 Repair Manual: Pcv Valve
Components
COMPONENTS
ILLUSTRATION
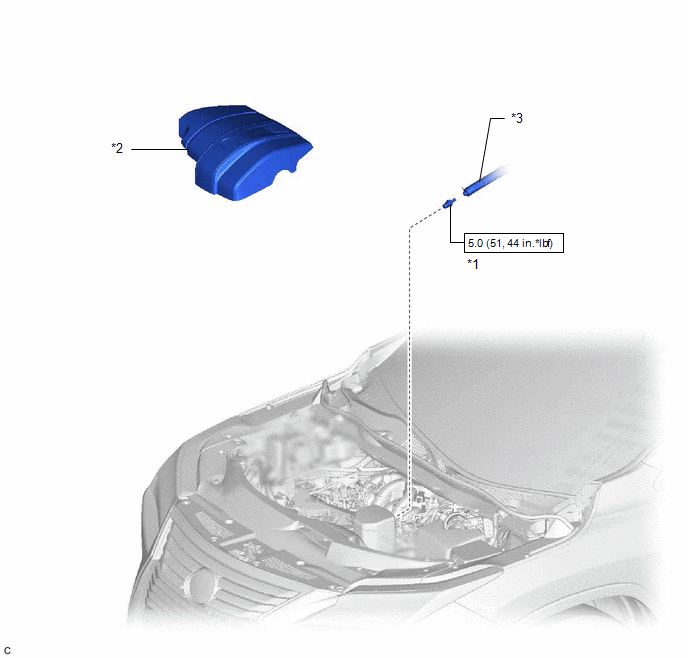
| *1 | PCV VALVE (VENTILATION VALVE SUB-ASSEMBLY) | *2 | V-BANK COVER SUB-ASSEMBLY |
| *3 | VENTILATION HOSE | - | - |
.png) | N*m (kgf*cm, ft.*lbf): Specified torque | - | - |
Removal
REMOVAL
PROCEDURE
1. REMOVE V-BANK COVER SUB-ASSEMBLY
Click here .gif)
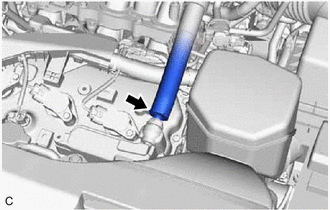
2. DISCONNECT VENTILATION HOSE
| (a) Slide the clip and disconnect the ventilation hose from the PCV valve (ventilation valve sub-assembly). |
|
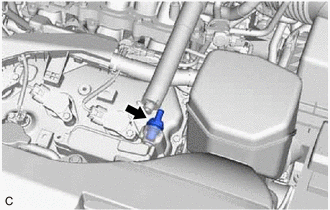
3. REMOVE PCV VALVE (VENTILATION VALVE SUB-ASSEMBLY)
| (a) Using a 22 mm deep socket wrench, remove the PCV valve (ventilation valve sub-assembly) from the cylinder head cover LH sub-assembly. |
|
Inspection
INSPECTION
PROCEDURE
1. INSPECT PCV VALVE (VENTILATION VALVE SUB-ASSEMBLY)
(a) Install a hose to the PCV valve (ventilation valve sub-assembly).
(b) Check PCV valve (ventilation valve sub-assembly) operation.
(1) Blow air into the cylinder head cover sub-assembly LH side, and check that air passes through easily.
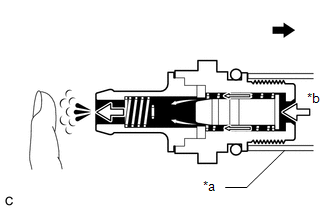
| *a | Hose |
| *b | Air |
.png) | Cylinder Head Cover Sub-assembly LH Side |
CAUTION:
Do not suck air through the valve.
Petroleum substances inside the valve are hazardous to your health.
If the result is not as specified, replace the PCV valve (ventilation valve sub-assembly).
(2) Blow air into the intake air surge tank assembly side, and check that air passes through with difficulty.
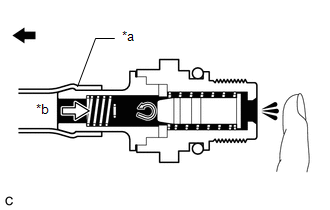
| *a | Hose |
| *b | Air |
| | Intake Air Surge Tank Assembly Side |
CAUTION:
Do not suck air through the valve.
Petroleum substances inside the valve are hazardous to your health.
If the result is not as specified, replace the PCV valve (ventilation valve sub-assembly).
(c) Remove the hose from the PCV valve (ventilation valve sub-assembly).
Installation
INSTALLATION
PROCEDURE
1. INSTALL PCV VALVE (VENTILATION VALVE SUB-ASSEMBLY)
(a) Apply a light coat of engine oil to the O-ring.
(b) Using a 22 mm deep socket wrench, install the PCV valve (ventilation valve sub-assembly) to the cylinder head cover sub-assembly LH.
Torque:
5.0 N·m {51 kgf·cm, 44 in·lbf}
NOTICE:
When reusing the PCV valve (ventilation valve sub-assembly), inspect the O-ring.
2. CONNECT VENTILATION HOSE
(a) Connect the ventilation hose to the PCV valve (ventilation valve sub-assembly) and slide the clip to secure it.
3. INSTALL V-BANK COVER SUB-ASSEMBLY
Click here .gif)
 Fuel Tank Cap
InspectionINSPECTION PROCEDURE 1. INSPECT FUEL TANK CAP ASSEMBLY (a) Visually check that the fuel tank cap assembly and gasket are not deformed or damaged. If the result is not as specified, replac ...
 Purge Valve
...
Other materials:
Lexus RX (RX 350L, RX450h) 2016-2026 Repair Manual > Power Mirror Control System (w/ Memory): Reverse Shift-linked Function of Power Mirrors does not Operate
DESCRIPTION The ECM sends the reverse signal to the main body ECU (multiplex network body ECU) via CAN communication. When receiving the reverse signal, the main body ECU (multiplex network body ECU) sends the reverse request signal to each outer mirror control ECU assembly. Based on the signal, eac ...
Lexus RX (RX 350L, RX450h) 2016-2026 Repair Manual > Vehicle Stability Control System: ABS Pump Motor Control Circuit Open (C052C13,C052C49,C052F14)
DESCRIPTION The motor relay and motor fail safe relay are built into the brake actuator assembly. When the skid control ECU (brake actuator assembly) operate ABS, TRAC, VSC, brake hold or brake assist, the motor relay turns ON and drives the motor pump built into the brake actuator assembly. If any ...
Lexus RX (RX 350L, RX450h) 2016-{YEAR} Owners Manual
- For your information
- Pictorial index
- For safety and security
- Instrument cluster
- Operation of each component
- Driving
- Lexus Display Audio system
- Interior features
- Maintenance and care
- When trouble arises
- Vehicle specifications
- For owners
Lexus RX (RX 350L, RX450h) 2016-{YEAR} Repair Manual

0.0093