Lexus RX (RX 350L, RX450h) 2016-2026 Repair Manual: Installation
INSTALLATION
PROCEDURE
1. INSTALL NO. 2 ECM BRACKET
(a) Install the No. 2 ECM bracket to the ECM with the 2 bolts.
Torque:
3.0 N·m {31 kgf·cm, 27 in·lbf}
2. INSTALL NO. 1 ECM BRACKET
(a) Install the No. 1 ECM bracket to the ECM with the 2 bolts.
Torque:
3.0 N·m {31 kgf·cm, 27 in·lbf}
3. INSTALL ECM
(a) Install the ECM with the 2 bolts and nut.
Torque:
Bolt :
8.0 N·m {82 kgf·cm, 71 in·lbf}
Nut :
8.0 N·m {82 kgf·cm, 71 in·lbf}
NOTICE:
If the ECM has been struck or dropped, replace it.
(b) Engage the wire harness clamp.
| (c) Connect the 2 ECM connectors and lower the 2 levers. NOTICE:
|
|
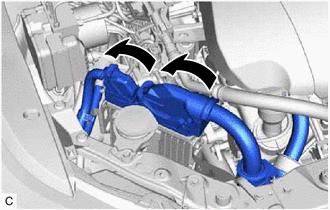
4. INSTALL COOL AIR INTAKE DUCT SEAL
Click here .gif)
5. CONNECT CABLE TO NEGATIVE BATTERY TERMINAL
NOTICE:
When disconnecting the cable, some systems need to be initialized after the cable is reconnected.
Click here
6. PERFORM INITIALIZATION
Click here
 Removal
REMOVAL CAUTION / NOTICE / HINT The necessary procedures (adjustment, calibration, initialization or registration) that must be performed after parts are removed and installed, or replaced during ECM ...

Other materials:
Lexus RX (RX 350L, RX450h) 2016-2026 Repair Manual > Theft Deterrent System: System Description
SYSTEM DESCRIPTION OUTLINE OF THEFT DETERRENT SYSTEM
The theft deterrent system can be set/canceled by locking/unlocking the doors using any of the following operations:
Entry lock/unlock operation
Wireless lock/unlock operation*1
Key linked lock/unlock operation
Opening and closing the ...
Lexus RX (RX 350L, RX450h) 2016-2026 Repair Manual > Cornering Light Assembly: Installation
INSTALLATION CAUTION / NOTICE / HINT HINT:
Use the same procedure for the RH side and LH side.
The following procedure is for the LH side.
PROCEDURE 1. INSTALL CORNERING LIGHT ASSEMBLY (FOG LIGHT ASSEMBLY) Click here 2. INSTALL FRONT BUMPER ARM HOLE COVER LH (for LH Side) for Type A: Click ...
Lexus RX (RX 350L, RX450h) 2016-{YEAR} Owners Manual
- For your information
- Pictorial index
- For safety and security
- Instrument cluster
- Operation of each component
- Driving
- Lexus Display Audio system
- Interior features
- Maintenance and care
- When trouble arises
- Vehicle specifications
- For owners
Lexus RX (RX 350L, RX450h) 2016-{YEAR} Repair Manual

0.0096