Lexus RX (RX 350L, RX450h) 2016-2026 Repair Manual: Installation
INSTALLATION
PROCEDURE
1. INSTALL HEATED OXYGEN SENSOR (for Bank 2)
HINT:
Perform "Inspection After Repairs" after replacing the heated oxygen sensor.
Click here .gif)
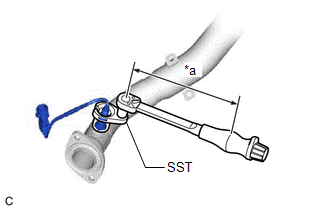
| (a) Using SST, install the heated oxygen sensor to the front exhaust pipe assembly. SST: 09224-00011 Torque: Specified tightening torque : 44 N·m {449 kgf·cm, 32 ft·lbf} NOTICE: If the heated oxygen sensor has been struck or dropped, replace it. HINT:
|
|
2. INSTALL FRONT EXHAUST PIPE ASSEMBLY
Click here
3. INSTALL NO. 1 EXHAUST PIPE SUPPORT BRACKET (for Lower Side)
Click here
4. INSTALL HEATED OXYGEN SENSOR (for Bank 1)
HINT:
Perform "Inspection After Repairs" after replacing the heated oxygen sensor.
Click here
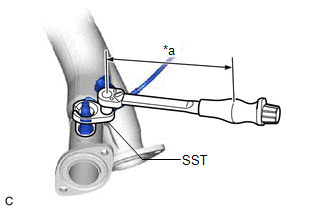
| (a) Using SST, install the heated oxygen sensor to the front No. 3 exhaust pipe sub-assembly. SST: 09224-00011 Torque: Specified tightening torque : 44 N·m {449 kgf·cm, 32 ft·lbf} NOTICE: If the heated oxygen sensor has been struck or dropped, replace it. HINT:
|
|
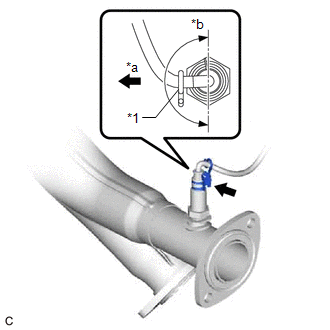
| (b) Install the wire harness clamp bracket to the heated oxygen sensor. HINT: Make sure the direction of the wire harness clamp bracket is as shown in the illustration. |
|
5. INSTALL FRONT NO. 3 EXHAUST PIPE SUB-ASSEMBLY
Click here
6. INSPECT FOR EXHAUST GAS LEAK
Click here
7. INSTALL FRONT FLOOR COVER LH
Click here
8. PERFORM INITIALIZATION
(a) Perform "Inspection After Repair" after replacing the heated oxygen sensor.
Click here
 Inspection
INSPECTION PROCEDURE 1. INSPECT HEATED OXYGEN SENSOR (a) for Bank 1: (1) Measure the resistance according to the value(s) in the table below. Standard Resistance: Tester Connection Condition ...

Other materials:
Lexus RX (RX 350L, RX450h) 2016-2026 Repair Manual > Rear No. 1 Seat Inner Belt Assembly(for 60/40 Split Seat Type Rh Side): Removal
REMOVAL CAUTION / NOTICE / HINT The necessary procedures (adjustment, calibration, initialization or registration) that must be performed after parts are removed and installed, or replaced during rear No. 1 seat inner belt assembly removal/installation are shown below. Necessary Procedure After Part ...
Lexus RX (RX 350L, RX450h) 2016-2026 Repair Manual > Knock Sensor: Components
COMPONENTS ILLUSTRATION *1 KNOCK CONTROL SENSOR (for Bank 1) *2 KNOCK CONTROL SENSOR (for Bank 2) N*m (kgf*cm, ft.*lbf): Specified torque * For use with a union nut wrench ...
Lexus RX (RX 350L, RX450h) 2016-{YEAR} Owners Manual
- For your information
- Pictorial index
- For safety and security
- Instrument cluster
- Operation of each component
- Driving
- Lexus Display Audio system
- Interior features
- Maintenance and care
- When trouble arises
- Vehicle specifications
- For owners
Lexus RX (RX 350L, RX450h) 2016-{YEAR} Repair Manual

0.0145