Lexus RX (RX 350L, RX450h) 2016-2026 Repair Manual: On-vehicle Inspection
ON-VEHICLE INSPECTION
PROCEDURE
1. PERFORM SPARK TEST
CAUTION:
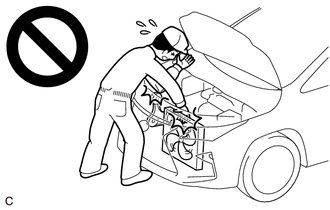
To prevent injury due to contact with an operating V-ribbed belt or cooling fan, keep your hands and clothing away from the V-ribbed belt and cooling fans when working in the engine compartment with the engine running or the engine switch on (IG).
(a) Check for DTCs.
Click here .gif)
NOTICE:
If any DTCs are output, perform troubleshooting in accordance with the procedure for each DTC.
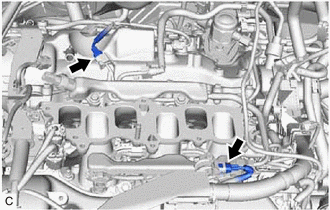
(b) Remove the 6 ignition coil assemblies and 6 spark plugs.
Click here
NOTICE:
If an ignition coil assembly or spark plug has been struck or dropped, replace it.
HINT:
Arrange the removed parts in the correct order.
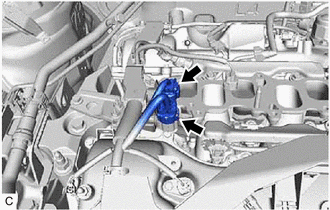
| (c) Disconnect the 2 No. 5 engine wire connectors (for Port Injection). NOTICE: Perform this step in order to stop fuel injection to prevent damage to the catalyst due to unburned fuel. |
|
| (d) Disconnect the No. 6 engine wire connector and No. 7 engine wire connector (for Direct Injection). NOTICE: Perform this step in order to stop fuel injection to prevent damage to the catalyst due to unburned fuel. |
|
| (e) Install the spark plug to the ignition coil assembly, and then connect the ignition coil assembly connector. |
|
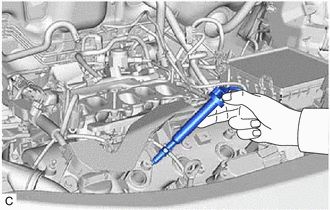
(f) Ground the spark plug.
(g) Check that spark occurs at each spark plug while the engine is being cranked.
NOTICE:
- Be sure to ground the spark plugs when checking them.
- Do not crank the engine for more than 2 seconds.
- If an ignition coil assembly or spark plug has been struck or dropped, replace it.
HINT:
If spark does not occur, perform the following procedure.
(h) Connect the No. 6 engine wire connector and No. 7 engine wire connector (for Direct Injection).
(i) Connect the 2 No. 5 engine wire connectors (for Port Injection).
(j) Install the 6 spark plugs and 6 ignition coil assemblies.
Click here
NOTICE:
If an ignition coil assembly or spark plug has been struck or dropped, replace it.
HINT:
Install the same parts to their original positions.
(k) Check for DTCs.
Click here
(l) Clear the DTCs.
Click here
2. INSPECT IGNITION COIL ASSEMBLY AND SPARK TEST
HINT:
Perform "Inspection After Repair" after replacing a spark plug or ignition coil assembly.
Click here
(a) Check that the ignition coil assembly connector is securely connected.
| Result | Action |
|---|---|
| NG | Connect securely |
| OK | Go to next step |
(b) Perform a spark test on each ignition coil assembly.
(1) Replace the ignition coil assembly with a known good one.
(2) Perform the spark test again.
| Result | Action |
|---|---|
| NG | Go to next step |
| OK | Replace ignition coil assembly |
NOTICE:
If an ignition coil assembly or spark plug has been struck or dropped, replace it.
(c) Perform a spark test on each spark plug.
(1) Replace the spark plug with a known good one.
(2) Perform the spark test again.
| Result | Action |
|---|---|
| NG | Inspect the ignition system Click here |
| OK | Replace spark plug |
NOTICE:
If an ignition coil assembly or spark plug has been struck or dropped, replace it.
(d) Connect the No. 6 engine wire connector and No. 7 engine wire connector (for Direct Injection).
(e) Connect the 2 No. 5 engine wire connectors (for Port Injection).
(f) Install the 6 spark plugs and 6 ignition coil assemblies.
Click here
NOTICE:
If an ignition coil assembly or spark plug has been struck or dropped, replace it.
HINT:
Install the same parts to their original positions.
(g) Check for DTCs.
Click here
(h) Clear the DTCs.
Click here
3. INSPECT SPARK PLUG
NOTICE:
- Be careful not to damage the iridium tip or platinum tip of the spark plug.
- Check the iridium tip visually as it is easily damaged.
- Never attempt to adjust the electrode gap of a used spark plug.
- If a spark plug is extremely dirty with oil, etc., replace it.
- Replace a spark plug if it is damaged.
- If a spark plug has been struck or dropped, replace it.
- When installing a new spark plug, do not remove the protective cap from the spark plug tip until just before installing the spark plug to the engine.
HINT:
Perform "Inspection After Repair" after replacing a spark plug.
Click here
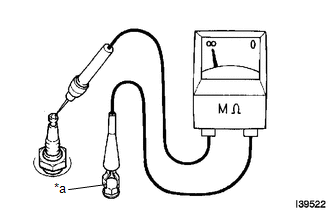
| (a) Check the electrode. (1) Using a megohmmeter, measure the insulation resistance. Standard Insulation Resistance:
HINT:
|
|
(b) Alternative inspection method.
(1) Start the engine.
NOTICE:
Do not perform this step when any of the following DTCs are output: P030000, P030027, P030085, P030100, P030200, P030300, P030400 (Cylinder Misfire Detected).
(2) Quickly accelerate the engine to 4000 rpm 5 times.
NOTICE:
Do not perform this step when any of the following DTCs are output: P030000, P030027, P030085, P030100, P030200, P030300, P030400 (Cylinder Misfire Detected).
(3) Remove the spark plug.
Click here
(4) Visually check the spark plug.
HINT:
If the electrode is dry, the spark plug is functioning properly. If the electrode is damp, proceed to the next step.
(c) Check the spark plug for any damage to its threads and insulator.
If there is any damage, replace the spark plug.
Recommended Spark Plug:
| Manufacturer | Spark Plug Type |
|---|---|
| DENSO | FK20HBR8 |
| (d) Check the spark plug electrode gap. Maximum Electrode Gap for Used Spark Plug: 1.1 mm (0.0433 in.) NOTICE: Never attempt to adjust the electrode gap of a used spark plug. If the electrode gap is more than the maximum, replace the spark plug. Standard Electrode Gap for New Spark Plug: 0.7 to 0.8 mm (0.0276 to 0.0315 in.) |
|

(e) Install the spark plug.
Click here
4. PERFORM INITIALIZATION
(a) Perform "Inspection After Repair" after replacing a spark plug or ignition coil assembly.
Click here
 System Diagram
SYSTEM DIAGRAM ...
 Knock Sensor
...
Other materials:
Lexus RX (RX 350L, RX450h) 2016-2026 Repair Manual > Headlight Assembly: Components
COMPONENTS ILLUSTRATION *1 FRONT FENDER REINFORCEMENT SUB-ASSEMBLY TOP *2 HEADLIGHT ASSEMBLY *3 CENTER HOOD CUSHION - - N*m (kgf*cm, ft.*lbf): Specified torque - - ILLUSTRATION *A w/ Automatic Headlight Beam Level Control System *B for Bulb Type Turn Signa ...
Lexus RX (RX 350L, RX450h) 2016-2026 Repair Manual > Audio And Visual System (for 8 Inch Display): D-Seat ECU Vehicle Information Reading/Writing Process Malfunction (B15F8)
DESCRIPTION This DTC is stored when items controlled by the main body ECU (multiplex network body ECU) cannot be customized via the audio and visual system vehicle customization screen. HINT: The main body ECU (multiplex network body ECU) controls the front power seat control system (w/ Memory) rela ...
Lexus RX (RX 350L, RX450h) 2016-{YEAR} Owners Manual
- For your information
- Pictorial index
- For safety and security
- Instrument cluster
- Operation of each component
- Driving
- Lexus Display Audio system
- Interior features
- Maintenance and care
- When trouble arises
- Vehicle specifications
- For owners
Lexus RX (RX 350L, RX450h) 2016-{YEAR} Repair Manual

0.0107