
Lexus RX (RX 350L, RX450h) 2016-2026 Repair Manual: Components
COMPONENTS
ILLUSTRATION
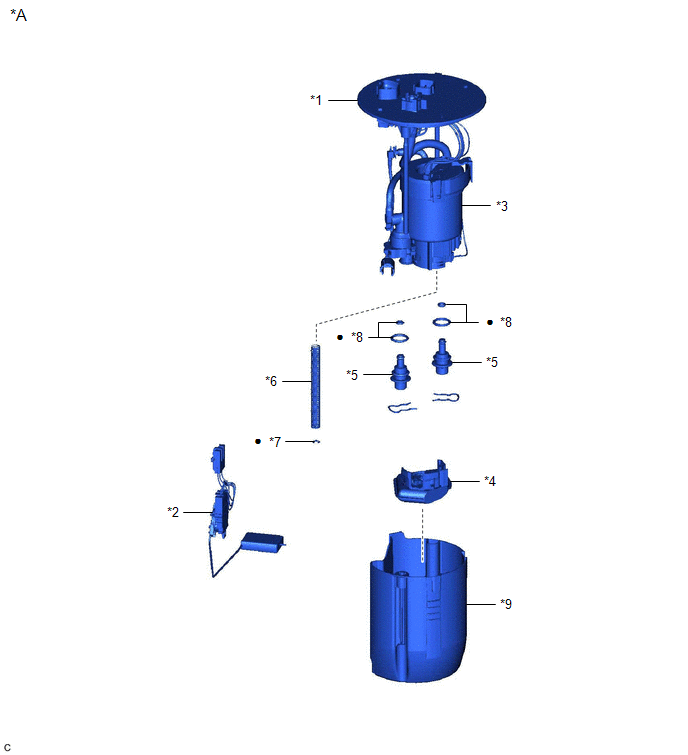
| *A | for TMC Made | - | - |
| *1 | FUEL SUCTION PLATE SUB-ASSEMBLY | *2 | FUEL SENDER GAUGE ASSEMBLY |
| *3 | FUEL FILTER | *4 | FUEL PUMP FILTER |
| *5 | FUEL MAIN VALVE ASSEMBLY | *6 | SPRING |
| *7 | E-RING | *8 | O-RING |
| *9 | NO. 1 FUEL SUB-TANK | - | - |
| ● | Non-reusable part | - | - |
ILLUSTRATION
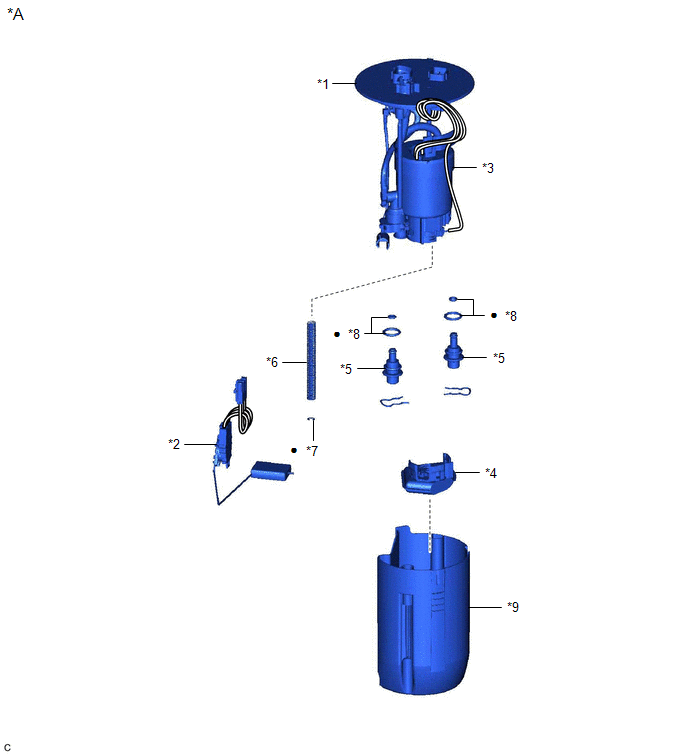
| *A | for TMMC Made | - | - |
| *1 | FUEL SUCTION PLATE SUB-ASSEMBLY | *2 | FUEL SENDER GAUGE ASSEMBLY |
| *3 | FUEL FILTER | *4 | FUEL PUMP FILTER |
| *5 | FUEL MAIN VALVE ASSEMBLY | *6 | SPRING |
| *7 | E-RING | *8 | O-RING |
| *9 | NO. 1 FUEL SUB-TANK | - | - |
| ● | Non-reusable part | - | - |
 Fuel Main Valve
...
 Installation
INSTALLATION PROCEDURE 1. INSTALL FUEL MAIN VALVE ASSEMBLY (a) Apply gasoline to 2 new O-rings. Then install the O-rings to the fuel main valve assembly (for Low Pressure). (b) Apply gasoline to 2 new ...
Other materials:
Lexus RX (RX 350L, RX450h) 2016-2026 Repair Manual > Road Sign Assist System: Utility
UTILITY NOTICE: If the forward recognition camera has been replaced due to a malfunction in the road sign assist system, be sure to perform forward recognition camera adjustment. Otherwise all systems that use the forward recognition camera may be affected. HINT: Forward recognition camera adjustmen ...
Lexus RX (RX 350L, RX450h) 2016-2026 Repair Manual > Telephone Microphone Assembly: Installation
INSTALLATION PROCEDURE 1. INSTALL TELEPHONE MICROPHONE ASSEMBLY (a) Engage the 2 claws to install the telephone microphone assembly to the No. 1 microphone case. *1 Telephone Microphone Assembly *2 No. 1 Microphone Case Install in this Direction (Telephone Microphone Assembly) ...
Lexus RX (RX 350L, RX450h) 2016-{YEAR} Owners Manual
- For your information
- Pictorial index
- For safety and security
- Instrument cluster
- Operation of each component
- Driving
- Lexus Display Audio system
- Interior features
- Maintenance and care
- When trouble arises
- Vehicle specifications
- For owners
Lexus RX (RX 350L, RX450h) 2016-{YEAR} Repair Manual

0.0108