Lexus RX (RX 350L, RX450h) 2016-2026 Repair Manual: Installation
INSTALLATION
PROCEDURE
1. INSTALL FUEL MAIN VALVE ASSEMBLY
(a) Apply gasoline to 2 new O-rings. Then install the O-rings to the fuel main valve assembly (for Low Pressure).
(b) Apply gasoline to 2 new O-rings. Then install the O-rings to the fuel main valve assembly (for High Pressure).
(c) Install the 2 fuel main valve assemblies to the fuel filter.
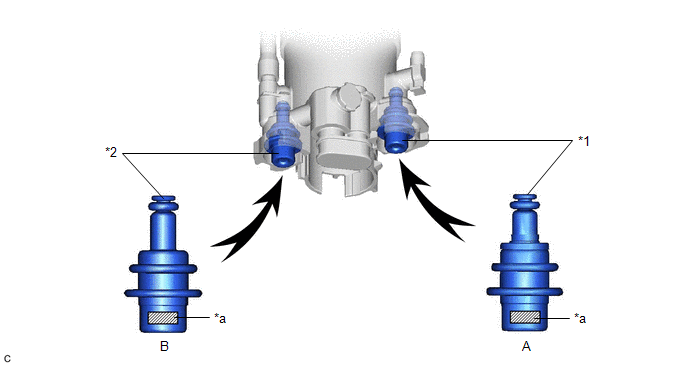
| *1 | Fuel Main Valve Assembly (for Low Pressure) | *2 | Fuel Main Valve Assembly (for High Pressure) |
| *a | Identification Mark (Part Number) | - | - |
NOTICE:
- Make sure that the O-rings are not cut or pinched during installation.
- The fuel main valve assembly (for Low Pressure) and fuel main valve assembly (for High Pressure) have identification marks (part numbers). If the parts are installed in the incorrect positions, the engine may stall. Therefore, make sure to install the parts in the correct positions.
| A | Fuel Main Valve Assembly (for Low Pressure) | 23070-31*** |
| B | Fuel Main Valve Assembly (for High Pressure) | 23070-36*** |
(d) Install the 2 clips to the fuel filter.
2. INSTALL FUEL PUMP FILTER
-
for TMC Made:
Click here
.gif)
-
for TMMC Made:
Click here
3. INSTALL FUEL SUCTION PLATE SUB-ASSEMBLY
-
for TMC Made:
Click here
-
for TMMC Made:
Click here
4. INSTALL FUEL SENDER GAUGE ASSEMBLY
Click here
5. INSTALL FUEL SUCTION TUBE WITH PUMP AND GAUGE ASSEMBLY
-
for TMC Made:
Click here
-
for TMMC Made:
Click here
 Components
COMPONENTS ILLUSTRATION *A for TMC Made - - *1 FUEL SUCTION PLATE SUB-ASSEMBLY *2 FUEL SENDER GAUGE ASSEMBLY *3 FUEL FILTER *4 FUEL PUMP FILTER *5 FUEL MAIN VALVE A ...
 Removal
REMOVAL CAUTION / NOTICE / HINT The necessary procedures (adjustment, calibration, initialization or registration) that must be performed after parts are removed and installed, or replaced during fuel ...
Other materials:
Lexus RX (RX 350L, RX450h) 2016-2026 Repair Manual > Headup Display Switch: Inspection
INSPECTION PROCEDURE 1. INSPECT HEADUP DISPLAY SWITCH ASSEMBLY (INTEGRATION CONTROL AND PANEL ASSEMBLY) (a) Measure the resistance according to the value(s) in the table below. Standard Resistance: Tester Connection Condition Specified Condition 5 (ILU) - 15 (CH) Headup display swit ...
Lexus RX (RX 350L, RX450h) 2016-2026 Repair Manual > Fuel Lid Opener Motor Assembly: Inspection
INSPECTION PROCEDURE 1. INSPECT FUEL LID LOCK WITH MOTOR ASSEMBLY (a) Check the operation of the fuel lid lock with motor assembly. (1) Apply battery voltage to the fuel lid lock with motor assembly connector, and check that the fuel lid lock with motor assembly operates smoothly as follows. OK: ...
Lexus RX (RX 350L, RX450h) 2016-{YEAR} Owners Manual
- For your information
- Pictorial index
- For safety and security
- Instrument cluster
- Operation of each component
- Driving
- Lexus Display Audio system
- Interior features
- Maintenance and care
- When trouble arises
- Vehicle specifications
- For owners
Lexus RX (RX 350L, RX450h) 2016-{YEAR} Repair Manual

0.009