Lexus RX (RX 350L, RX450h) 2016-2026 Repair Manual: Removal
REMOVAL
CAUTION / NOTICE / HINT
The necessary procedures (adjustment, calibration, initialization or registration) that must be performed after parts are removed and installed, or replaced during fuel main valve assembly removal/installation are shown below.
Necessary Procedures After Parts Removed/Installed/Replaced| Replaced Part or Performed Procedure | Necessary Procedure | Effect/Inoperative Function when Necessary Procedure not Performed | Link |
|---|---|---|---|
|
*1: When performing learning using the Techstream.
Click here | |||
| Battery terminal is disconnected/reconnected | Memorize steering angle neutral point | Lane Control System | |
| Pre-collision system | |||
| Intelligent clearance sonar system*1 | |||
| Lighting system (w/ Automatic Headlight Beam Level Control System) | | ||
| Parking assist monitor system | | ||
| Panoramic view monitor system | | ||
| Initialize back door lock | Power door lock control system | | |
| Reset back door close position | Power Back Door System (w/ Outside Door Control Switch) | | |
NOTICE:
- Do not disconnect the tube shown in the illustration when disassembling the fuel suction tube with pump and gauge assembly. Doing so will cause reassembly of the fuel suction tube with pump and gauge assembly to be impossible as the tube is pressed into the fuel suction plate sub-assembly.
- When replacing the fuel filter, replace it together with the fuel suction plate sub-assembly.
.png)
| *A | for TMMC Made |
| *B | for TMMC Made |
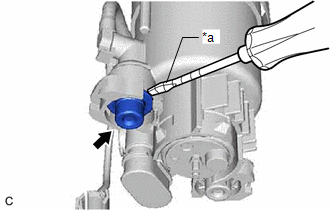
| *a | Tube |
PROCEDURE
1. REMOVE FUEL SUCTION TUBE WITH PUMP AND GAUGE ASSEMBLY
-
for TMC Made:
Click here
.gif)
-
for TMMC Made:
Click here
2. REMOVE FUEL SENDER GAUGE ASSEMBLY
Click here
3. REMOVE FUEL SUCTION PLATE SUB-ASSEMBLY
-
for TMC Made:
Click here
-
for TMMC Made:
Click here
4. REMOVE FUEL PUMP FILTER
-
for TMC Made:
Click here
-
for TMMC Made:
Click here
5. REMOVE FUEL MAIN VALVE ASSEMBLY
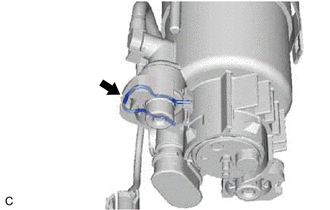
(a) Remove the fuel main valve assembly (for Low Pressure).
(1) Remove the clip from the fuel filter.
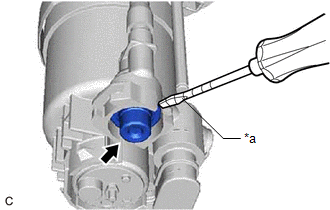
| (2) Using a screwdriver with its tip wrapped with protective tape, remove the fuel main valve assembly from the fuel filter. NOTICE:
|
|
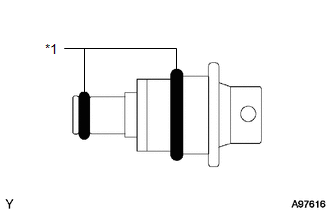
| (3) Remove the 2 O-rings from the fuel main valve assembly. |
|
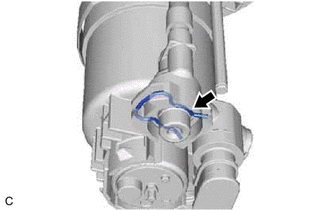
(b) Remove the fuel main valve assembly (for High Pressure).
(1) Remove the clip from the fuel filter.
| (2) Using a screwdriver with its tip wrapped with protective tape, remove the fuel main valve assembly from the fuel filter. NOTICE:
|
|
| (3) Remove the 2 O-rings from the fuel main valve assembly. |
|
 Installation
INSTALLATION PROCEDURE 1. INSTALL FUEL MAIN VALVE ASSEMBLY (a) Apply gasoline to 2 new O-rings. Then install the O-rings to the fuel main valve assembly (for Low Pressure). (b) Apply gasoline to 2 new ...

Other materials:
Lexus RX (RX 350L, RX450h) 2016-2026 Repair Manual > Valve Body Assembly: Components
COMPONENTS ILLUSTRATION *1 FRONT WHEEL OPENING EXTENSION PAD LH *2 NO. 3 ENGINE UNDER COVER *3 FRONT FENDER APRON SEAL LH - - ILLUSTRATION *1 REFILL PLUG *2 DRAIN PLUG *3 OVERFLOW PLUG *4 GASKET *5 O-RING - - Tightening torque for "Major ar ...
Lexus RX (RX 350L, RX450h) 2016-2026 Repair Manual > Height Control Sensor: Components
COMPONENTS ILLUSTRATION *1 REAR HEIGHT CONTROL SENSOR SUB-ASSEMBLY - - N*m (kgf*cm, ft.*lbf): Specified torque - - ...
Lexus RX (RX 350L, RX450h) 2016-{YEAR} Owners Manual
- For your information
- Pictorial index
- For safety and security
- Instrument cluster
- Operation of each component
- Driving
- Lexus Display Audio system
- Interior features
- Maintenance and care
- When trouble arises
- Vehicle specifications
- For owners
Lexus RX (RX 350L, RX450h) 2016-{YEAR} Repair Manual

0.0142