Lexus RX (RX 350L, RX450h) 2016-2026 Repair Manual: Disassembly
DISASSEMBLY
CAUTION / NOTICE / HINT
NOTICE:
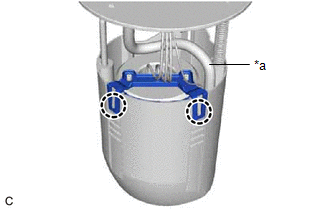
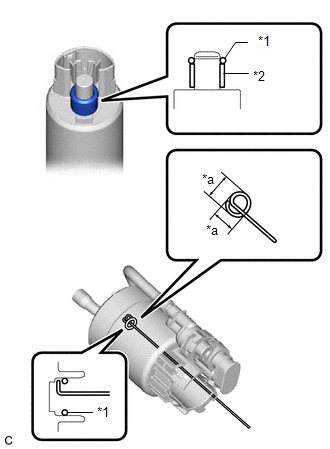
- Do not disconnect the tube shown in the illustration when disassembling the fuel suction tube with pump and gauge assembly. Doing so will cause reassembly of the fuel suction tube with pump and gauge assembly to be impossible as the tube is pressed into the fuel suction plate sub-assembly.
- When replacing the fuel filter, replace it together with the fuel suction plate sub-assembly.
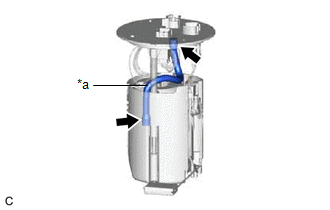
| *a | Tube |
PROCEDURE
1. REMOVE FUEL SENDER GAUGE ASSEMBLY
Click here .gif)
2. REMOVE FUEL SUCTION PLATE SUB-ASSEMBLY
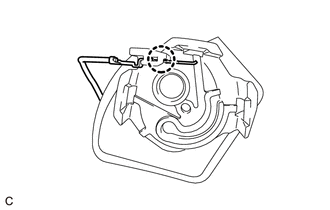
| (a) Disengage the clamp to disconnect the fuel pump harness from the fuel suction plate sub-assembly. |
|
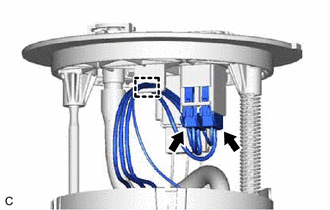
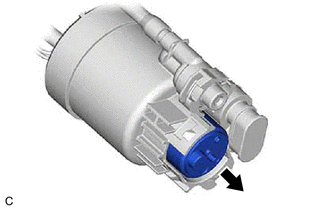
(b) Disconnect the 2 fuel pump harness connectors.
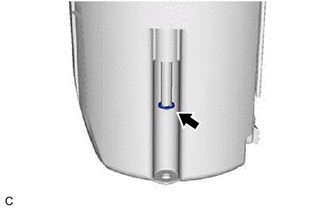
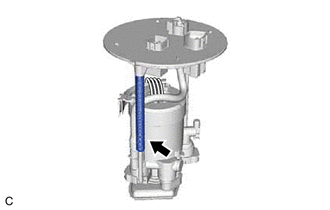
| (c) Using needle nose pliers, remove the E-ring from the fuel suction plate shaft. |
|
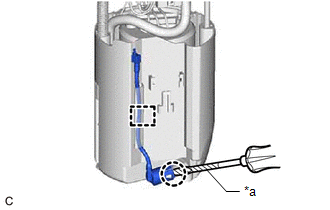
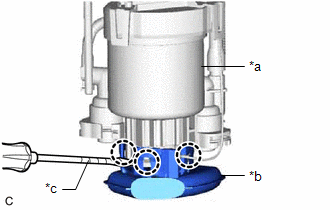
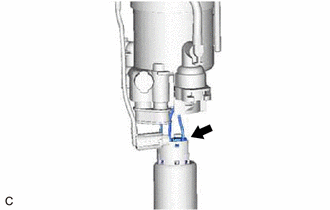
| (d) Using a screwdriver with its tip wrapped with protective tape, disengage the claw and clamp, and disconnect the fuel pump filter hose from the No. 1 fuel sub-tank. NOTICE: Do not damage the No. 1 fuel sub-tank. |
|
| (e) Disengage the 2 claws and remove the fuel filter from the No. 1 fuel sub-tank. NOTICE: Do not do anything which may separate the tube from either the fuel suction plate sub-assembly or fuel filter, such as applying excessive force to the tube. Click here |
|
| (f) Remove the spring from the fuel suction plate shaft. |
|
3. REMOVE FUEL PUMP FILTER
| (a) Using a screwdriver with its tip wrapped with protective tape, disengage the 3 claws, and remove the fuel pump filter from the fuel filter. NOTICE:
|
|
| (b) Disengage the claw to disconnect the fuel pump harness from the fuel pump filter. NOTICE: Do not forcibly pull the fuel pump harness. HINT: If it is difficult to disconnect the terminal of the fuel pump harness from the fuel pump filter, push the terminal towards the center of the fuel pump filter while disconnecting it. |
|
4. REMOVE FUEL PUMP
| (a) Remove the fuel pump from the fuel filter. |
|
| (b) Disconnect the fuel pump harness connector to remove the fuel pump harness from the fuel pump. |
|
| (c) Remove the O-ring and fuel pump spacer from the fuel pump. NOTICE: Be careful not to damage the sealing surface. HINT: If the O-ring still remains in the fuel filter, remove it using a wire tip (1 mm (0.0394 in.) diameter) that is formed as shown in the illustration. |
|
 Components
COMPONENTS ILLUSTRATION *A w/ Rear No. 2 Seat - - *1 REAR DOOR INSIDE SCUFF PLATE LH *2 REAR DOOR SCUFF PLATE LH *3 FRONT DECK SIDE TRIM COVER LH *4 REAR SEAT SIDE GARNIS ...
 Inspection
INSPECTION PROCEDURE 1. INSPECT FUEL PUMP (a) Measure the resistance according to the value(s) in the table below. Standard Resistance: Tester Connection Specified Condition U - V 0.05 ...
Other materials:
Lexus RX (RX 350L, RX450h) 2016-2026 Repair Manual > Seat Heater Switch (for Rear Side): Components
COMPONENTS ILLUSTRATION *A for Console Box - - *1 CONSOLE REAR END PANEL SUB-ASSEMBLY *2 REFRESHING SEAT SWITCH ILLUSTRATION *A for Armrest - - *1 ARMREST ASSEMBLY *2 CENTER ARMREST HINGE COVER LH *3 NO. 1 SEAT ARMREST ASSEMBLY *4 REAR SEATBACK BO ...
Lexus RX (RX 350L, RX450h) 2016-2026 Repair Manual > Seat Heater System: Customize Parameters
CUSTOMIZE PARAMETERS CUSTOMIZE SEAT HEATER SYSTEM HINT: The following items can be customized. NOTICE:
When the customer requests a change in a function, first make sure that the function can be customized.
Be sure to make a note of the current settings before customizing.
When troubleshootin ...
Lexus RX (RX 350L, RX450h) 2016-{YEAR} Owners Manual
- For your information
- Pictorial index
- For safety and security
- Instrument cluster
- Operation of each component
- Driving
- Lexus Display Audio system
- Interior features
- Maintenance and care
- When trouble arises
- Vehicle specifications
- For owners
Lexus RX (RX 350L, RX450h) 2016-{YEAR} Repair Manual

0.0102