Lexus RX (RX 350L, RX450h) 2016-2026 Repair Manual: Tilt And Telescopic Manual Switch
Inspection
INSPECTION
PROCEDURE
1. INSPECT TILT AND TELESCOPIC SWITCH
| (a) Remove the tilt and telescopic switch. Click here |
|
.gif)
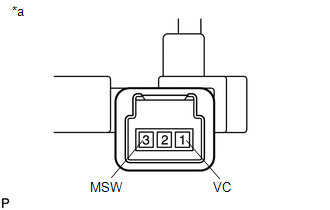
(b) Measure the resistance according to the value(s) in the table below.
Standard Resistance:
| Tester Connection | Condition | Specified Condition |
|---|---|---|
| 1 (VC) - 3 (MSW) | Tilt up | 342 to 378 Ω |
| Tilt down | 1890.5 to 2089.5 Ω | |
| Telescopic contract | 750.5 to 829.5 Ω | |
| Telescopic extend | 152 to 168 Ω |
Installation
INSTALLATION
PROCEDURE
1. INSTALL TILT AND TELESCOPIC SWITCH
(a) Engage the claw to install the tilt and telescopic switch.
(b) Connect the tilt and telescopic connector to the tilt and telescopic switch.
2. INSTALL LOWER STEERING COLUMN COVER
Click here .gif)
3. CUSTOMIZE POWER TILT AND POWER TELESCOPIC STEERING COLUMN SYSTEM
Click here
Removal
REMOVAL
PROCEDURE
1. CHANGE POWER TILT AND POWER TELESCOPIC STEERING COLUMN SYSTEM SETTINGS
Click here .gif)
2. REMOVE LOWER STEERING COLUMN COVER
Click here
3. REMOVE TILT AND TELESCOPIC SWITCH
| (a) Disconnect the tilt and telescopic connector from the tilt and telescopic switch. |
|
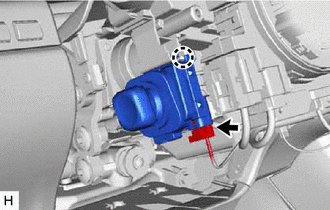
(b) Disengage the claw and pull out the tilt and telescopic switch.
 Removal
REMOVAL CAUTION / NOTICE / HINT The necessary procedures (adjustment, calibration, initialization, or registration) that must be performed after parts are removed, installed, or replaced during the st ...

Other materials:
Lexus RX (RX 350L, RX450h) 2016-2026 Repair Manual > Roof Drip Side Finish Moulding: Removal
REMOVAL CAUTION / NOTICE / HINT The necessary procedures (adjustment, calibration, initialization or registration) that must be performed after parts are removed and installed, or replaced during roof drip side finish moulding removal/installation are shown below. Necessary Procedures After Parts Re ...
Lexus RX (RX 350L, RX450h) 2016-2026 Repair Manual > Can Communication System: Lost Communication with Rear Gate Module (U0230)
DESCRIPTION DTC No. Detection Item DTC Detection Condition Trouble Area Note U0230 Lost Communication with Rear Gate Module No communication from the multiplex network door ECU continues.
Multiplex network door ECU branch line or connector
Power source circuit of multiplex ...
Lexus RX (RX 350L, RX450h) 2016-{YEAR} Owners Manual
- For your information
- Pictorial index
- For safety and security
- Instrument cluster
- Operation of each component
- Driving
- Lexus Display Audio system
- Interior features
- Maintenance and care
- When trouble arises
- Vehicle specifications
- For owners
Lexus RX (RX 350L, RX450h) 2016-{YEAR} Repair Manual

0.0132