Lexus RX (RX 350L, RX450h) 2016-2026 Repair Manual: Disassembly
DISASSEMBLY
CAUTION / NOTICE / HINT
The necessary procedures (adjustment, calibration, initialization, or registration) that must be performed after parts are removed and installed, or replaced during back door disassembly/reassembly are shown below.
Necessary Procedure After Parts Removed/Installed/Replaced| Replaced Part or Performed Procedure | Necessary Procedure | Effect/Inoperative Function when Necessary Procedure not Performed | Link |
|---|---|---|---|
| Rear television camera assembly | Rear television camera view adjustment | Panoramic view monitor system | |
| Multiplex network door ECU | Reset Back Door Close Position | Power Back Door System (w/ Outside Door Control Switch) | |
PROCEDURE
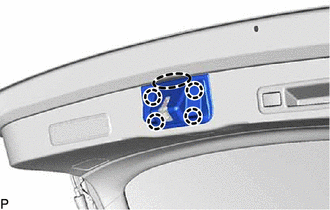
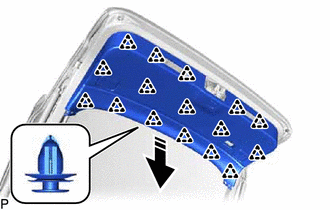
1. REMOVE BACK WINDOW UPPER PANEL TRIM (w/o Rear No. 2 Seat)
(a) Disengage the 4 claws, 5 clips and 4 guides to remove the back window upper panel trim as shown in the illustration.
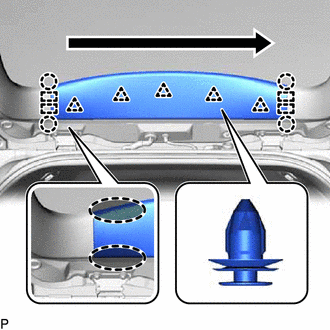
 | Place Hand Here |
.png) | Order of Removal |
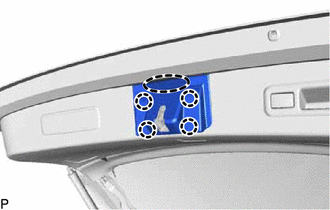
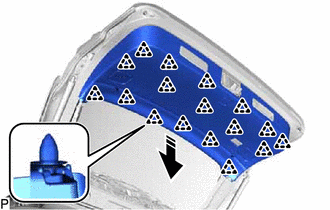
2. REMOVE BACK WINDOW UPPER PANEL TRIM (w/ Rear No. 2 Seat)
(a) Disengage the 4 claws, 6 clips and 4 guides to remove the back window upper panel trim as shown in the illustration.
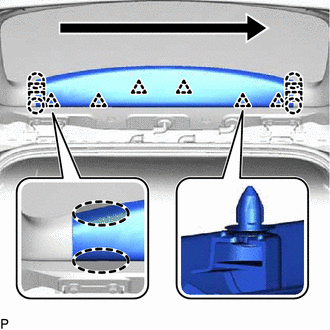
| | Place Hand Here |
| | Order of Removal |
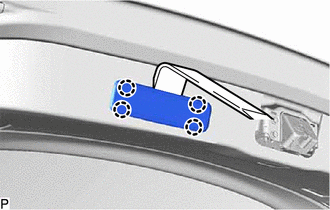
3. REMOVE BACK DOOR TRIM COVER LH (w/o Rear No. 2 Seat)
(a) Disengage the 2 clips, 2 claws and 2 guides to remove the back door trim cover LH as shown in the illustration.
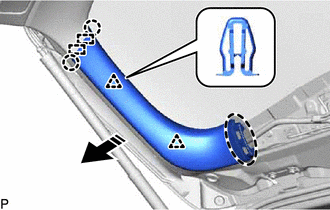
| | Place Hand Here |
 | Remove in this Direction |
4. REMOVE BACK DOOR TRIM COVER LH (w/ Rear No. 2 Seat)
(a) Disengage the 2 clips, 2 claws and 2 guides to remove the back door trim cover LH as shown in the illustration.
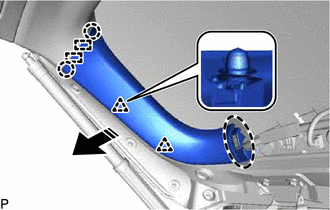
| | Place Hand Here |
| | Remove in this Direction |
5. REMOVE BACK DOOR TRIM COVER RH
HINT:
Use the same procedure as for the LH side.
6. REMOVE BACK DOOR LOCK COVER (w/o Rear No. 2 Seat)
(a) Disengage the 4 claws to remove the back door lock cover.
| | Place Hand Here |
7. REMOVE BACK DOOR LOCK COVER (w/ Rear No. 2 Seat)
(a) Disengage the 4 claws to remove the back door lock cover.
| | Place Hand Here |
8. REMOVE BACK DOOR TRIM BASE
| (a) Using a moulding remover, disengage the 4 claws to remove the back door trim base. |
|
9. REMOVE DOOR PULL HANDLE
| (a) Using a moulding remover, disengage the 6 claws. |
|
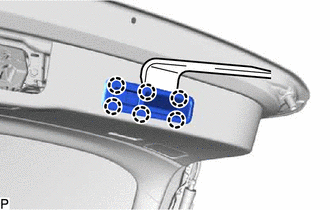
(b) Disconnect each connector to remove the door pull handle.
10. REMOVE NO. 1 LUGGAGE COMPARTMENT LIGHT ASSEMBLY
Click here 
11. REMOVE BACK DOOR TRIM PANEL ASSEMBLY (w/o Rear No. 2 Seat)
(a) Disengage the 16 clips to remove the back door trim panel assembly as shown in the illustration.
| | Remove in this Direction |
12. REMOVE BACK DOOR TRIM PANEL ASSEMBLY (w/ Rear No. 2 Seat)
(a) Disengage the 17 clips to remove the back door trim panel assembly as shown in the illustration.
| | Remove in this Direction |
13. REMOVE BACK DOOR LOCK ASSEMBLY
Click here
14. REMOVE BACK DOOR LOWER STAY REINFORCEMENT LH
| (a) Remove the 2 bolts. |
|
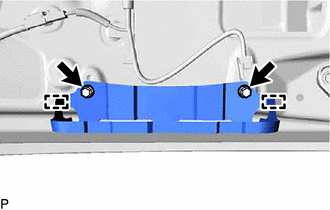
(b) Disengage the 2 guides to remove the back door lower stay reinforcement LH.
15. REMOVE BACK DOOR LOWER STAY REINFORCEMENT RH
HINT:
Use the same procedure as for the LH side.
16. REMOVE BACK DOOR STAY REINFORCEMENT LH (w/ Rear No. 2 Seat)
| (a) Remove the bolt. |
|
(b) Disengage the guide to remove the back door stay reinforcement LH.
17. REMOVE BACK DOOR STAY REINFORCEMENT RH (w/ Rear No. 2 Seat)
HINT:
Use the same procedure as for the LH side.
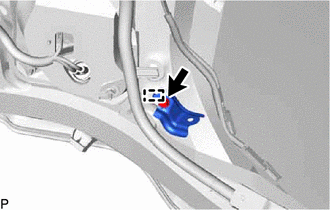
18. REMOVE BACK DOOR LOWER STOPPER
| (a) Remove the bolt. |
|
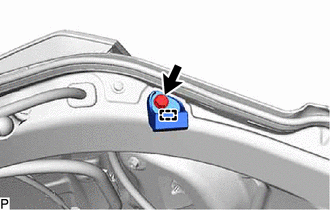
(b) Disengage the guide to remove the back door lower stopper.
HINT:
Use the same procedure for the RH side and LH side.
19. REMOVE POWER BACK DOOR SENSOR ASSEMBLY LH (w/o Rear No. 2 Seat)
Click here
20. REMOVE POWER BACK DOOR SENSOR ASSEMBLY LH (w/ Rear No. 2 Seat)
Click here
21. REMOVE POWER BACK DOOR SENSOR ASSEMBLY RH
HINT:
Use the same procedure as for the LH side.
22. REMOVE SIDE REAR SPOILER PROTECTOR SUB-ASSEMBLY LH
Click here
23. REMOVE SIDE REAR SPOILER PROTECTOR SUB-ASSEMBLY RH
HINT:
Use the same procedure as for the LH side.
24. REMOVE REAR WIPER MOTOR AND BRACKET ASSEMBLY
Click here
25. REMOVE BACK DOOR OUTSIDE GARNISH SUB-ASSEMBLY
Click here
26. REMOVE BACK DOOR OPENER SWITCH ASSEMBLY
Click here
27. REMOVE LICENSE PLATE LIGHT ASSEMBLY LH
Click here
28. REMOVE LICENSE PLATE LIGHT ASSEMBLY RH
HINT:
Use the same procedure as for the LH side.
29. REMOVE MULTIPLEX NETWORK DOOR ECU
Click here
30. REMOVE POWER BACK DOOR WARNING BUZZER
Click here
31. REMOVE REAR LIGHT ASSEMBLY LH (for Bulb Type Turn Signal Light)
Click here
32. REMOVE REAR LIGHT ASSEMBLY RH (for Bulb Type Turn Signal Light)
HINT:
Use the same procedure as for the LH side.
33. REMOVE REAR LIGHT ASSEMBLY LH (for LED Type Turn Signal Light)
Click here
34. REMOVE REAR LIGHT ASSEMBLY RH (for LED Type Turn Signal Light)
HINT:
Use the same procedure as for the LH side.
35. REMOVE REAR TELEVISION CAMERA ASSEMBLY
Click here
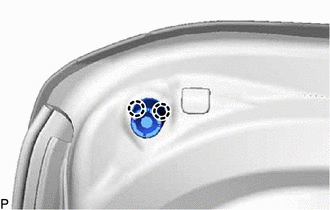
36. REMOVE BACK DOOR LOWER STOPPER CUSHION
| (a) Disengage the 2 claws to remove the back door lower stopper cushion. HINT: Use the same procedure for the RH side and LH side. |
|
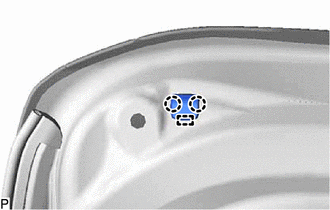
37. REMOVE BACK DOOR DUST PROOF SEAL
| (a) Disengage the 2 claws and guide to remove the back door dust proof seal. HINT: Use the same procedure for the RH side and LH side. |
|
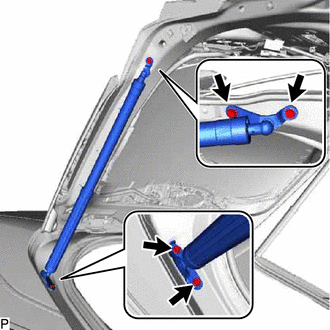
38. REMOVE POWER BACK DOOR UNIT SET ASSEMBLY LH
NOTICE:
Do not apply any horizontal load to the power back door unit set assembly in order to prevent the piston rod from deforming.
| (a) Disconnect the connector. |
|
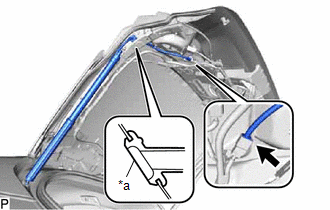
(b) Disengage the grommet.
| (c) Remove the 4 bolts and power back door unit set assembly. NOTICE: Remove the power back door unit set assembly while supporting the back door by hand. |
|
39. REMOVE POWER BACK DOOR UNIT SET ASSEMBLY RH
HINT:
Use the same procedure as for the LH side.
 Components
COMPONENTS ILLUSTRATION *A w/o Rear No. 2 Seat *B w/ Rear No. 2 Seat *1 BACK DOOR LOCK COVER *2 BACK DOOR TRIM BASE *3 BACK DOOR TRIM COVER LH *4 BACK DOOR TRIM COVER RH ...
 Adjustment
ADJUSTMENT CAUTION / NOTICE / HINT *a Centering Bolt *b Standard Bolt HINT:
Centering bolts are used to install the door hinges to the vehicle body and door. The door cannot be adjus ...
Other materials:
Lexus RX (RX 350L, RX450h) 2016-2026 Repair Manual > Can Communication System: Brake Actuator (Skid Control ECU) Communication Stop Mode
DESCRIPTION Detection Item Symptom Trouble Area Brake Actuator (Skid Control ECU) Communication Stop Mode Either condition is met:
"Skid Control (ABS/VSC/TRAC)" is not displayed on the CAN Bus Check screen of the Techstream.
Click here
Communication system DTCs (DTCs that star ...
Lexus RX (RX 350L, RX450h) 2016-2026 Repair Manual > Towing Converter System: Parts Location
PARTS LOCATION ILLUSTRATION *1 TOWING CONVERTER RELAY *2 TOWING SOCKET *3 ENGINE ROOM RELAY BLOCK - SEMICONDUCTOR POWER INTEGRATION ECU - TOWING FUSE *4 INSTRUMENT PANEL JUNCTION BLOCK ASSEMBLY - TAIL FUSE *5 COMBINATION METER ASSEMBLY - - ...
Lexus RX (RX 350L, RX450h) 2016-{YEAR} Owners Manual
- For your information
- Pictorial index
- For safety and security
- Instrument cluster
- Operation of each component
- Driving
- Lexus Display Audio system
- Interior features
- Maintenance and care
- When trouble arises
- Vehicle specifications
- For owners
Lexus RX (RX 350L, RX450h) 2016-{YEAR} Repair Manual

0.0098