Lexus RX (RX 350L, RX450h) 2016-2026 Repair Manual: Adjustment
ADJUSTMENT
CAUTION / NOTICE / HINT
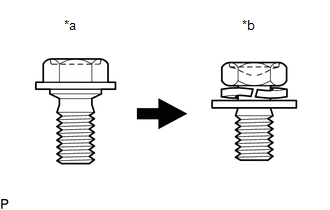
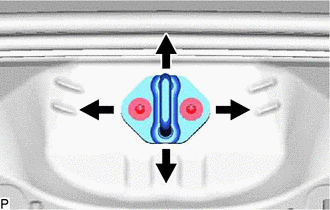
| *a | Centering Bolt |
| *b | Standard Bolt |
HINT:
- Centering bolts are used to install the door hinges to the vehicle body and door. The door cannot be adjusted with the centering bolts installed. Substitute the centering bolts with standard bolts (with washers) when making adjustments.
-
The specified torque for standard bolts is shown in the standard bolt chart.
Click here
.gif)
PROCEDURE
1. INSPECT BACK DOOR (w/o Rear No. 2 Seat)
(a) Check that the clearance measurements of areas a through g are within each standard range.
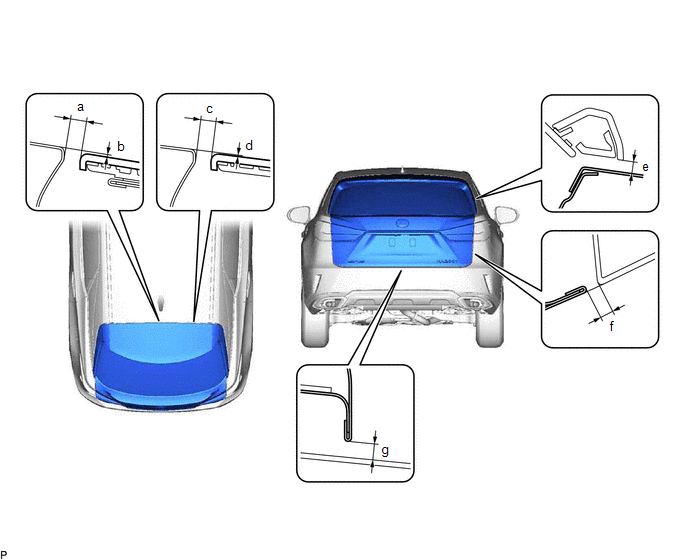 Standard Clearance
 | Area | Measurement | Area | Measurement |
|---|---|---|---|
| a | 5.95 to 9.95 mm (0.234 to 0.392 in.) | b | -1.15 to 2.85 mm (-0.0453 to 0.112 in.) |
| c | 5.95 to 9.95 mm (0.234 to 0.392 in.) | d | -1.15 to 2.85 mm (-0.0453 to 0.112 in.) |
| e | 3.15 to 7.15 mm (0.124 to 0.281 in.) | f | 3.85 to 6.85 mm (0.152 to 0.270 in.) |
| g | 4.55 to 8.55 mm (0.179 to 0.337 in.) | - | - |
2. INSPECT BACK DOOR (w/ Rear No. 2 Seat)
(a) Check that the clearance measurements of areas a through g are within each standard range.
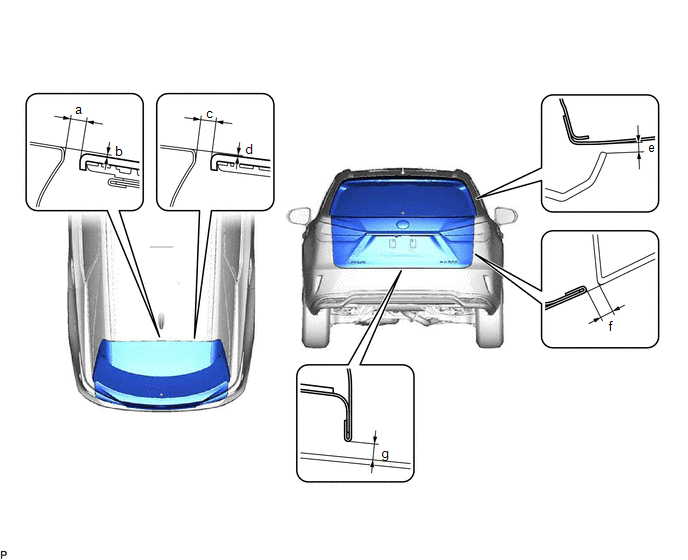 Standard Clearance
 | Area | Measurement | Area | Measurement |
|---|---|---|---|
| a | 5.95 to 9.95 mm (0.234 to 0.392 in.) | b | -1.15 to 2.85 mm (-0.0453 to 0.112 in.) |
| c | 5.95 to 9.95 mm (0.234 to 0.392 in.) | d | -1.15 to 2.85 mm (-0.0453 to 0.112 in.) |
| e | 2.35 to 6.35 mm (0.0925 to 0.250 in.) | f | 3.85 to 6.85 mm (0.152 to 0.270 in.) |
| g | 3.55 to 7.55 mm (0.140 to 0.297 in.) | - | - |
3. REMOVE TONNEAU COVER ASSEMBLY (w/o Rear No. 2 Seat)
Click here
4. REMOVE DECK BOARD ASSEMBLY (w/o Rear No. 2 Seat)
Click here
5. REMOVE REAR NO. 3 FLOOR BOARD (w/o Rear No. 2 Seat)
Click here
6. REMOVE REAR DECK FLOOR BOX (w/o Rear No. 2 Seat)
Click here
7. REMOVE REAR NO. 4 FLOOR BOARD (w/o Rear No. 2 Seat)
Click here
8. REMOVE FRONT DECK FLOOR BOX (w/o Rear No. 2 Seat)
Click here
9. REMOVE DECK SIDE TRIM BOX RH (w/o Rear No. 2 Seat)
Click here
10. REMOVE REAR FLOOR FINISH PLATE (w/o Rear No. 2 Seat)
Click here
11. REMOVE TONNEAU COVER ASSEMBLY (w/ Rear No. 2 Seat)
Click here
12. REMOVE DECK BOARD ASSEMBLY (w/ Rear No. 2 Seat)
Click here
13. REMOVE REAR NO. 4 FLOOR BOARD (w/ Rear No. 2 Seat)
Click here
14. REMOVE DECK SIDE TRIM BOX LH (w/ Rear No. 2 Seat)
Click here
15. REMOVE NO. 1 DECK BOARD (w/ Rear No. 2 Seat)
Click here
16. DISCONNECT REAR NO. 2 SEAT ASSEMBLY (w/ Rear No. 2 Seat)
Click here
17. REMOVE REAR DECK FLOOR BOX (w/ Rear No. 2 Seat)
Click here
18. REMOVE FRONT DECK FLOOR BOX (w/ Rear No. 2 Seat)
Click here
19. REMOVE REAR FLOOR FINISH PLATE (w/ Rear No. 2 Seat)
Click here
20. ADJUST BACK DOOR
| (a) Before adjusting the upper end of the back door up and down or left and right, loosen the 4 hinge bolts on the vehicle body. |
|
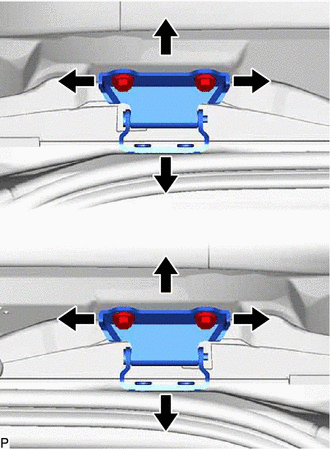
(b) Tighten the 4 hinge bolts on the vehicle body after adjustment.
Torque:
19.5 N·m {199 kgf·cm, 14 ft·lbf}
| (c) Using a T40 "TORX" socket wrench, slightly loosen the 2 striker mounting screws. |
|
(d) Using a brass bar and a hammer, hit the striker to adjust its position.
(e) Using a T40 "TORX" socket wrench, tighten the 2 striker mounting screws after adjustment.
Torque:
23 N·m {235 kgf·cm, 17 ft·lbf}
21. INSTALL REAR FLOOR FINISH PLATE (w/o Rear No. 2 Seat)
Click here
22. INSTALL DECK SIDE TRIM BOX RH (w/o Rear No. 2 Seat)
Click here
23. INSTALL FRONT DECK FLOOR BOX (w/o Rear No. 2 Seat)
Click here
24. INSTALL REAR NO. 4 FLOOR BOARD (w/o Rear No. 2 Seat)
Click here
25. INSTALL REAR DECK FLOOR BOX (w/o Rear No. 2 Seat)
Click here
26. INSTALL REAR NO. 3 FLOOR BOARD (w/o Rear No. 2 Seat)
Click here
27. INSTALL DECK BOARD ASSEMBLY (w/o Rear No. 2 Seat)
Click here
28. INSTALL TONNEAU COVER ASSEMBLY (w/o Rear No. 2 Seat)
Click here
29. INSTALL REAR FLOOR FINISH PLATE (w/ Rear No. 2 Seat)
Click here
30. INSTALL FRONT DECK FLOOR BOX (w/ Rear No. 2 Seat)
Click here
31. INSTALL REAR DECK FLOOR BOX (w/ Rear No. 2 Seat)
Click here
32. CONNECT REAR NO. 2 SEAT ASSEMBLY (w/ Rear No. 2 Seat)
Click here
33. INSTALL NO. 1 DECK BOARD (w/ Rear No. 2 Seat)
Click here
34. INSTALL DECK SIDE TRIM BOX LH (w/ Rear No. 2 Seat)
Click here
35. INSTALL REAR NO. 4 FLOOR BOARD (w/ Rear No. 2 Seat)
Click here
36. INSTALL DECK BOARD ASSEMBLY (w/ Rear No. 2 Seat)
Click here
37. INSTALL TONNEAU COVER ASSEMBLY (w/ Rear No. 2 Seat)
Click here
 Disassembly
DISASSEMBLY CAUTION / NOTICE / HINT The necessary procedures (adjustment, calibration, initialization, or registration) that must be performed after parts are removed and installed, or replaced during ...
 Reassembly
REASSEMBLY PROCEDURE 1. INSTALL POWER BACK DOOR UNIT SET ASSEMBLY LH NOTICE: Do not apply any horizontal load to the power back door unit set assembly in order to prevent the piston rod from deforming ...
Other materials:
Lexus RX (RX 350L, RX450h) 2016-2026 Repair Manual > Heated Steering Wheel System: Parts Location
PARTS LOCATION ILLUSTRATION *1 SPIRAL CABLE SUB-ASSEMBLY *2 STEERING HEATER SWITCH (INTEGRATION CONTROL AND PANEL ASSEMBLY) *3 STEERING WHEEL ASSEMBLY - STEERING WHEEL HEATER UNIT *4 INSTRUMENT PANEL JUNCTION BLOCK ASSEMBLY - ECU-IG1 NO. 3 FUSE *5 STEERING VIBRATION AND HEA ...
Lexus RX (RX 350L, RX450h) 2016-2026 Repair Manual > Oil Pump: Disassembly
DISASSEMBLY PROCEDURE 1. REMOVE OIL PUMP RELIEF VALVE (a) Using a 27 mm socket wrench, remove the oil pump relief valve plug from the oil pump cover. (b) Remove the oil pump relief valve spring and oil pump relief valve from the oil pump cover hole. 2. REMOVE OIL PUMP COVER (a) Rem ...
Lexus RX (RX 350L, RX450h) 2016-{YEAR} Owners Manual
- For your information
- Pictorial index
- For safety and security
- Instrument cluster
- Operation of each component
- Driving
- Lexus Display Audio system
- Interior features
- Maintenance and care
- When trouble arises
- Vehicle specifications
- For owners
Lexus RX (RX 350L, RX450h) 2016-{YEAR} Repair Manual

0.0114