Lexus RX (RX 350L, RX450h) 2016-2026 Repair Manual: Removal
REMOVAL
CAUTION / NOTICE / HINT
HINT:
- Use the same procedure for the RH side and LH side.
- The following procedure is for the LH side.
PROCEDURE
1. REMOVE BACK WINDOW UPPER PANEL TRIM (w/o Rear No. 2 Seat)
Click here .gif)
2. REMOVE BACK WINDOW UPPER PANEL TRIM (w/ Rear No. 2 Seat)
Click here
3. REMOVE BACK DOOR TRIM COVER LH (w/o Rear No. 2 Seat)
Click here
4. REMOVE BACK DOOR TRIM COVER LH (w/ Rear No. 2 Seat)
Click here
5. REMOVE BACK DOOR TRIM COVER RH
HINT:
Use the same procedure as for the LH side.
6. REMOVE BACK DOOR LOCK COVER (w/o Rear No. 2 Seat)
Click here
7. REMOVE BACK DOOR LOCK COVER (w/ Rear No. 2 Seat)
Click here
8. REMOVE BACK DOOR TRIM BASE
Click here
9. REMOVE DOOR PULL HANDLE
Click here
10. REMOVE NO. 1 LUGGAGE COMPARTMENT LIGHT ASSEMBLY
Click here
11. REMOVE BACK DOOR TRIM PANEL ASSEMBLY (w/o Rear No. 2 Seat)
Click here
12. REMOVE BACK DOOR TRIM PANEL ASSEMBLY (w/ Rear No. 2 Seat)
Click here
13. REMOVE POWER BACK DOOR UNIT SET ASSEMBLY
| (a) Disconnect the connector. |
|
.png)
(b) Disengage the grommet.
(c) Using a screwdriver with its tip wrapped with protective tape, slightly raise the 2 stop rings as indicated by the arrows, in the order shown in the illustration.
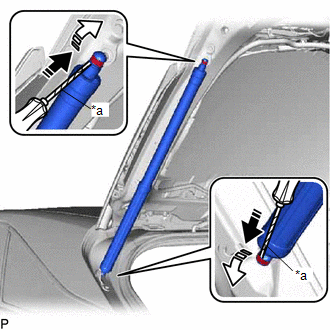
| *a | Protective Tape |
.png) | Remove in this Direction (1) |
.png) | Remove in this Direction (2) |
(d) Disengage the 2 ball joints to remove the power back door unit set assembly.
NOTICE:
- Remove the power back door unit set assembly while supporting the back door by hand.
- Make sure to replace the power back door unit set assembly with a new one.
14. REMOVE BACK DOOR DAMPER STAY UPPER BRACKET
| (a) Remove the 2 bolts and back door damper stay upper bracket. |
|

15. REMOVE BACK DOOR DAMPER STAY LOWER BRACKET
| (a) Remove the 2 bolts and back door damper stay lower bracket. |
|
.png)
 Installation
INSTALLATION CAUTION / NOTICE / HINT HINT:
Use the same procedure for the RH side and LH side.
The following procedure is for the LH side.
PROCEDURE 1. INSTALL BACK DOOR DAMPER STAY LOWER BRAC ...

Other materials:
Lexus RX (RX 350L, RX450h) 2016-2026 Repair Manual > Fuel Sender Gauge Assembly: Installation
INSTALLATION PROCEDURE 1. INSTALL FUEL SENDER GAUGE ASSEMBLY (a) Engage the claw to install the fuel sender gauge assembly to the fuel suction tube with pump and gauge assembly. NOTICE:
Do not touch the resistance plate or contacts of the fuel sender gauge assembly.
Be careful not to bend the a ...
Lexus RX (RX 350L, RX450h) 2016-2026 Repair Manual > Automatic Transaxle System: Parts Location
PARTS LOCATION ILLUSTRATION *1 ECM *2 ENGINE ROOM RELAY BLOCK AND JUNCTION BLOCK ASSEMBLY - EFI-MAIN FUSE - ETCS FUSE - ST RELAY ILLUSTRATION *1 SHIFT SOLENOID VALVE SL1 *2 SHIFT SOLENOID VALVE SL2 *3 SHIFT SOLENOID VALVE SL3 *4 SHIFT SOLENOID VALVE SL4 *5 SHIF ...
Lexus RX (RX 350L, RX450h) 2016-{YEAR} Owners Manual
- For your information
- Pictorial index
- For safety and security
- Instrument cluster
- Operation of each component
- Driving
- Lexus Display Audio system
- Interior features
- Maintenance and care
- When trouble arises
- Vehicle specifications
- For owners
Lexus RX (RX 350L, RX450h) 2016-{YEAR} Repair Manual

0.0133