Lexus RX (RX 350L, RX450h) 2016-2026 Repair Manual: Installation
INSTALLATION
CAUTION / NOTICE / HINT
HINT:
- Use the same procedure for the RH side and LH side.
- The following procedure is for the LH side.
PROCEDURE
1. INSTALL NO. 2 ROOF CARRIER SEAL
HINT:
When installing the No. 2 roof carrier seal, heat the roof rack assembly using a heat light.
Heating Temperature| Item | Temperature |
|---|---|
| Roof Rack Assembly | 40 to 60°C (104 to 140°F) |
CAUTION:
- Do not touch the heat light and heated parts, touching the heat light may result in burns.
- Touching heated parts for a long time may result in burns.
.png)
| *a | Heated Part |
| *b | Heat Light |
NOTICE:
Do not heat the roof rack assembly excessively.
(a) Clean the roof rack assembly surface.
(1) Using a heat light, heat the roof rack assembly surface.
(2) Remove the double-sided tape from the roof rack assembly.
(3) Wipe off any tape adhesive residue with cleaner.
(b) Using a heat light, heat the roof rack assembly.
(c) Remove the release paper from the 3 new No. 2 roof carrier seals.
HINT:
After removing the release paper, keep the exposed adhesive free from foreign matter.
(d) Install the 3 No. 2 roof carrier seals.
2. INSTALL FRONT ROOF RACK LEG CUSHION LH
(a) Engage the 2 claws and guide as shown in the illustration to install the front roof rack leg cushion LH.
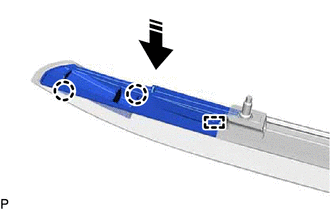
.png) | Install in this Direction |
3. INSTALL NO. 1 ROOF CARRIER PROTECTOR (except TMMC Made)
(a) Install the No. 1 roof carrier protector as shown in the illustration.
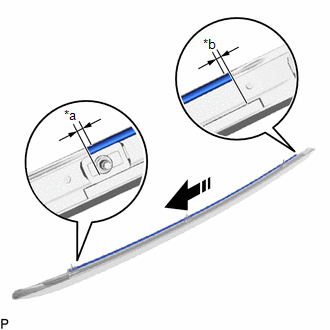
| *a | 3.0 mm (0.118 in.) |
| *b | 0.5 mm (0.0197 in.) |
| | Install in this Direction |
HINT:
Make sure to install the No. 1 roof carrier protector so that the ends of the No. 1 roof carrier protector are within each area shown in the illustration.
4. INSTALL REAR ROOF RACK LEG CUSHION LH
(a) Engage the 2 claws and guide as shown in the illustration to install the rear roof rack leg cushion LH.
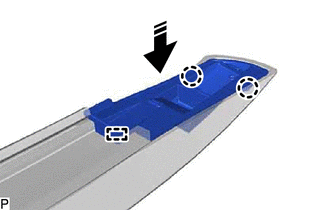
| | Install in this Direction |
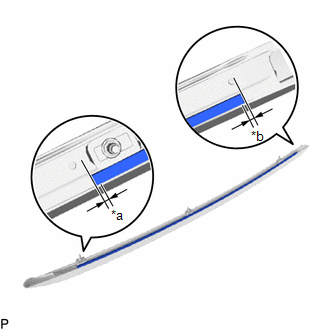
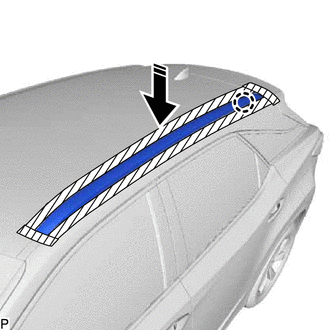
5. INSTALL NO. 2 ROOF CARRIER PROTECTOR (except TMMC Made)
HINT:
When installing the No. 2 roof carrier protector, heat the roof rack assembly using a heat light.
Heating Temperature| Item | Temperature |
|---|---|
| Roof Rack Assembly | 40 to 60°C (104 to 140°F) |
CAUTION:
- Do not touch the heat light and heated parts, touching the heat light may result in burns.
- Touching heated parts for a long time may result in burns.
| *a | Heated Part |
| *b | Heat Light |
NOTICE:
Do not heat the roof rack assembly excessively.
(a) Clean the roof rack assembly surface.
(1) Using a heat light, heat the roof rack assembly surface.
(2) Remove the double-sided tape from the roof rack assembly.
(3) Wipe off any tape adhesive residue with cleaner.
(b) Using a heat light, heat the roof rack assembly.
(c) Remove the release paper from a new No. 2 roof carrier protector.
HINT:
After removing the release paper, keep the exposed adhesive free from foreign matter.
| (d) Install the No. 2 roof carrier protector as shown in the illustration. HINT: Make sure to install the No. 2 roof carrier protector so that the ends of the No. 2 roof carrier protector are within each area shown in the illustration. |
|
6. INSTALL FRONT ROOF RACK RETAINER LH (except TMMC Made)
(a) Engage the claw as shown in the illustration to install the front roof rack retainer LH.
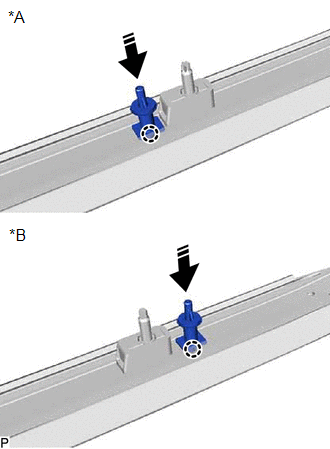
| *A | except Panoramic Moon Roof |
| *B | for Panoramic Moon Roof |
| | Install in this Direction |
7. INSTALL ROOF RACK ASSEMBLY LH
| (a) Engage the claw as shown in the illustration. |
|
(b) Install the roof rack assembly LH with the 3 nuts.
Torque:
32 N·m {326 kgf·cm, 24 ft·lbf}
8. INSTALL FRONT SLIDING ROOF HOUSING MOUNTING BRACKET LH (for Panoramic Moon Roof)
Click here .gif)
9. INSTALL CURTAIN SHIELD AIRBAG ASSEMBLY LH
Click here
 Components
COMPONENTS ILLUSTRATION *A for Panoramic Moon Roof - - *1 FRONT SLIDING ROOF HOUSING MOUNTING BRACKET LH *2 ROOF RACK ASSEMBLY LH N*m (kgf*cm, ft.*lbf): Specified torque - ...
 Removal
REMOVAL CAUTION / NOTICE / HINT The necessary procedures (adjustment, calibration, initialization or registration) that must be performed after parts are removed and installed, or replaced during roof ...
Other materials:
Lexus RX (RX 350L, RX450h) 2016-2026 Repair Manual > Automatic Transaxle System: Monitor Drive Pattern
MONITOR DRIVE PATTERN MONITOR DRIVE PATTERN FOR ECT CAUTION: Perform the following procedure on a level surface while strictly observing all traffic laws and speed limits. HINT: Performing this drive pattern is one method to simulate ECM (ECT) malfunction detection conditions. Some DTCs may not be d ...
Lexus RX (RX 350L, RX450h) 2016-2026 Repair Manual > Audio And Visual System (for 8 Inch Display): Portable Player cannot be Registered
CAUTION / NOTICE / HINT HINT: Some versions of "Bluetooth" compatible audio players may not function properly, or the functions may be limited using the radio receiver assembly, even if the portable audio player itself can play files. Click here PROCEDURE 1. CHECK THAT PORTABLE PLAYER IS "Bl ...
Lexus RX (RX 350L, RX450h) 2016-{YEAR} Owners Manual
- For your information
- Pictorial index
- For safety and security
- Instrument cluster
- Operation of each component
- Driving
- Lexus Display Audio system
- Interior features
- Maintenance and care
- When trouble arises
- Vehicle specifications
- For owners
Lexus RX (RX 350L, RX450h) 2016-{YEAR} Repair Manual

0.0098