Lexus RX (RX 350L, RX450h) 2016-2026 Repair Manual: Headlight LH Circuit (B2439,B243A)
DESCRIPTION
The No. 1 headlight ECU sub-assembly LH and No. 1 headlight ECU sub-assembly RH internally boost the power supply voltage to ensure a constant supplied current for the lo/hi beam LED of their respective headlight.
By monitoring the LED power supply voltage, abnormal current and malfunctions can be detected.
for Multiple Beam Headlight| DTC No. | Detection Item | DTC Detection Condition | Trouble Area | DTC Output from |
|---|---|---|---|---|
| B2439 | Headlight LH Circuit |
Malfunction status:
|
| AFS |
| B243A | Headlight RH Circuit |
Malfunction status:
|
| AFS |
| DTC No. | Detection Item | DTC Detection Condition | Trouble Area | DTC Output from |
|---|---|---|---|---|
| B2439 | Headlight LH Circuit |
Malfunction status:
|
| HL AutoLeveling |
| B243A | Headlight RH Circuit |
Malfunction status:
|
| HL AutoLeveling |
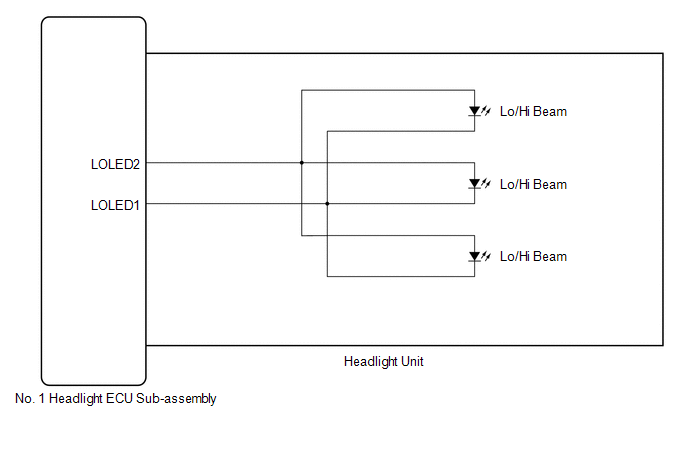
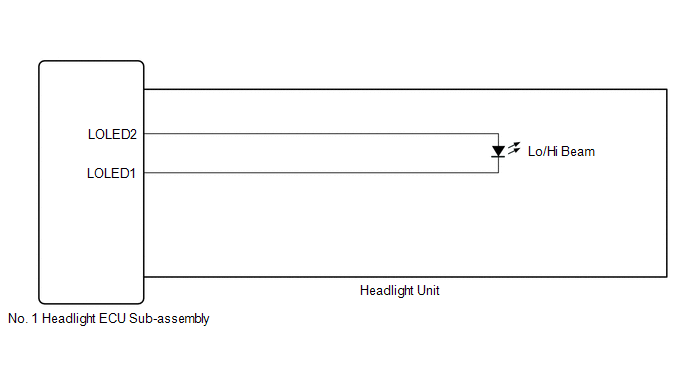
WIRING DIAGRAM
for Multiple Beam Headlight

for Single Beam Headlight

CAUTION / NOTICE / HINT
NOTICE:
-
If the No. 1 headlight ECU sub-assembly LH has been replaced, it is necessary to synchronize the vehicle information and initialize the No. 1 headlight ECU sub-assembly LH.
Click here
.gif)
.gif)
-
If the headlight assembly LH has been replaced, it is necessary to synchronize the vehicle information and initialize the No. 1 headlight ECU sub-assembly LH.*
Click here
.gif)
.gif)
- When replacing the No. 1 headlight ECU sub-assembly LH, always replace it with a new one. If a No. 1 headlight ECU sub-assembly LH which was installed to another vehicle is used, the information stored in it will not match the information from the vehicle and a DTC may be stored.
-
When replacing the headlight assembly LH, always replace it with a new one. If a headlight assembly LH which was installed to another vehicle is used, the information stored in it will not match the information from the vehicle and a DTC may be stored.*
- *: for TMMC Made
PROCEDURE
| 1. | CONFIRM MODEL |
(a) Choose the model to be inspected.
| Result | Proceed to |
|---|---|
| for Multiple Beam Headlight | A |
| for Single Beam Headlight | B |
| B | .gif) | GO TO STEP 10 |
|
| 2. | CLEAR DTC |
(a) Connect the Techstream to the DLC3.
(b) Turn the engine switch on (IG).
(c) Turn the Techstream on.
(d) Enter the following menus: Body Electrical / AFS / Trouble Codes.
(e) Clear the DTCs.
Body Electrical > AFS > Clear DTCs
|
| 3. | CHECK FOR DTC |
(a) Connect the Techstream to the DLC3.
(b) Turn the engine switch on (IG).
(c) Operate the light control switch to turn on the low beam headlights and wait 10 seconds or more.
(d) Turn the Techstream on.
(e) Enter the following menus: Body Electrical / AFS / Trouble Codes.
(f) Check for DTCs.
Body Electrical > AFS > Trouble CodesOK:
DTC B2439 and B243A are not output.
| Result | Proceed to |
|---|---|
| OK | A |
| NG (DTC B2439 is output) | B |
| NG (DTC B243A is output) | C |
| A | .gif) | USE SIMULATION METHOD TO CHECK |
| C | .gif) | GO TO STEP 7 |
|
| 4. | CHECK HEADLIGHT UNIT LH |
(a) Interchange the headlight unit LH with RH and connect the connectors.
Click here .gif)
|
| 5. | CLEAR DTC |
(a) Connect the Techstream to the DLC3.
(b) Turn the engine switch on (IG).
(c) Turn the Techstream on.
(d) Enter the following menus: Body Electrical / AFS / Trouble Codes.
(e) Clear the DTCs.
Body Electrical > AFS > Clear DTCs
|
| 6. | CHECK FOR DTC |
(a) Connect the Techstream to the DLC3.
(b) Turn the engine switch on (IG).
(c) Operate the light control switch to turn on the low beam headlights and wait 10 seconds or more.
(d) Turn the Techstream on.
(e) Enter the following menus: Body Electrical / AFS / Trouble Codes.
(f) Check for DTCs.
Body Electrical > AFS > Trouble Codes| Result | Proceed to |
|---|---|
| DTC B2439 is output | A |
| DTC B243A is output (for TMC Made) | B |
| DTC B243A is output (for TMMC Made) | C |
| A | .gif) | REPLACE NO. 1 HEADLIGHT ECU SUB-ASSEMBLY LH |
| B | .gif) | REPLACE HEADLIGHT UNIT LH |
| C | .gif) | REPLACE HEADLIGHT ASSEMBLY LH |
| 7. | CHECK HEADLIGHT UNIT RH |
(a) Interchange the headlight unit RH with LH and connect the connectors.
Click here .gif)
|
| 8. | CLEAR DTC |
(a) Connect the Techstream to the DLC3.
(b) Turn the engine switch on (IG).
(c) Turn the Techstream on.
(d) Enter the following menus: Body Electrical / AFS / Trouble Codes.
(e) Clear the DTCs.
Body Electrical > AFS > Clear DTCs
|
| 9. | CHECK FOR DTC |
(a) Connect the Techstream to the DLC3.
(b) Turn the engine switch on (IG).
(c) Operate the light control switch to turn on the low beam headlights and wait 10 seconds or more.
(d) Turn the Techstream on.
(e) Enter the following menus: Body Electrical / AFS / Trouble Codes.
(f) Check for DTCs.
Body Electrical > AFS > Trouble Codes| Result | Proceed to |
|---|---|
| DTC B243A is output | A |
| DTC B2439 is output (for TMC Made) | B |
| DTC B2439 is output (for TMMC Made) | C |
| A | .gif) | REPLACE NO. 1 HEADLIGHT ECU SUB-ASSEMBLY RH |
| B | .gif) | REPLACE HEADLIGHT UNIT RH |
| C | .gif) | REPLACE HEADLIGHT ASSEMBLY RH |
| 10. | CLEAR DTC |
(a) Connect the Techstream to the DLC3.
(b) Turn the engine switch on (IG).
(c) Turn the Techstream on.
(d) Enter the following menus: Body Electrical / HL AutoLeveling / Trouble Codes.
(e) Clear the DTCs.
Body Electrical > HL AutoLeveling > Clear DTCs
|
| 11. | CHECK FOR DTC |
(a) Connect the Techstream to the DLC3.
(b) Turn the engine switch on (IG).
(c) Operate the light control switch to turn on the low beam headlights and wait 10 seconds or more.
(d) Turn the Techstream on.
(e) Enter the following menus: Body Electrical / HL AutoLeveling / Trouble Codes.
(f) Check for DTCs.
Body Electrical > HL AutoLeveling > Trouble CodesOK:
DTC B2439 and B243A are not output.
| Result | Proceed to |
|---|---|
| OK | A |
| NG (DTC B2439 is output) | B |
| NG (DTC B243A is output) | C |
| A | .gif) | USE SIMULATION METHOD TO CHECK |
| C | .gif) | GO TO STEP 15 |
|
| 12. | CHECK HEADLIGHT UNIT LH |
(a) Interchange the headlight unit LH with RH and connect the connectors.
Click here .gif)
|
| 13. | CLEAR DTC |
(a) Connect the Techstream to the DLC3.
(b) Turn the engine switch on (IG).
(c) Turn the Techstream on.
(d) Enter the following menus: Body Electrical / HL AutoLeveling / Trouble Codes.
(e) Clear the DTCs.
Body Electrical > HL AutoLeveling > Clear DTCs
|
| 14. | CHECK FOR DTC |
(a) Connect the Techstream to the DLC3.
(b) Turn the engine switch on (IG).
(c) Operate the light control switch to turn on the low beam headlights and wait 10 seconds or more.
(d) Turn the Techstream on.
(e) Enter the following menus: Body Electrical / HL AutoLeveling / Trouble Codes.
(f) Check for DTCs.
Body Electrical > HL AutoLeveling > Trouble Codes| Result | Proceed to |
|---|---|
| DTC B2439 is output | A |
| DTC B243A is output (for TMC Made) | B |
| DTC B243A is output (for TMMC Made) | C |
| A | .gif) | REPLACE NO. 1 HEADLIGHT ECU SUB-ASSEMBLY LH |
| B | .gif) | REPLACE HEADLIGHT UNIT LH |
| C | .gif) | REPLACE HEADLIGHT ASSEMBLY LH |
| 15. | CHECK HEADLIGHT UNIT RH |
(a) Interchange the headlight unit RH with LH and connect the connectors.
Click here .gif)
|
| 16. | CLEAR DTC |
(a) Connect the Techstream to the DLC3.
(b) Turn the engine switch on (IG).
(c) Turn the Techstream on.
(d) Enter the following menus: Body Electrical / HL AutoLeveling / Trouble Codes.
(e) Clear the DTCs.
Body Electrical > HL AutoLeveling > Clear DTCs
|
| 17. | CHECK FOR DTC |
(a) Connect the Techstream to the DLC3.
(b) Turn the engine switch on (IG).
(c) Operate the light control switch to turn on the low beam headlights and wait 10 seconds or more.
(d) Turn the Techstream on.
(e) Enter the following menus: Body Electrical / HL AutoLeveling / Trouble Codes.
(f) Check for DTCs.
Body Electrical > HL AutoLeveling > Trouble Codes| Result | Proceed to |
|---|---|
| DTC B243A is output | A |
| DTC B2439 is output (for TMC Made) | B |
| DTC B2439 is output (for TMMC Made) | C |
| A | .gif) | REPLACE NO. 1 HEADLIGHT ECU SUB-ASSEMBLY RH |
| B | .gif) | REPLACE HEADLIGHT UNIT RH |
| C | .gif) | REPLACE HEADLIGHT ASSEMBLY RH |
 Left Low Beam Fan Malfunction (B243D,B243E)
DESCRIPTION The No. 1 headlight ECU sub-assembly operates the low beam fan to cool the headlight LED unit in order to prevent the headlight LED unit from overheating. Illuminates the low beam headligh ...
 Height Sensor Initialization Incomplete (B2450)
DESCRIPTION The No. 1 headlight ECU sub-assembly LH stores this DTC if initialization has not been performed after it was replaced. DTC No. Detection Item DTC Detection Condition Trouble Area ...
Other materials:
Lexus RX (RX 350L, RX450h) 2016-2026 Repair Manual > Power Mirror Control System (w/o Memory): AUTO Power Retract Mirrors do not operate
DESCRIPTION The multiplex network master switch assembly sends the auto retractable outer mirror switch signal to the main body ECU (multiplex network body ECU) via LIN communication. The main body ECU (multiplex network body ECU) sends the auto retract/return signal to the outer mirror control ECU ...
Lexus RX (RX 350L, RX450h) 2016-2026 Repair Manual > Fuel System: Precaution
PRECAUTION CAUTION:
The fuel tank assembly is very heavy. Be sure to follow the procedure described in the repair manual, or the fuel tank assembly may fall off the engine lifter.
To prevent serious injury due to fuel spray from the high-pressure fuel lines, always discharge fuel system pressu ...
Lexus RX (RX 350L, RX450h) 2016-{YEAR} Owners Manual
- For your information
- Pictorial index
- For safety and security
- Instrument cluster
- Operation of each component
- Driving
- Lexus Display Audio system
- Interior features
- Maintenance and care
- When trouble arises
- Vehicle specifications
- For owners
Lexus RX (RX 350L, RX450h) 2016-{YEAR} Repair Manual
0.0124

.gif)