Lexus RX (RX 350L, RX450h) 2016-2026 Repair Manual: Outside Handle Foot Light Circuit
DESCRIPTION
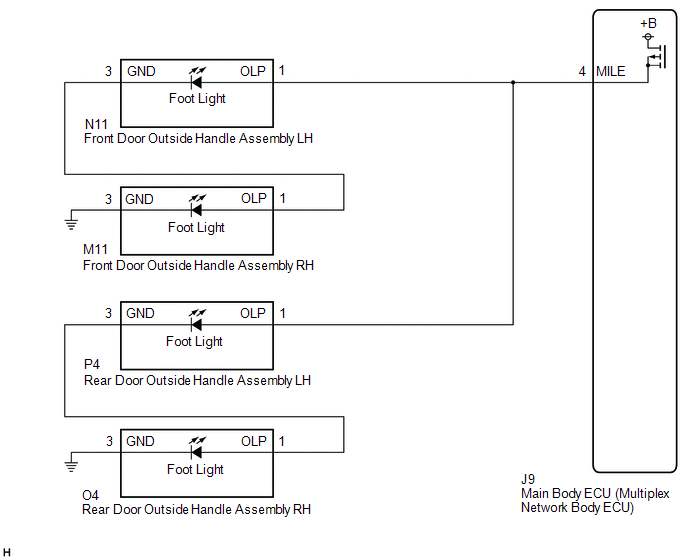
The main body ECU (multiplex network body ECU) controls the outside handle foot lights.
WIRING DIAGRAM

CAUTION / NOTICE / HINT
NOTICE:
Before replacing the main body ECU (multiplex network body ECU), refer to Registration.
Click here .gif)
.gif)
PROCEDURE
| 1. | PERFORM ACTIVE TEST USING TECHSTREAM |
(a) Connect the Techstream to the DLC3.
(b) Turn the engine switch on (IG).
(c) Turn the Techstream on.
(d) Enter the following menus: Body Electrical / Main Body / Active Test.
(e) Perform the Active Test according to the display on the Techstream.
Body Electrical > Main Body > Active Test| Tester Display | Measurement Item | Control Range | Diagnostic Note |
|---|---|---|---|
| Exterior Light | Outside handle foot lights | OFF or ON | - |
| Tester Display |
|---|
| Exterior Light |
OK:
Outside handle foot lights illuminate.
| OK | .gif) | PROCEED TO NEXT SUSPECTED AREA SHOWN IN PROBLEM SYMPTOMS TABLE |
|
| 2. | CHECK HARNESS AND CONNECTOR (DOOR OUTSIDE HANDLE ASSEMBLY LH - MAIN BODY ECU (MULTIPLEX NETWORK BODY ECU)) |
(a) Disconnect the N11 front door outside handle assembly LH connector.
(b) Disconnect the P4 rear door outside handle assembly LH connector.
(c) Disconnect the J9 main body ECU (multiplex network body ECU) connector.
(d) Measure the resistance according to the value(s) in the table below.
Standard Resistance:
| Tester Connection | Condition | Specified Condition |
|---|---|---|
| N11-1 (OLP) - J9-4 (MILE) | Always | Below 1 Ω |
| P4-1 (OLP) - J9-4 (MILE) | Always | Below 1 Ω |
| N11-1 (OLP), P4-1 (OLP) or J9-4 (MILE) - Body ground | Always | 10 kΩ or higher |
| OK | .gif) | REPLACE MAIN BODY ECU (MULTIPLEX NETWORK BODY ECU) |
| NG | .gif) | REPAIR OR REPLACE HARNESS OR CONNECTOR |
 Hazard Warning Switch Circuit
DESCRIPTION The combination meter assembly receives the hazard warning signal switch on signal and controls the operation of the hazard warning lights. WIRING DIAGRAM CAUTION / NOTICE / HINT NOTICE: ...
 Front Side Marker Light Circuit
DESCRIPTION When the light control switch is in the tail or head position, the main body ECU (multiplex network body ECU) sends an illumination request signal to the No. 1 headlight ECU sub-assembly t ...
Other materials:
Lexus RX (RX 350L, RX450h) 2016-2026 Repair Manual > U881e (automatic Transmission / Transaxle): Transmission Wire
ComponentsCOMPONENTS ILLUSTRATION *1 TRANSMISSION WIRE - - Tightening torque for "Major areas involving basic vehicle performance such as moving/turning/stopping": N*m (kgf*cm, ft.*lbf) ATF WS RemovalREMOVAL PROCEDURE 1. REMOVE TRANSMISSION VALVE BODY ASSEMBLY Click here ...
Lexus RX (RX 350L, RX450h) 2016-2026 Repair Manual > Sfi System: HO2S Heater Control Bank 1 Sensor 1 Circuit Short to Battery (P003012,P003013,P005012,P005013,P101A9E,P103A9E)
DESCRIPTION Refer to DTC P219519. Click here HINT:
When any of these DTCs are stored, the ECM enters fail-safe mode. The ECM turns off the air fuel ratio sensor heater in fail-safe mode. Fail-safe mode continues until the engine switch is turned off.
Although the DTC titles say oxygen sensor ...
Lexus RX (RX 350L, RX450h) 2016-{YEAR} Owners Manual
- For your information
- Pictorial index
- For safety and security
- Instrument cluster
- Operation of each component
- Driving
- Lexus Display Audio system
- Interior features
- Maintenance and care
- When trouble arises
- Vehicle specifications
- For owners
Lexus RX (RX 350L, RX450h) 2016-{YEAR} Repair Manual
0.0118

.gif)