Lexus RX (RX 350L, RX450h) 2016-2026 Repair Manual: Components
COMPONENTS
ILLUSTRATION
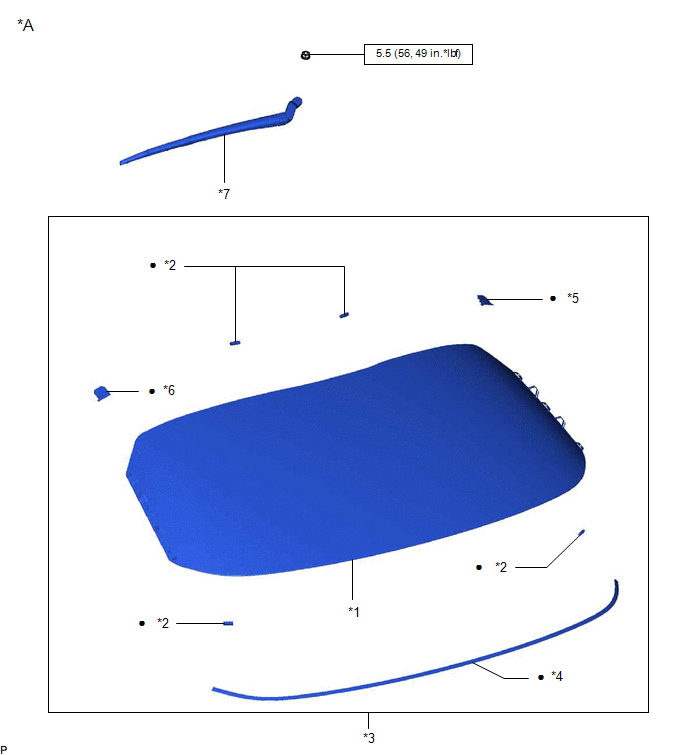
| *A | w/o Rear No. 2 Seat | - | - |
| *1 | BACK DOOR GLASS | *2 | BACK DOOR GLASS SPACER |
| *3 | BACK DOOR GLASS SUB-ASSEMBLY | *4 | LOWER BACK WINDOW MOULDING |
| *5 | NO. 1 BACK WINDOW GLASS SPACER | *6 | NO. 2 BACK WINDOW GLASS SPACER |
| *7 | REAR WIPER ARM AND BLADE ASSEMBLY | - | - |
.png) | N*m (kgf*cm, ft.*lbf): Specified torque | ● | Non-reusable part |
ILLUSTRATION
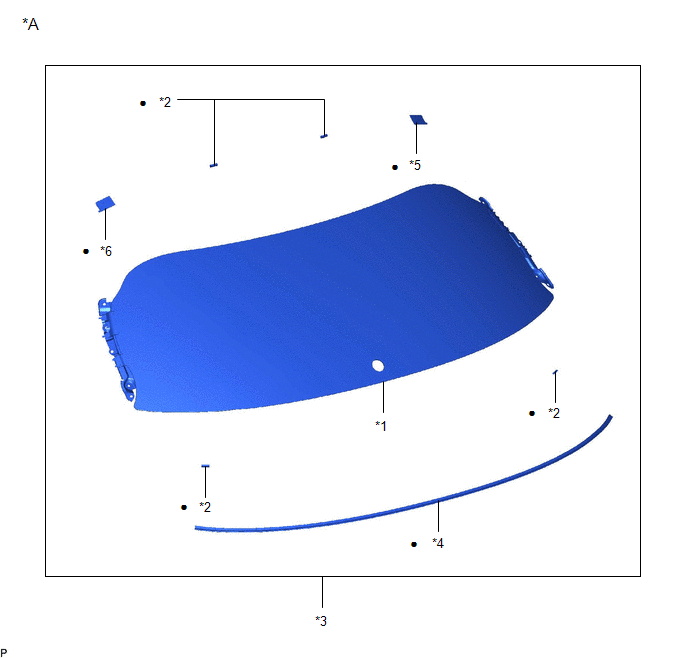
| *A | w/ Rear No. 2 Seat | - | - |
| *1 | BACK DOOR GLASS | *2 | BACK DOOR GLASS SPACER |
| *3 | BACK DOOR GLASS SUB-ASSEMBLY | *4 | LOWER BACK WINDOW MOULDING |
| *5 | NO. 1 BACK WINDOW GLASS SPACER | *6 | NO. 2 BACK WINDOW GLASS SPACER |
| ● | Non-reusable part | - | - |
 Back Door Glass
...
 Removal
REMOVAL PROCEDURE 1. REMOVE BACK DOOR OUTSIDE GARNISH SUB-ASSEMBLY Click here 2. REMOVE REAR SPOILER Click here 3. REMOVE POWER BACK DOOR SENSOR ASSEMBLY LH Click here 4. REMOVE POWER BACK DOOR ...
Other materials:
Lexus RX (RX 350L, RX450h) 2016-2026 Repair Manual > Oil Pressure Switch: Installation
INSTALLATION PROCEDURE 1. INSTALL ENGINE OIL PRESSURE SWITCH ASSEMBLY (a) Apply adhesive to 2 or 3 threads of the engine oil pressure switch assembly. Adhesive: Toyota Genuine Adhesive 1344, Three Bond 1344 or equivalent NOTICE:
Do not apply adhesive to the oil inlet port of the engine oil ...
Lexus RX (RX 350L, RX450h) 2016-2026 Repair Manual > Rear Seat Inner Belt Assembly(for Rh Side): Removal
REMOVAL CAUTION / NOTICE / HINT The necessary procedures (adjustment, calibration, initialization or registration) that must be performed after parts are removed and installed, or replaced during rear seat inner belt assembly removal/installation are shown below. Necessary Procedure After Parts Remo ...
Lexus RX (RX 350L, RX450h) 2016-{YEAR} Owners Manual
- For your information
- Pictorial index
- For safety and security
- Instrument cluster
- Operation of each component
- Driving
- Lexus Display Audio system
- Interior features
- Maintenance and care
- When trouble arises
- Vehicle specifications
- For owners
Lexus RX (RX 350L, RX450h) 2016-{YEAR} Repair Manual

0.0117