Lexus RX (RX 350L, RX450h) 2016-2026 Repair Manual: Terminals Of Ecu
TERMINALS OF ECU
CHECK AIR CONDITIONING AMPLIFIER ASSEMBLY
| *A | w/o Seat Heater System | *B | w/ Seat Heater System |
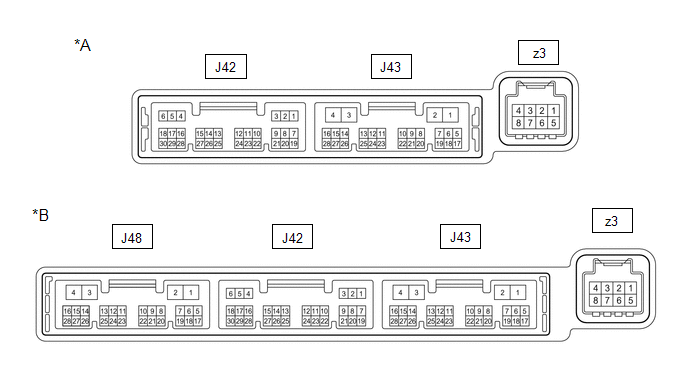
(a) Disconnect the J43 air conditioning amplifier assembly connector.
(b) Measure the voltage and resistance according to the value(s) in the table below.
HINT:
Measure the values on the wire harness side with the connector disconnected.
| Terminal No. (Symbol) | Wiring Color | Terminal Description | Condition | Specified Condition |
|---|---|---|---|---|
| J43-2 (IG+) - J43-4 (GND) | GR - W-B | Power source (IG) | Engine switch on (IG) | 11 to 14 V |
| J43-2 (IG+) - J43-4 (GND) | GR - W-B | Power source (IG) | Engine switch off | Below 1 V |
| J43-1 (B) - J43-4 (GND) | R - W-B | Battery power supply | Always | 11 to 14 V |
| J43-4 (GND) - Body ground | W-B - Body ground | Ground | Always | Below 1 Ω |
(c) Reconnect the J43 air conditioning amplifier assembly connector.
(d) Measure the voltage and check for pulses according to the value(s) in the table below.
| Terminal No. (Symbol) | Wiring Color | Terminal Description | Condition | Specified Condition |
|---|---|---|---|---|
| J43-5 (RDFG) - J43-4 (GND) | P - W-B | Rear window defogger signal | Engine switch on (IG), rear window defogger switch off | 11 to 14 V |
| J43-5 (RDFG) - J43-4 (GND) | P - W-B | Rear window defogger signal | Engine switch on (IG), rear window defogger switch on | Below 2.2 V |
CHECK RADIO RECEIVER ASSEMBLY
Click here .gif)
 Problem Symptoms Table
PROBLEM SYMPTOMS TABLE NOTICE: If the battery voltage is low, the window defogger system may not operate. When "Operation of Electrical Items Restricted." is not displayed on the multi-information dis ...
 Data List / Active Test
DATA LIST / ACTIVE TEST ACTIVE TEST HINT: Using the Techstream to perform Active Tests allows relays, VSVs, actuators and other items to be operated without removing any parts. This non-intrusive func ...
Other materials:
Lexus RX (RX 350L, RX450h) 2016-2026 Repair Manual > Intelligent Clearance Sonar System: System Description
SYSTEM DESCRIPTION CASES OF UNNECESSARY INTELLIGENT CLEARANCE SONAR SYSTEM OPERATION (a) In the following situations, the intelligent clearance sonar system may operate even when there is no possibility of a collision: (1) Environmental influence
There is an obstacle on the shoulder of the road ( ...
Lexus RX (RX 350L, RX450h) 2016-2026 Repair Manual > Can Communication System: Lost Communication with Tilt & (U1115)
DESCRIPTION DTC No. Detection Item DTC Detection Condition Trouble Area Note U1115 Lost Communication with Tilt & Telescopic Module No communication from the multiplex tilt and telescopic ECU continues.
Multiplex tilt and telescopic ECU branch line or connector
Power so ...
Lexus RX (RX 350L, RX450h) 2016-{YEAR} Owners Manual
- For your information
- Pictorial index
- For safety and security
- Instrument cluster
- Operation of each component
- Driving
- Lexus Display Audio system
- Interior features
- Maintenance and care
- When trouble arises
- Vehicle specifications
- For owners
Lexus RX (RX 350L, RX450h) 2016-{YEAR} Repair Manual

0.015