Lexus RX (RX 350L, RX450h) 2016-2026 Repair Manual: On-vehicle Inspection
ON-VEHICLE INSPECTION
PROCEDURE
1. INSPECT REAR WASHER NOZZLE (w/o Rear No. 2 Seat)
(a) Operate the rear washer nozzle and check the position that the washer fluid contacts the back door glass.
Standard:
Washer fluid contacts the back door glass in the area shown in the illustration.
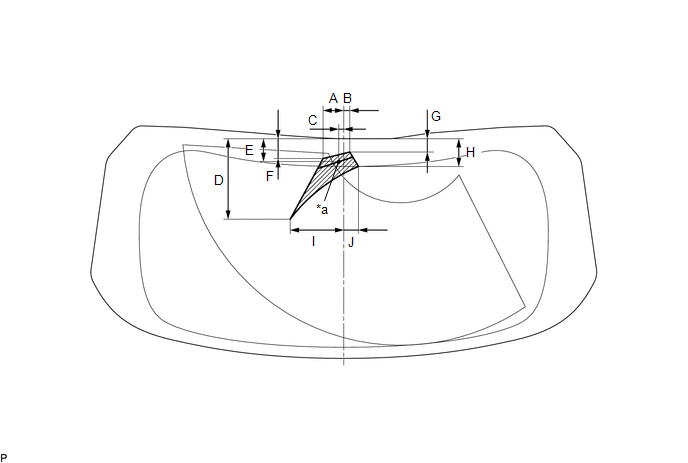
| *a | Center of washer fluid contact | - | - |
.png) | Measurement | - | - |
Standard Measurement:
| Area | Measurement | Area | Measurement |
|---|---|---|---|
| A | 55.5 mm (2.19 in.) | B | 16.5 mm (0.650 in.) |
| C | 14.2 mm (0.559 in.) | D | 218.1 mm (8.59 in.) |
| E | 61.4 mm (2.42 in.) | F | 53.6 mm (2.11 in.) |
| G | 34.8 mm (1.37 in.) | H | 76.4 mm (3.01 in.) |
| I | 145.1 mm (5.71 in.) | J | 39.8 mm (1.57 in.) |
HINT:
If the result is not as specified, replace the rear washer nozzle.
2. INSPECT REAR WASHER NOZZLE (w/ Rear No. 2 Seat)
(a) Operate the rear washer nozzle and check the position that the washer fluid contacts the back door glass.
Standard:
Washer fluid contacts the back door glass in the area shown in the illustration.
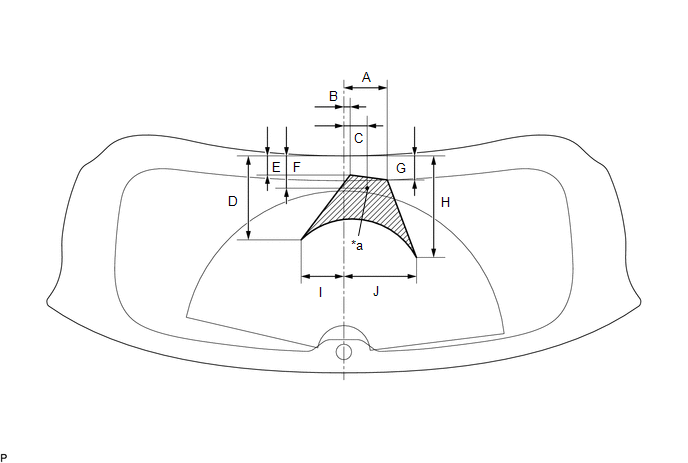
| *a | Center of washer fluid contact | - | - |
| | Measurement | - | - |
Standard Measurement:
| Area | Measurement | Area | Measurement |
|---|---|---|---|
| A | 98.6 mm (3.88 in.) | B | 14.8 mm (0.583 in.) |
| C | 53.1 mm (2.09 in.) | D | 188.4 mm (7.42 in.) |
| E | 42.8 mm (1.69 in.) | F | 71.8 mm (2.83 in.) |
| G | 54.7 mm (2.15 in.) | H | 227.3 mm (8.95 in.) |
| I | 96.0 mm (3.78 in.) | J | 163.2 mm (6.43 in.) |
HINT:
If the result is not as specified, replace the rear washer nozzle.
 Components
COMPONENTS ILLUSTRATION *A w/o Rear No. 2 Seat *B w/ Rear No. 2 Seat *1 REAR WASHER NOZZLE - - ...
 Removal
REMOVAL PROCEDURE 1. REMOVE REAR SPOILER SUB-ASSEMBLY Click here 2. REMOVE REAR WASHER NOZZLE (a) Disconnect the rear washer hose. *A w/o Rear No. 2 Seat *B w/ Rear No. 2 Sea ...
Other materials:
Lexus RX (RX 350L, RX450h) 2016-2026 Repair Manual > Sfi System: Evaporative Emission System Leak Detection Reference Orifice Low Flow (P043E00,P043F00,P24007E,P24007F,P24187E)
DTC SUMMARY DTC No. Detection Item DTC Detection Condition Trouble Area MIL Memory Note P043E00 Evaporative Emission System Leak Detection Reference Orifice Low Flow Reference orifice clogged during key-off EVAP monitor
Canister pump module
Wire harness or connector (ca ...
Lexus RX (RX 350L, RX450h) 2016-2026 Repair Manual > Automatic Transaxle System: Pressure Control Solenoid "H" Actuator Stuck Off (P28167F)
DESCRIPTION Based on signals from the transmission revolution sensors (NT, NC3 and NC), the actual gear is detected. The ECM compares the actual gear with the shift schedule in the ECM memory to detect mechanical malfunctions of the shift solenoid valves, transmission valve body assembly and automat ...
Lexus RX (RX 350L, RX450h) 2016-{YEAR} Owners Manual
- For your information
- Pictorial index
- For safety and security
- Instrument cluster
- Operation of each component
- Driving
- Lexus Display Audio system
- Interior features
- Maintenance and care
- When trouble arises
- Vehicle specifications
- For owners
Lexus RX (RX 350L, RX450h) 2016-{YEAR} Repair Manual

0.0107