
Lexus RX (RX 350L, RX450h) 2016-2026 Repair Manual: Lost Communication with Wiper System LIN BUS (B1373)
DESCRIPTION
The main body ECU (multiplex network body ECU) communicates with the windshield wiper motor and link assembly (wiper ECU), windshield wiper switch assembly and rain sensor via LIN communication. If a malfunction occurs in the LIN communication line and a communication error occurs, this DTC is stored.
| DTC No. | Detection Item | DTC Detection Condition | Trouble Area | Memory | DTC Output from |
|---|---|---|---|---|---|
| B1373 | Lost Communication with Wiper System LIN BUS | When the battery voltage is 9.5 V or more, a malfunction in the communication or LIN communication line between the main body ECU (multiplex network body ECU) and components of the wiper system occurs for 7 seconds or more 3 times consecutively. |
| ○ | Main body ECU (multiplex network body ECU) |
WIRING DIAGRAM
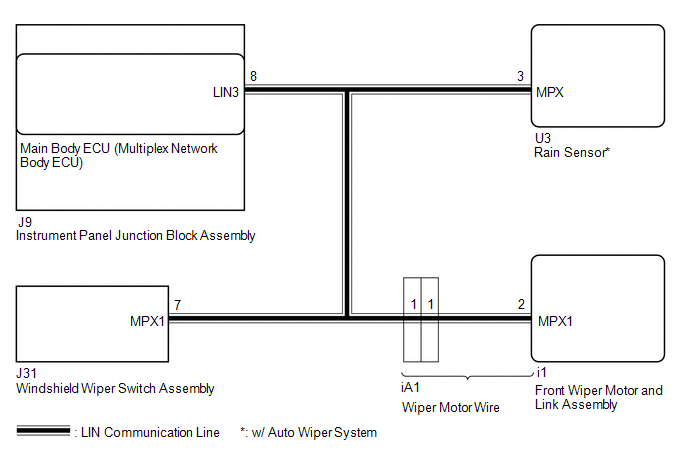
CAUTION / NOTICE / HINT
NOTICE:
Before replacing the main body ECU (multiplex network body ECU), refer to Service Bulletin.
PROCEDURE
| 1. | CHECK HARNESS AND CONNECTOR (MAIN BODY ECU (MULTIPLEX NETWORK BODY ECU) - FRONT WIPER MOTOR AND LINK ASSEMBLY) |
(a) Disconnect the J9 main body ECU (multiplex network body ECU) connector.
(b) Disconnect the i1 front wiper motor and link assembly connector.
(c) Disconnect the J31 windshield wiper switch assembly connector.
(d) Disconnect the U3 rain sensor connector (w/ Auto Wiper System).
(e) Measure the resistance according to the value(s) in the table below.
Standard Resistance:
| Tester Connection | Condition | Specified Condition |
|---|---|---|
| J9-8 (LIN3) - i1-2 (MPX1) | Always | Below 1 Ω |
| J9-8 (LIN3) - J31-7 (MPX1) | Always | Below 1 Ω |
| J9-8 (LIN3) - U3-3 (MPX) * | Always | Below 1 Ω |
| J9-8 (LIN3) or i1-2 (MPX1) or J31-7 (MPX1) - Body ground | Always | 10 kΩ or higher |
| J9-8 (LIN3) or i1-2 (MPX1) or J31-7 (MPX1) or U3-3 (MPX) - Body ground * | Always | 10 kΩ or higher |
- *: w/ Auto Wiper System
| NG | .gif) | GO TO STEP 5 |
|
.gif)
| 2. | CHECK FRONT WIPER MOTOR AND LINK ASSEMBLY |
(a) Reconnect the J9 main body ECU (multiplex network body ECU) connector.
(b) Reconnect the J31 windshield wiper switch assembly connector.
(c) Reconnect the U3 rain sensor connector (w/ Auto Wiper System).
(d) Turn the engine switch on (IG).
(e) Check for DTCs.
Click here .gif)
| Result | Proceed to |
|---|---|
| DTC B1373 is not output. | A |
| DTC B1373 is output. | B |
| A | | REPLACE FRONT WIPER MOTOR AND LINK ASSEMBLY |
|
| 3. | CHECK WINDSHIELD WIPER SWITCH ASSEMBLY |
(a) Disconnect the J31 windshield wiper switch assembly connector.
(b) Reconnect the i1 front wiper motor and link assembly connector.
(c) Turn the engine switch on (IG).
(d) Check for DTCs.
Click here
| Result | Proceed to |
|---|---|
| DTC B1373 is not output. | A |
| DTC B1373 is output (w/o Auto Wiper System). | B |
| DTC B1373 is output (w/ Auto Wiper System). | C |
| A | | REPLACE WINDSHIELD WIPER SWITCH ASSEMBLY |
| B | | REPLACE MAIN BODY ECU (MULTIPLEX NETWORK BODY ECU) |
|
| 4. | CHECK RAIN SENSOR |
(a) Disconnect the U3 rain sensor connector.
(b) Reconnect the J31 windshield wiper switch assembly connector.
(c) Turn the engine switch on (IG).
(d) Check for DTCs.
Click here
| Result | Proceed to |
|---|---|
| DTC B1373 is not output. | A |
| DTC B1373 is output. | B |
| A | | REPLACE RAIN SENSOR |
| B | | REPLACE MAIN BODY ECU (MULTIPLEX NETWORK BODY ECU) |
| 5. | CHECK WIPER MOTOR WIRE |
(a) Remove the wiper motor wire.
Click here
| (b) Measure the resistance according to the value(s) in the table below. Standard Resistance:
|
|
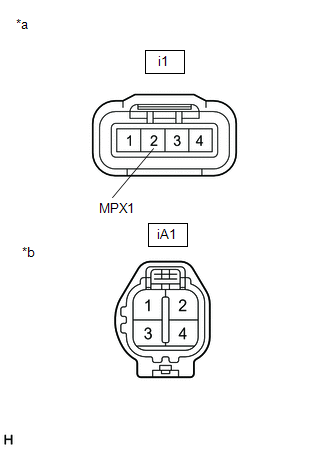
| OK | | REPAIR OR REPLACE HARNESS OR CONNECTOR |
| NG | | REPLACE WIPER MOTOR WIRE |
 Wiper Switch Signal Mismatch between LIN and Line (B1372)
DESCRIPTION Under normal operation, the front wiper motor and link assembly (wiper ECU) receives operation signals from the windshield wiper switch assembly via LIN communication. The windshield front ...
 Rain Sensor Malfunction (B1400)
DESCRIPTION This DTC is stored when the rain sensor detects an internal malfunction. DTC No. Detection Item DTC Detection Condition Trouble Area Memory DTC Output from B1400 Rain Se ...
Other materials:
Lexus RX (RX 350L, RX450h) 2016-2026 Repair Manual > Rear No. 1 Seat Inner Belt Assembly(for 60/40 Split Seat Type Rh Side): Installation
INSTALLATION PROCEDURE 1. INSTALL REAR SEAT 3 POINT TYPE BELT ASSEMBLY RH (a) Install the rear seat 3 point type belt assembly RH with the bolt. Torque: 42 N·m {428 kgf·cm, 31 ft·lbf} (b) Engage the 2 clamps. (c) Connect the connector. 2. INSTALL REAR NO. 1 SEAT RECLINING ADJUSTER INSIDE COVER C ...
Lexus RX (RX 350L, RX450h) 2016-2026 Repair Manual > Console Box Light (for Console Box Front Side): Inspection
INSPECTION PROCEDURE 1. INSPECT NO. 1 INTERIOR ILLUMINATION LIGHT ASSEMBLY (a) Inspect the No. 1 interior illumination light. (1) Apply battery voltage to each terminal of No. 1 interior illumination light connector and check the operation of the No. 1 interior illumination light. Result: Con ...
Lexus RX (RX 350L, RX450h) 2016-{YEAR} Owners Manual
- For your information
- Pictorial index
- For safety and security
- Instrument cluster
- Operation of each component
- Driving
- Lexus Display Audio system
- Interior features
- Maintenance and care
- When trouble arises
- Vehicle specifications
- For owners
Lexus RX (RX 350L, RX450h) 2016-{YEAR} Repair Manual

0.0108