Lexus RX (RX 350L, RX450h) 2016-2026 Repair Manual: Inspection
INSPECTION
PROCEDURE
1. INSPECT BACK DOOR LOCK ASSEMBLY
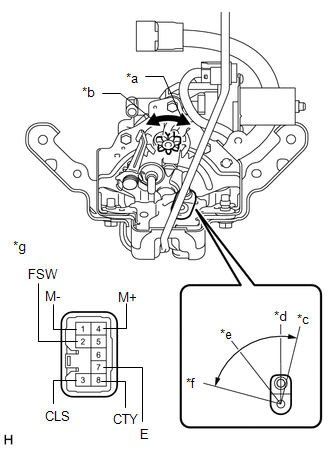
| *a | Clockwise |
| *b | Counterclockwise |
| *c | Over-latch |
| *d | Full-latch |
| *e | Half-latch |
| *f | Open-latch |
| *g | Component without harness connected (Back Door Lock Assembly) |
(a) Apply battery voltage to the door lock motor and check the operation of the door lock motor.
OK:
| Battery Connection | Result |
|---|---|
| Battery positive (+) → 4 (M+) Battery negative (-) → 1 (M-) | Latch turns to open-latch position (rotates clockwise) |
| Battery positive (+) → 1 (M-) Battery negative (-) → 4 (M+) | Latch turns to full-latch position (rotates counterclockwise) |
If the result is not as specified, replace the back door lock assembly.
(b) Check the operation of the latch switch.
(1) Measure the resistance according to the value(s) in the table below.
Standard Resistance:
| Tester Connection | Condition | Specified Condition |
|---|---|---|
| 3 (CLS) - 7 (E) | Full-latch | 10 kΩ or higher |
| 3 (CLS) - 7 (E) | Half-latch | 10 kΩ or higher |
| 3 (CLS) - 7 (E) | Half-latch → Open-latch | 10 kΩ or higher → Below 1 Ω |
| 3 (CLS) - 7 (E) | Open-latch | Below 1 Ω |
Standard Resistance:
| Tester Connection | Condition | Specified Condition |
|---|---|---|
| 3 (CLS) - 7 (E) | Open-latch | Below 1 Ω |
| 3 (CLS) - 7 (E) | Open-latch → Half-latch | Below 1 Ω → 10 kΩ or higher |
| 3 (CLS) - 7 (E) | Half-latch | 10 kΩ or higher |
| 3 (CLS) - 7 (E) | Full-latch | 10 kΩ or higher |
| 3 (CLS) - 7 (E) | Over-latch | 10 kΩ or higher |
If the result is not as specified, replace the back door lock assembly.
(c) Check the operation of the pawl switch.
(1) Measure the resistance according to the value(s) in the table below.
Standard Resistance:
| Tester Connection | Condition | Specified Condition |
|---|---|---|
| 2 (FSW) - 7 (E) | Open-latch | 10 kΩ or higher |
| 2 (FSW) - 7 (E) | Open-latch → Half-latch | 10 kΩ or higher → Below 1 Ω → 10 kΩ or higher |
| 2 (FSW) - 7 (E) | Half-latch | 10 kΩ or higher |
| 2 (FSW) - 7 (E) | Half-latch → Full-latch | 10 kΩ or higher → Below 1 Ω → 10 kΩ or higher |
| 2 (FSW) - 7 (E) | Full-latch | 10 kΩ or higher |
If the result is not as specified, replace the back door lock assembly.
(d) Check the operation of the back door courtesy switch.
(1) Measure the resistance according to the value(s) in the table below.
Standard Resistance:
| Tester Connection | Condition | Specified Condition |
|---|---|---|
| 8 (CTY) - 7 (E) | Open-latch | Below 1 Ω |
| 8 (CTY) - 7 (E) | Half-latch | Below 1 Ω |
| 8 (CTY) - 7 (E) | Half-latch → Full-latch | Below 1 Ω → 10 kΩ or higher |
| 8 (CTY) - 7 (E) | Full-latch | 10 kΩ or higher |
| 8 (CTY) - 7 (E) | Over-latch | 10 kΩ or higher |
If the result is not as specified, replace the back door lock assembly.
| (e) Check the operation of the selector switch. (1) Measure the resistance according to the value(s) in the table below. Standard Resistance:
If the result is not as specified, replace the back door lock assembly. |
|
 Removal
REMOVAL PROCEDURE 1. REMOVE BACK WINDOW UPPER PANEL TRIM (w/o Rear No. 2 Seat) Click here 2. REMOVE BACK WINDOW UPPER PANEL TRIM (w/ Rear No. 2 Seat) Click here 3. REMOVE BACK DOOR TRIM COVER LH ...
 Installation
INSTALLATION PROCEDURE 1. INSTALL BACK DOOR LOCK ASSEMBLY HINT: Make sure to remove the string before installing a new back door lock assembly. (a) Apply MP grease to the sliding parts of the back doo ...
Other materials:
Lexus RX (RX 350L, RX450h) 2016-2026 Repair Manual > Front Console Box: Removal
REMOVAL PROCEDURE 1. REMOVE REAR CONSOLE UPPER PANEL (a) Disengage the 3 clips and 2 claws in the direction indicated by the arrow (1). Place Hand Here Remove in this Direction (1) Remove in this Direction (2) (b) Pull the rear console upper panel in the direction indicated b ...
Lexus RX (RX 350L, RX450h) 2016-2026 Repair Manual > Power Steering System: Problem Symptoms Table
PROBLEM SYMPTOMS TABLE HINT:
Use the table below to help determine the cause of problem symptoms. If multiple suspected areas are listed, the potential causes of the symptoms are listed in order of probability in the "Suspected Area" column of the table.
Check each symptom by checking the suspe ...
Lexus RX (RX 350L, RX450h) 2016-{YEAR} Owners Manual
- For your information
- Pictorial index
- For safety and security
- Instrument cluster
- Operation of each component
- Driving
- Lexus Display Audio system
- Interior features
- Maintenance and care
- When trouble arises
- Vehicle specifications
- For owners
Lexus RX (RX 350L, RX450h) 2016-{YEAR} Repair Manual

0.0092