Lexus RX (RX 350L, RX450h) 2016-2026 Repair Manual: On-vehicle Inspection
ON-VEHICLE INSPECTION
PROCEDURE
1. INSPECT AIR CONDITIONER PRESSURE SENSOR
(a) Check the wire harness.
(1) Disconnect the A9 air conditioner pressure sensor connector.
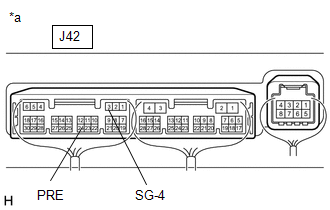
(2) Disconnect the J42 air conditioning amplifier assembly connector.
(3) Measure the resistance according to the value(s) in the table below.
Standard Resistance:
| Tester Connection | Condition | Specified Condition |
|---|---|---|
| A9-1 (-) - J42-3 (SG-4) | Always | Below 1 Ω |
| A9-2 (PR) - J42-24 (PRE) | Always | Below 1 Ω |
| A9-3 (+) - J42-6 (S5-3) | Always | Below 1 Ω |
| A9-1 (-) - Body ground | Always | 10 kΩ or higher |
| A9-2 (PR) - Body ground | Always | 10 kΩ or higher |
| A9-3 (+) - Body ground | Always | 10 kΩ or higher |
If the resistance is not as specified, repair the wire harness.
(4) Reconnect the J42 air conditioning amplifier assembly connector.
(5) Turn the engine switch on (IG).
(6) Measure the voltage according to the value(s) in the table below.
Standard Voltage:
| Tester Connection | Condition | Specified Condition |
|---|---|---|
| A9-3 (+) - Body ground | Engine switch on (IG) | 4.75 to 5.25 V |
If the voltage is not as specified, repair the wire harness or replace air conditioning amplifier assembly.
(b) Check the air conditioner pressure sensor.
(1) Connect the connector to the air conditioner pressure sensor.
(2) Install a manifold gauge set.
(3) Warm up the engine.
(4) Turn the A/C switch on.
| (5) Measure the voltage according to the value(s) in the table below. HINT: Check from the rear of the connector while it is connected to the air conditioning amplifier assembly. Standard Voltage:
If the voltage is not as specified, replace the air conditioner pressure sensor. |
|
 Components
COMPONENTS ILLUSTRATION *1 AIR CONDITIONER PRESSURE SENSOR - - N*m (kgf*cm, ft.*lbf): Specified torque ● Non-reusable part Compressor oil ND-OIL 12 or equivalent - - ...
 Removal
REMOVAL PROCEDURE 1. RECOVER REFRIGERANT FROM REFRIGERATION SYSTEM Click here 2. REMOVE AIR CONDITIONER PRESSURE SENSOR (a) Disconnect the connector. (b) Using a 27 mm deep socket wrench, remov ...
Other materials:
Lexus RX (RX 350L, RX450h) 2016-2026 Repair Manual > Vacuum Warning Switch: Installation
INSTALLATION PROCEDURE 1. INSTALL CHECK VALVE GROMMET (a) Install a new check valve grommet to the brake booster assembly. 2. INSTALL VACUUM WARNING SWITCH ASSEMBLY (for TMC Made) (a) Install the vacuum warning switch assembly to the brake booster assembly as shown in the illustration. *a 30° ...
Lexus RX (RX 350L, RX450h) 2016-2026 Repair Manual > Front Console Box: Components
COMPONENTS ILLUSTRATION *1 CONSOLE BOX ASSEMBLY *2 CONSOLE PANEL SUB-ASSEMBLY *3 CONSOLE REAR END PANEL SUB-ASSEMBLY *4 INSTRUMENT CLUSTER FINISH PANEL ORNAMENT *5 INSTRUMENT PANEL CUP HOLDER ASSEMBLY *6 LOWER NO. 1 INSTRUMENT PANEL FINISH PANEL *7 LOWER NO. 2 INS ...
Lexus RX (RX 350L, RX450h) 2016-{YEAR} Owners Manual
- For your information
- Pictorial index
- For safety and security
- Instrument cluster
- Operation of each component
- Driving
- Lexus Display Audio system
- Interior features
- Maintenance and care
- When trouble arises
- Vehicle specifications
- For owners
Lexus RX (RX 350L, RX450h) 2016-{YEAR} Repair Manual

0.0119