
Lexus RX (RX 350L, RX450h) 2016-2026 Repair Manual: Rear Blower Motor Circuit
DESCRIPTION
The rear blower motor with fan sub-assembly is operated by signals from the air conditioning amplifier assembly. Rear blower motor speed signals are transmitted in accordance with changes in the duty ratio.
WIRING DIAGRAM
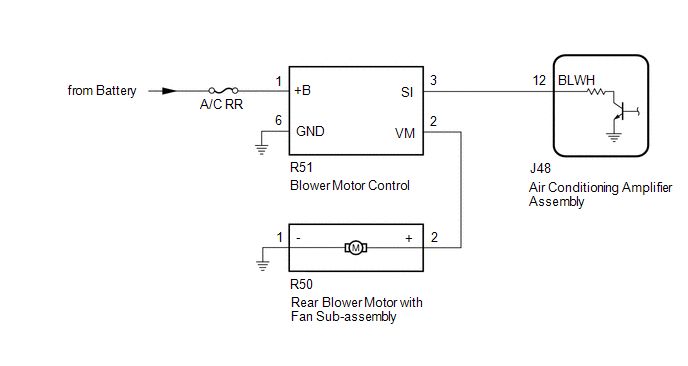
CAUTION / NOTICE / HINT
NOTICE:
Inspect the fuses for circuits related to this system before performing the following procedure.
PROCEDURE
| 1. | PERFORM ACTIVE TEST USING TECHSTREAM |
(a) Connect the Techstream to the DLC3.
(b) Turn the engine switch on (IG).
(c) Turn the Techstream on.
(d) Enter the following menus: Body Electrical / Air Conditioner / Active Test.
(e) Check the operation by referring to the table below.
Body Electrical > Air Conditioner > Active Test| Tester Display | Measurement Item | Control Range | Diagnostic Note |
|---|---|---|---|
| Rear Blower Motor | Rear blower motor with fan sub-assembly | Min.: 0 Max.: 31 | - |
| Tester Display |
|---|
| Rear Blower Motor |
| OK | .gif) | PROCEED TO NEXT SUSPECTED AREA SHOWN IN PROBLEM SYMPTOMS TABLE |
|
.gif)
| 2. | CHECK HARNESS AND CONNECTOR (BLOWER MOTOR CONTROL - POWER SOURCE AND BODY GROUND) |
(a) Disconnect the R51 blower motor control connector.
(b) Measure the voltage and resistance according to the value(s) in the table below.
Standard Voltage:
| Tester Connection | Condition | Specified Condition |
|---|---|---|
| R51-1 (+B) - Body ground | Always | 11 to 14 V |
Standard Resistance:
| Tester Connection | Condition | Specified Condition |
|---|---|---|
| R51-6 (GND) - Body ground | Always | Below 1 Ω |
| NG | | REPAIR OR REPLACE HARNESS OR CONNECTOR |
|
| 3. | CHECK HARNESS AND CONNECTOR (BLOWER MOTOR CONTROL - AIR CONDITIONING AMPLIFIER ASSEMBLY) |
(a) Disconnect the J48 air conditioning amplifier assembly connector.
(b) Measure the resistance according to the value(s) in the table below.
Standard Resistance:
| Tester Connection | Condition | Specified Condition |
|---|---|---|
| R51-3 (SI) - J48-12 (BLWH) | Always | Below 1 Ω |
| R51-3 (SI) or J48-12 (BLWH) - Other terminals and body ground | Always | 10 kΩ or higher |
| NG | | REPAIR OR REPLACE HARNESS OR CONNECTOR |
|
| 4. | CHECK HARNESS AND CONNECTOR (REAR BLOWER MOTOR WITH FAN SUB-ASSEMBLY - BLOWER MOTOR CONTROL AND BODY GROUND) |
(a) Measure the resistance according to the value(s) in the table below.
Standard Resistance:
| Tester Connection | Condition | Specified Condition |
|---|---|---|
| R50-2 (+) - R51-2 (VM) | Always | Below 1 Ω |
| R50-1 (-) - Body ground | Always | Below 1 Ω |
| R50-2 (+) or R51-2 (VM) - Other terminals and body ground | Always | 10 kΩ or higher |
| NG | | REPAIR OR REPLACE HARNESS OR CONNECTOR |
|
| 5. | INSPECT AIR CONDITIONING AMPLIFIER ASSEMBLY |
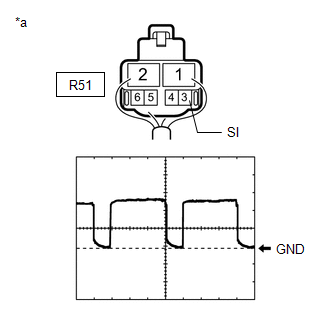
| *a | Component with harness connected (Blower Motor Control) |
(a) Connect the J48 air conditioning amplifier assembly connector.
(b) Measure the waveform.
OK:
Waveform is similar to that shown in the illustration.
| Item | Content |
|---|---|
| Terminal No. | R51-3 (SI) - Body ground |
| Tool Setting | 2 V/DIV., 500 μs./DIV. |
| Vehicle Condition |
|
HINT:
The waveform varies with the blower level.
| NG | | REPLACE AIR CONDITIONING AMPLIFIER ASSEMBLY |
|
| 6. | INSPECT REAR BLOWER MOTOR WITH FAN SUB-ASSEMBLY |
(a) Remove the rear blower motor with fan sub-assembly connector.
Click here .gif)
(b) Inspect the rear blower motor with fan sub-assembly connector.
Click here
| OK | | REPLACE BLOWER MOTOR CONTROL |
| NG | | REPLACE REAR BLOWER MOTOR WITH FAN SUB-ASSEMBLY |
 PTC Heater Circuit
DESCRIPTION The air conditioning amplifier assembly sends operation signals to the PTC heater relays when quick heater assembly operation conditions are met. Based on the signals from the air conditio ...
 Back-up Power Source Circuit
DESCRIPTION The back-up power source circuit for the air conditioning amplifier assembly is shown below. Power is supplied even when the engine switch is off. This power is used for diagnostic trouble ...
Other materials:
Lexus RX (RX 350L, RX450h) 2016-2026 Repair Manual > Rear Door Outside Moulding: Removal
REMOVAL CAUTION / NOTICE / HINT HINT:
Use the same procedures for the RH side and LH side.
The following procedure is for the LH side.
PROCEDURE 1. REMOVE REAR DOOR OUTSIDE MOULDING SUB-ASSEMBLY (a) Disengage the clip. (b) Using a moulding remover, disengage the 5 claws and tu ...
Lexus RX (RX 350L, RX450h) 2016-2026 Repair Manual > Rear Seat Inner Belt Assembly(for Lh Side): Inspection
INSPECTION PROCEDURE 1. INSPECT REAR SEAT INNER BELT ASSEMBLY LH (a) Measure the resistance according to the value(s) in the table below. Standard Resistance: Tester Connection Condition Specified Condition 3 - 4 Rear seat belt LH unfastened Below 1 Ω Rear seat belt LH fasten ...
Lexus RX (RX 350L, RX450h) 2016-{YEAR} Owners Manual
- For your information
- Pictorial index
- For safety and security
- Instrument cluster
- Operation of each component
- Driving
- Lexus Display Audio system
- Interior features
- Maintenance and care
- When trouble arises
- Vehicle specifications
- For owners
Lexus RX (RX 350L, RX450h) 2016-{YEAR} Repair Manual

0.0108