Lexus RX (RX 350L, RX450h) 2016-2026 Repair Manual: Reassembly
REASSEMBLY
PROCEDURE
1. INSTALL MAGNET CLUTCH ASSEMBLY
(a) Secure the compressor and magnetic clutch in a vise between aluminum plates.
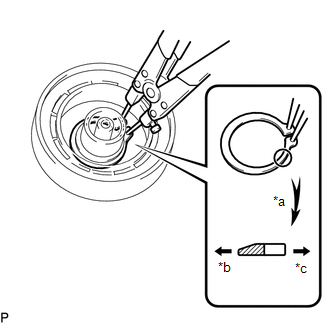
| (b) Install the magnet clutch stator with the parts aligned as shown in the illustration. |
|

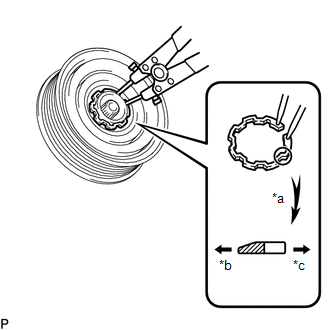
| (c) Using a snap ring expander, install a new snap ring with the chamfered side facing outward. NOTICE: When installing the snap ring, do not widen it excessively. |
|
(d) Connect the connector.
| (e) Using a snap ring expander, install the magnet clutch rotor and a new snap ring with the chamfered side facing outward. NOTICE:
|
|
(f) Install the magnet clutch washer(s) and magnet clutch hub.
NOTICE:
Use the same magnet clutch washer(s) as removed during disassembly.
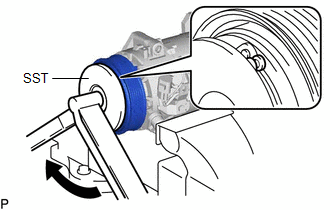
| (g) Using SST, hold the magnet clutch hub and install the bolt. SST: 09985-00270 Torque: 18 N·m {184 kgf·cm, 13 ft·lbf} NOTICE: Make sure that there is no foreign matter or oil on the compressor shaft, bolt and magnet clutch hub before installing the bolt. |
|
2. INSPECT MAGNET CLUTCH CLEARANCE
| (a) Set a dial indicator to the magnet clutch hub. |
|
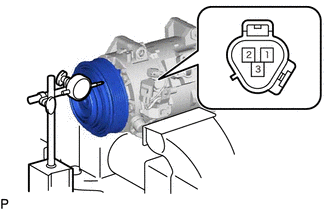
(b) Connect a positive (+) lead from the battery to terminal 3 of the magnet clutch connector and a negative (-) lead to the ground wire. Turn the magnet clutch on and off and measure the clearance.
Standard Clearance:
0.26 to 0.60 mm (0.0102 to 0.0236 in.)
If the measured value is not within the standard clearance, remove the magnet clutch hub and adjust the clearance using magnet clutch washers to obtain the standard clearance.
Magnet Clutch Washer Thickness:
0.1 mm (0.00394 in.)
0.3 mm (0.0118 in.)
0.5 mm (0.0197 in.)
NOTICE:
Adjustment should be performed with 3 or fewer magnet clutch washers.
(c) Remove the compressor and magnetic clutch from the vise.
3. INSTALL COOLER COMPRESSOR BRACKET
| (a) Install the cooler compressor bracket with the screw. |
|
.png)
(b) Engage the clamp.
 Installation
INSTALLATION PROCEDURE 1. ADJUST COMPRESSOR OIL (a) When replacing the compressor and magnetic clutch with a new one: (1) Remove the drain bolt (seal washer) from a new compressor and magnetic clut ...
 Condenser
...
Other materials:
Lexus RX (RX 350L, RX450h) 2016-2026 Repair Manual > Intelligent Clearance Sonar System: ICS Detection Area Adjustment Incomplete (C1AF0)
DESCRIPTION When ICS detection area adjustment is incomplete, the clearance warning ECU assembly stores DTC C1AF0. DTC No. Detection Item DTC Detection Condition Trouble Area C1AF0 ICS Detection Area Adjustment Incomplete ICS detection area adjustment incomplete
Intelligent cle ...
Lexus RX (RX 350L, RX450h) 2016-2026 Repair Manual > Parking Assist Monitor System: How To Proceed With Troubleshooting
CAUTION / NOTICE / HINT HINT:
Use the following procedure to troubleshoot the parking assist monitor system.
*: Use the Techstream.
PROCEDURE 1. VEHICLE BROUGHT TO WORKSHOP
NEXT 2. CUSTOMER PROBLEM ANALYSIS (a) Ask the customer about the problems and the co ...
Lexus RX (RX 350L, RX450h) 2016-{YEAR} Owners Manual
- For your information
- Pictorial index
- For safety and security
- Instrument cluster
- Operation of each component
- Driving
- Lexus Display Audio system
- Interior features
- Maintenance and care
- When trouble arises
- Vehicle specifications
- For owners
Lexus RX (RX 350L, RX450h) 2016-{YEAR} Repair Manual

0.0093