Lexus RX (RX 350L, RX450h) 2016-2026 Repair Manual: Front Door Courtesy Switch
Components
COMPONENTS
ILLUSTRATION
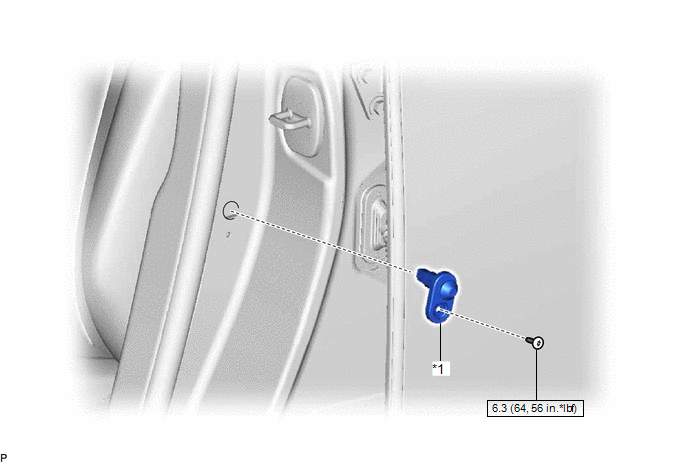
| *1 | FRONT DOOR COURTESY LIGHT SWITCH ASSEMBLY | - | - |
.png) | N*m (kgf*cm, ft.*lbf): Specified torque | - | - |
Removal
REMOVAL
CAUTION / NOTICE / HINT
HINT:
- Use the same procedure for the RH side and LH side.
- The following procedure is for the LH side.
PROCEDURE
1. REMOVE FRONT DOOR COURTESY LIGHT SWITCH ASSEMBLY
| (a) Using a T30 "TORX" socket wrench, remove the screw. |
|
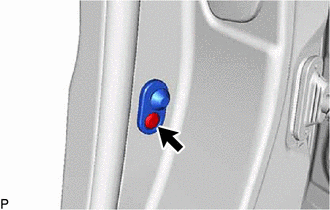
(b) Disconnect the connector to remove the front door courtesy light switch assembly.
Inspection
INSPECTION
PROCEDURE
1. INSPECT FRONT DOOR COURTESY LIGHT SWITCH ASSEMBLY
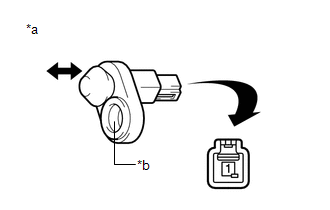
| (a) Measure the resistance according to the value(s) in the table below. Standard Resistance:
If the result is not as specified, replace the front door courtesy light switch assembly. |
|
Installation
INSTALLATION
CAUTION / NOTICE / HINT
HINT:
- Use the same procedure for the RH side and LH side.
- The following procedure is for the LH side.
PROCEDURE
1. INSTALL FRONT DOOR COURTESY LIGHT SWITCH ASSEMBLY
(a) Connect the connector.
(b) Using a T30 "TORX" socket wrench, install the front door courtesy light switch assembly with the screw.
Torque:
6.3 N·m {64 kgf·cm, 56 in·lbf}
 Installation
INSTALLATION PROCEDURE 1. INSTALL NO. 1 INTERIOR ILLUMINATION LIGHT ASSEMBLY LH (for Driver Side) (a) Engage the 2 claws to install the No. 1 interior illumination light assembly LH. 2. INSTALL NO. 1 ...
 Glove Box Light
...
Other materials:
Lexus RX (RX 350L, RX450h) 2016-2026 Repair Manual > Rear Seatback Heater (for 60/40 Split Seat Type Lh Side): Inspection
INSPECTION PROCEDURE 1. INSPECT SEAT HEATER ASSEMBLY (a) Measure the resistance according to the value(s) in the table below. Standard Resistance: Tester Connection Condition Specified Condition 1 - 2 Seat heater temperature 20 °C (68 °F) 3.98 to 4.78 Ω If the result is not ...
Lexus RX (RX 350L, RX450h) 2016-2026 Repair Manual > Lighting System (w/ Automatic Headlight Beam Level Control System): Vehicle Speed Sensor (B2415)
DESCRIPTION The No. 1 headlight ECU sub-assembly LH receives speed signals from the skid control ECU (brake actuator assembly) via CAN communication and performs light control. DTC No. Detection Item DTC Detection Condition Trouble Area DTC Output from B2415 Vehicle Speed Sensor ...
Lexus RX (RX 350L, RX450h) 2016-{YEAR} Owners Manual
- For your information
- Pictorial index
- For safety and security
- Instrument cluster
- Operation of each component
- Driving
- Lexus Display Audio system
- Interior features
- Maintenance and care
- When trouble arises
- Vehicle specifications
- For owners
Lexus RX (RX 350L, RX450h) 2016-{YEAR} Repair Manual

0.0104