Lexus RX (RX 350L, RX450h) 2016-2026 Repair Manual: Terminals Of Ecu
TERMINALS OF ECU
CHECK AIR CONDITIONING AMPLIFIER ASSEMBLY
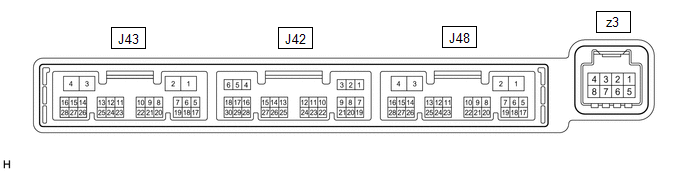
(a) Disconnect the J43 air conditioning amplifier assembly connector.
(b) Measure the voltage and resistance according to the value(s) in the table below.
HINT:
Measure the values on the wire harness side with the connector disconnected.
| Terminal No. (Symbol) | Wiring Color | Terminal Description | Condition | Specified Condition |
|---|---|---|---|---|
| J43-2 (IG+) - Body ground | GR - Body ground | Air conditioning amplifier power supply | Engine switch off | Below 1 V |
| J43-2 (IG+) - Body ground | GR - Body ground | Air conditioning amplifier power supply | Engine switch on (IG) | 11 to 14 V |
| J43-4 (GND) - Body ground | W-B - Body ground | Air conditioning amplifier ground | Always | Below 1 Ω |
(c) Reconnect the J43 air conditioning amplifier assembly connector.
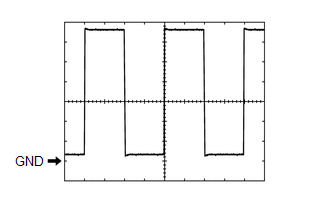
(d) Check for pulses according to the value(s) in the table below.
| Terminal No. (Symbol) | Wiring Color | Terminal Description | Condition | Specified Condition |
|---|---|---|---|---|
| J43-24 (LOUT) - Body ground | GR - Body ground | Climate control blower control signal |
| Pulse generation (See waveform) |
| J43-23 (ROUT) - Body ground | BE - Body ground | Climate control blower control signal |
| Pulse generation (See waveform) |
| J43-14 (LIN1) - Body ground | G - Body ground | Refreshing seat switch signal | Engine switch on (IG) | Pulse generation |
(1) Waveform (Reference):
 Measurement Condition
 | Item | Content |
|---|---|
| Tester Connection |
|
| Tool Setting | 1 V/DIV., 1 ms/DIV. |
| Vehicle Condition |
|
REFRESHING SEAT SWITCH (FOR FRONT SIDE)

(a) Disconnect the J82 refreshing seat switch (for front side) connector.
(b) Measure the voltage and resistance according to the value(s) in the table below.
HINT:
Measure the values on the wire harness side with the connector disconnected.
| Terminal No. (Symbol) | Wiring Color | Terminal Description | Condition | Specified Condition |
|---|---|---|---|---|
| J82-2 (IG) - Body ground | L - Body ground | Refreshing seat switch power (for front side) supply | Engine switch off | Below 1 V |
| J82-2 (IG) - Body ground | L - Body ground | Refreshing seat switch power (for front side) supply | Engine switch on (IG) | 11 to 14 V |
| J82-7 (E) - Body ground | W-B - Body ground | Refreshing seat switch (for front side) ground | Always | Below 1 Ω |
(c) Reconnect the J82 refreshing seat switch connector.
(d) Check for pulses according to the value(s) in the table below.
| Terminal No. (Symbol) | Wiring Color | Terminal Description | Condition | Specified Condition |
|---|---|---|---|---|
| J82-4 (LIN1) - Body ground | G - Body ground | Refreshing seat switch (for front side) signal | Engine switch on (IG) | Pulse generation |
 Problem Symptoms Table
PROBLEM SYMPTOMS TABLE NOTICE: If the battery voltage is low, the climate control seat system may not operate. When "Operation of Electrical Items Restricted." is displayed on the multi-information di ...
 Diagnosis System
DIAGNOSIS SYSTEM CHECK DLC3 (a) Check the DLC3. Click here INSPECT BATTERY VOLTAGE (a) Check the battery voltage. Standard Voltage: 11 to 14 V If the voltage is below 11 V, recharge or replace the ...
Other materials:
Lexus RX (RX 350L, RX450h) 2016-2026 Repair Manual > Automatic Transaxle System: Pressure Control Solenoid "B" Circuit Open (P077513)
DESCRIPTION Changing gears is performed by the ECM turning the shift solenoid valves SL1, SL2, SL3, SL4 and SL5 on and off. If an open or short occurs in any of the shift solenoid valve circuits, the ECM controls the remaining normal shift solenoid valves to allow the vehicle to be driven. If all of ...
Lexus RX (RX 350L, RX450h) 2016-2026 Repair Manual > Lin Communication System: Diagnosis System
DIAGNOSIS SYSTEM DESCRIPTION The main body ECU (multiplex network body ECU) and certification ECU (smart key ECU assembly) control the LIN communication system. LIN communication system data and Diagnostic Trouble Codes (DTCs) can be read through the Data Link Connector 3 (DLC3). When the system see ...
Lexus RX (RX 350L, RX450h) 2016-{YEAR} Owners Manual
- For your information
- Pictorial index
- For safety and security
- Instrument cluster
- Operation of each component
- Driving
- Lexus Display Audio system
- Interior features
- Maintenance and care
- When trouble arises
- Vehicle specifications
- For owners
Lexus RX (RX 350L, RX450h) 2016-{YEAR} Repair Manual

0.009