Lexus RX (RX 350L, RX450h) 2016-2026 Repair Manual: Removal
REMOVAL
CAUTION / NOTICE / HINT
The necessary procedures (adjustment, calibration, initialization or registration) that must be performed after parts are removed and installed, or replaced during lumbar support adjuster assembly removal/installation are shown below.
Necessary Procedures After Parts Removed/Installed/Replaced| Replaced Part or Performed Procedure | Necessary Procedure | Effect/Inoperative Function when Necessary Procedure not Performed | Link |
|---|---|---|---|
|
*: When performing learning using the Techstream.
Click here | |||
| Disconnect cable from negative battery terminal | Memorize steering angle neutral point | Lane Control System | |
| Pre-collision System | |||
| Intelligent Clearance Sonar System* | |||
| Parking Assist Monitor System | | ||
| Panoramic View Monitor System | | ||
| Lighting System (w/ Automatic Headlight Beam Level Control System) | | ||
| Initialize back door lock | Power Door Lock Control System | | |
| Reset back door close position | Power Back Door System (w/ Outside Door Control Switch) | | |
| Initialize position control ECU | Front Power Seat Control System (w/ Memory) | |
CAUTION:
Wear protective gloves. Sharp areas on the parts may injure your hands.
HINT:
- Use the same procedure for the RH side and LH side.
- The following procedure is for the LH side.
PROCEDURE
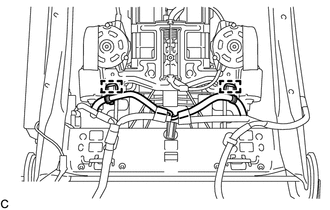
1. REMOVE FRONT SEAT ASSEMBLY
Click here .gif)
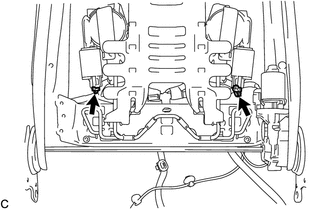
2. DISCONNECT FRONT SEATBACK BOARD SUB-ASSEMBLY
Click here
3. REMOVE FRONT SEAT CUSHION SHIELD (for Standard Seat Type)
Click here
4. REMOVE INNER NO. 1 FRONT SEAT CUSHION SHIELD (for Standard Seat Type)
Click here
5. REMOVE INNER NO. 1 FRONT SEAT CUSHION SHIELD (for Sports Seat Type)
Click here
6. REMOVE FRONT SEAT CUSHION SHIELD (for Sports Seat Type)
Click here
7. REMOVE FRONT SEAT INNER CUSHION SHIELD
Click here
8. REMOVE SEPARATE TYPE FRONT SEATBACK ASSEMBLY
Click here
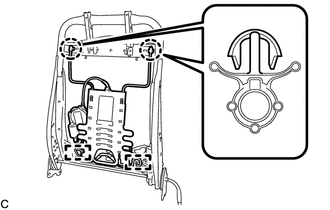
9. REMOVE FRONT SEATBACK BOARD SUB-ASSEMBLY
Click here
10. REMOVE FRONT SEAT HEADREST SUPPORT
Click here
11. REMOVE SEPARATE TYPE FRONT SEATBACK COVER WITH PAD (for Standard Seat Type)
Click here
12. REMOVE FRONT SEATBACK PAD WITH COVER (for Sports Seat Type)
Click here
13. REMOVE SEATBACK FELT
Click here
14. REMOVE FRONT SEATBACK EDGE PROTECTOR
Click here
15. REMOVE LUMBAR SUPPORT ADJUSTER ASSEMBLY
(a) w/o Variable Seat Cushion System:
| (1) Disconnect the lumbar support adjuster assembly connector. |
|

(2) Disengage the clamp.
(b) w/ Variable Seat Cushion System:
| (1) Disengage the 2 clamps. |
|
| (2) Disconnect the 2 lumbar support adjuster assembly connectors. |
|
| (c) Disengage the 2 claws. |
|
(d) Disengage the 2 guides to remove the lumbar support adjuster assembly from the front seatback frame sub-assembly.
16. REMOVE FRONT SEATBACK HOOK
Click here
 Inspection
INSPECTION PROCEDURE 1. INSPECT LUMBAR SUPPORT ADJUSTER ASSEMBLY LH (w/ Seat Variable Cushion Switch) (a) Check the operation of the lumbar support adjuster assembly LH. (1) Check that the front se ...
 Installation
INSTALLATION CAUTION / NOTICE / HINT CAUTION: Wear protective gloves. Sharp areas on the parts may injure your hands. HINT:
Use the same procedure for the RH side and LH side.
The following proce ...
Other materials:
Lexus RX (RX 350L, RX450h) 2016-2026 Owners Manual > Basic operation of the
Remote Touch screen: Remote Touch
The Remote Touch can be used to operate the Remote Touch screens.
For details, refer to the "NAVIGATION SYSTEM OWNER'S MANUAL".
Vehicles with 8-inch display
Vehicles with 12.3-inch display
"HOME" button
Press this button to display the home screen.
*
button
Press this button t ...
Lexus RX (RX 350L, RX450h) 2016-2026 Repair Manual > Smart Access System With Push-button Start (for Entry Function): Open in Inside Luggage Compartment Electrical Key Oscillator Circuit (B27A7)
DESCRIPTION The certification ECU (smart key ECU assembly) generates a request signal and transmits the signal to the No. 3 indoor electrical key antenna assembly (inside luggage compartment). For the No. 3 indoor electrical key antenna assembly (inside luggage compartment) to detect when the electr ...
Lexus RX (RX 350L, RX450h) 2016-{YEAR} Owners Manual
- For your information
- Pictorial index
- For safety and security
- Instrument cluster
- Operation of each component
- Driving
- Lexus Display Audio system
- Interior features
- Maintenance and care
- When trouble arises
- Vehicle specifications
- For owners
Lexus RX (RX 350L, RX450h) 2016-{YEAR} Repair Manual

0.0134