Lexus RX (RX 350L, RX450h) 2016-2026 Repair Manual: Removal
REMOVAL
PROCEDURE
1. REMOVE POWER SEAT SWITCH ASSEMBLY (for 60/40 Split Seat Type RH Side)
(a) Using a moulding remover A, disengage the 2 claws as shown in the illustration.
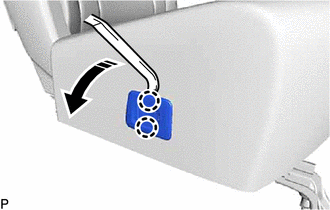
.png) | Remove in this Direction |
| (b) Disconnect the connector to remove the power seat switch assembly. |
|
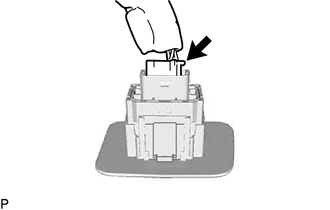
2. REMOVE REAR POWER SEAT SWITCH RH (for 60/40 Split Seat Type RH Side)
(a) Disengage the 2 claws to remove the rear power seat switch RH as shown in the illustration.

| | Remove in this Direction |
3. REMOVE POWER SEAT SWITCH ASSEMBLY (for 60/40 Split Seat Type LH Side)
HINT:
Use the same procedure as for the RH side.
4. REMOVE REAR POWER SEAT SWITCH LH (for 60/40 Split Seat Type LH Side)
HINT:
Use the same procedure as for the RH side.
5. REMOVE FOLD SEAT SWITCH ASSEMBLY (for Luggage Compartment)
(a) Using a moulding remover A, disengage the 4 claws as shown in the illustration.
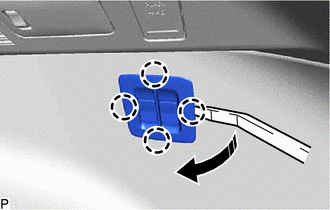
| | Remove in this Direction |
(b) Disconnect the connector to remove the fold seat switch assembly.
 Components
COMPONENTS ILLUSTRATION *A for 60/40 Split Seat Type RH Side - - *1 POWER SEAT SWITCH ASSEMBLY *2 REAR POWER SEAT SWITCH RH *3 RECLINING REMOTE CONTROL BEZEL RH - - IL ...
 Inspection
INSPECTION PROCEDURE 1. INSPECT REAR POWER SEAT SWITCH LH (a) for LH Side: (1) Measure the resistance according to the value(s) in the table below. Standard Resistance: Tester Connection Cond ...
Other materials:
Lexus RX (RX 350L, RX450h) 2016-2026 Repair Manual > Lighting System (w/o Automatic Headlight Beam Level Control System): Dtc Check / Clear
DTC CHECK / CLEAR CHECK FOR DTC (MAIN BODY) (a) Connect the Techstream to the DLC3. (b) Turn the engine switch on (IG). (c) Turn the Techstream on. (d) Enter the following menus: Body Electrical / Main Body / Trouble Codes. Body Electrical > Main Body > Trouble Codes (e) Check for DTCs. CHECK ...
Lexus RX (RX 350L, RX450h) 2016-2026 Repair Manual > Rear Seat Outer Belt Assembly: Disposal
DISPOSAL CAUTION / NOTICE / HINT CAUTION: Before performing pre-disposal deployment of any SRS part, review and closely follow all applicable environmental and hazardous material regulations. Pre-disposal deployment may be considered hazardous material treatment. PROCEDURE 1. PRECAUTION CAUTION:
...
Lexus RX (RX 350L, RX450h) 2016-{YEAR} Owners Manual
- For your information
- Pictorial index
- For safety and security
- Instrument cluster
- Operation of each component
- Driving
- Lexus Display Audio system
- Interior features
- Maintenance and care
- When trouble arises
- Vehicle specifications
- For owners
Lexus RX (RX 350L, RX450h) 2016-{YEAR} Repair Manual

0.0104