Lexus RX (RX 350L, RX450h) 2016-2026 Repair Manual: Inspection
INSPECTION
PROCEDURE
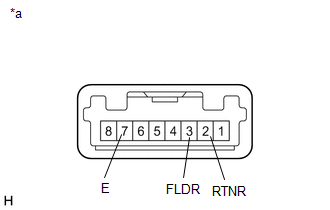
1. INSPECT REAR POWER SEAT SWITCH LH
(a) for LH Side:
| (1) Measure the resistance according to the value(s) in the table below. Standard Resistance:
If the result is not as specified, replace the rear power seat switch. |
|

2. INSPECT REAR POWER SEAT SWITCH RH
(a) for RH Side:
| (1) Measure the resistance according to the value(s) in the table below. Standard Resistance:
If the result is not as specified, replace the rear power seat switch. |
|
3. INSPECT FOLD SEAT SWITCH ASSEMBLY
| (a) Measure the resistance according to the value(s) in the table below. Standard Resistance:
If the result is not as specified, replace the fold seat switch assembly. |
|
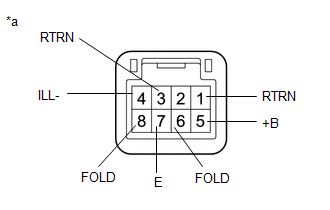
(b) Apply battery voltage to the switch connector and check that the fold seat switch assembly illuminates.
OK:
| Condition | Specified Condition |
|---|---|
| Battery positive (+) → Terminal 5 (+B) Battery negative (-) → Terminal 4 (ILL-) | Illumination illuminates |
If the result is not as specified, replace the fold seat switch assembly.
 Removal
REMOVAL PROCEDURE 1. REMOVE POWER SEAT SWITCH ASSEMBLY (for 60/40 Split Seat Type RH Side) (a) Using a moulding remover A, disengage the 2 claws as shown in the illustration. Remove in this Dir ...
 Installation
INSTALLATION PROCEDURE 1. INSTALL FOLD SEAT SWITCH ASSEMBLY (for Luggage Compartment) (a) Connect the connector. (b) Engage the 4 claws to install the fold seat switch assembly. 2. INST ...
Other materials:
Lexus RX (RX 350L, RX450h) 2016-2026 Repair Manual > Can Communication System: Precaution
PRECAUTION NOTICE FOR INITIALIZATION NOTICE: When disconnecting the cable from the negative (-) battery terminal, initialize the following systems after the cable is reconnected. System See Procedure LKA /LDA System Pre-collision System Intelligent Clearance Sonar System Li ...
Lexus RX (RX 350L, RX450h) 2016-2026 Repair Manual > Can Communication System: System Description
SYSTEM DESCRIPTION BRIEF DESCRIPTION (a) The Controller Area Network (CAN) is a serial data communication system for real time application. It is a vehicle multiplex communication system which has a high communication speed and the ability to detect malfunctions. (b) Using the CANH and CANL bus lin ...
Lexus RX (RX 350L, RX450h) 2016-{YEAR} Owners Manual
- For your information
- Pictorial index
- For safety and security
- Instrument cluster
- Operation of each component
- Driving
- Lexus Display Audio system
- Interior features
- Maintenance and care
- When trouble arises
- Vehicle specifications
- For owners
Lexus RX (RX 350L, RX450h) 2016-{YEAR} Repair Manual

0.0105