Lexus RX (RX 350L, RX450h) 2016-2026 Repair Manual: Reassembly
REASSEMBLY
CAUTION / NOTICE / HINT
CAUTION:
Wear protective gloves. Sharp areas on the seat frame may injure your hands.
PROCEDURE
1. INSTALL REAR SEAT INNER BELT COVER LH
| (a) Engage the claw. |
|
.png)
| (b) Install the rear seat inner belt cover LH with the clip. |
|
.png)
2. INSTALL REAR SEAT INNER BELT COVER RH
HINT:
Use the same procedure as for the LH side.
3. INSTALL NO. 2 SEATBACK FRAME SUB-ASSEMBLY LH
(a) Install the No. 2 seatback frame sub-assembly LH to the No. 2 seat cushion frame sub-assembly LH with the 4 bolts as shown in the illustration.
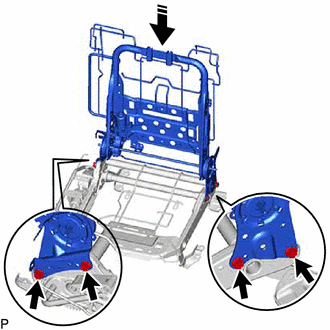
.png) | Install in this Direction |
Torque:
29 N·m {296 kgf·cm, 21 ft·lbf}
4. INSTALL FOLD SEAT CONTROL ECU (for LH Side)
| (a) Engage the 2 guides to install the fold seat control ECU. |
|
.png)
5. INSTALL REAR NO. 2 SEAT WIRE LH
| (a) Engage the 2 clamps to install the rear No. 2 seat wire LH. |
|
.png)
(b) Connect the 4 connectors.
6. INSTALL REAR SEATBACK PROTECTOR (for LH Side)
| (a) Install the rear seatback protector with the 2 nuts. Torque: 5.5 N·m {56 kgf·cm, 49 in·lbf} |
|
.png)
7. INSTALL RECLINING ADJUSTER INSIDE COVER LH
(a) Engage the 3 guides and claw as indicated by the arrows, in the order shown in the illustration to install the reclining adjuster inside cover LH.
| | Install in this Direction (1) |
.png) | Install in this Direction (2) |
8. INSTALL REAR NO. 2 SEAT RECLINING ADJUSTER INSIDE COVER (for LH Side)
| (a) Engage the guide and claw to install the rear No. 2 seat reclining adjuster inside cover. |
|
.png)
9. INSTALL NO. 3 REAR SEAT PROTECTOR LH
| (a) Install a new No. 3 rear seat protector LH. |
|
.png)
10. INSTALL SEATBACK FELT LH
(a) Engage the 5 hooks as indicated by the arrows, in the order shown in the illustration to install the seatback felt LH.
| | Install in this Direction (1) |
| | Install in this Direction (2) |
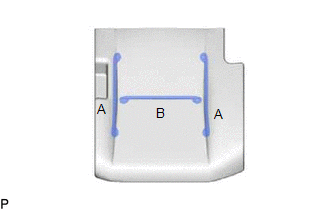
11. INSTALL SEAT COVER WIRE (for LH Side)
(a) Install the 4 seat cover wires.
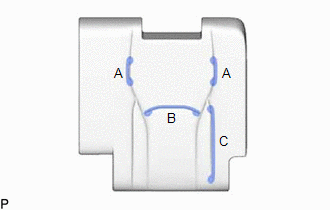
HINT:
- Wire 1000 mm (3.28 ft.) or longer and shaped wires are available as supplied parts.
- For wires 1000 mm (3.28 ft.) or less in length, cut or shape a 1000 mm (3.28 ft.) wire into the dimensions shown in the illustration.
-
Make sure to read Precaution before preparing the wire.
Click here
.gif)
Length:
| A | 130 mm (5.12 in.) |
| B | 176.5 mm (6.95 in.) |
| C | 250 mm (9.84 in.) |
HINT:
The dimension shown in the illustration is the length.
.png)
12. INSTALL NO. 2 SEATBACK COVER SUB-ASSEMBLY LH
HINT:
When installing a No. 2 seatback cover sub-assembly LH, refer to Precaution in order to prevent wrinkles from forming.
Click here
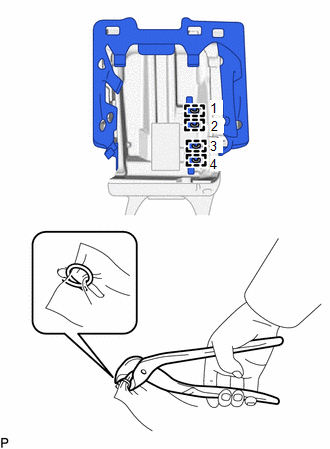
| (a) Using hog ring pliers, install 8 new hog rings in the order shown in the illustration. NOTICE:
|
|

| (b) Using hog ring pliers, install the No. 2 seatback cover sub-assembly LH to the No. 2 seatback pad LH with 4 new hog rings in the order shown in the illustration. NOTICE:
|
|
13. INSTALL SEPARATE TYPE REAR SEATBACK COVER WITH PAD LH
(a) Temporarily install the separate type rear seatback cover with pad LH to the rear seatback frame sub-assembly LH.
| (b) Engage the 7 hooks. |
|
.png)
| (c) Engage the 4 claws to install the 2 rear No. 2 seat headrest support assemblies. |
|
.png)
| (d) Engage the 2 hooks. |
|
.png)
| (e) Engage the 2 hooks. |
|
.png)
(f) Engage the 2 fasteners to install the separate type rear seatback cover with pad LH.
.png) | Fastener |
14. INSTALL OUTER REAR SEAT CUSHION EDGE PROTECTOR LH
| (a) Install a new outer rear seat cushion edge protector LH. |
|
.png)
15. INSTALL SEAT COVER WIRE (for LH Side)
(a) Install the 3 seat cover wires.
HINT:
- Wire 1000 mm (3.28 ft.) or longer and shaped wires are available as supplied parts.
- For wires 1000 mm (3.28 ft.) or less in length, cut or shape a 1000 mm (3.28 ft.) wire into the dimensions shown in the illustration.
-
Make sure to read Precaution before preparing the wire.
Click here
Length:
| A | 210 mm (8.27 in.) |
| B | 230 mm (9.06 in.) |
HINT:
The dimension shown in the illustration is the length.
16. INSTALL NO. 2 SEAT CUSHION COVER SUB-ASSEMBLY LH
HINT:
When installing a No. 2 seat cushion cover sub-assembly LH, refer to Precaution in order to prevent wrinkles from forming.
Click here
(a) Insert the No. 2 seat cushion cover sub-assembly LH as shown in the illustration.
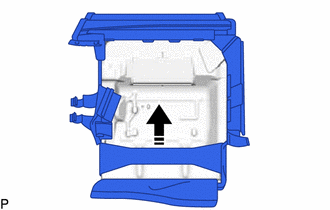
| | Install in this Direction |
| (b) Using hog ring pliers, install 8 new hog rings in the order shown in the illustration. NOTICE:
|
|
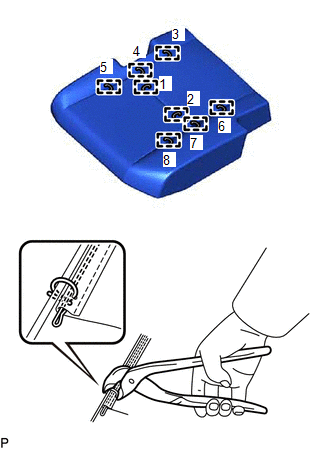
| (c) Using hog ring pliers, install the No. 2 seat cushion cover sub-assembly LH to the No. 2 seat cushion pad LH with a new hog ring as shown in the illustration. NOTICE:
|
|

17. INSTALL SEPARATE TYPE REAR SEAT CUSHION COVER WITH PAD LH
| (a) Engage the 5 hooks. |
|
.png)
| (b) Engage the 2 hooks. |
|
.png)
| (c) Install the clip. |
|
.png)
| (d) Engage the hook to install the separate type rear seat cushion cover with pad LH. |
|
.png)
| (e) Engage the clamp. |
|
.png)
| (f) Engage the guide to connect the rubber band. |
|
.png)
18. INSTALL REAR NO. 2 SEAT OUTER RECLINING COVER LH
(a) Engage the 5 guides and 5 claws as indicated by the arrows, in the order shown in the illustration to install the rear No. 2 seat outer reclining cover LH.
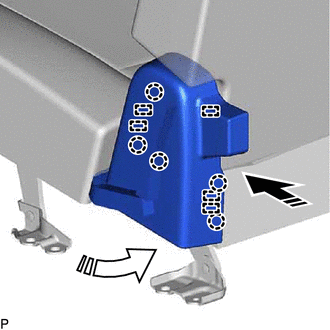
| | Install in this Direction (1) |
| | Install in this Direction (2) |
19. INSTALL NO. 2 REAR SEAT RECLINING COVER LH
| (a) Install the No. 2 rear seat reclining cover LH with the screw. |
|
.png)
20. INSTALL REAR NO. 2 SEAT RECLINING COVER LH
(a) Engage the 3 guides and 3 claws as shown in the illustration.

| | Install in this Direction |
| (b) Install the 2 screws. |
|
.png)
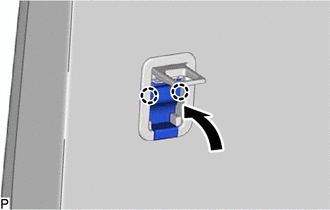
| (c) Engage the 2 clips to install the rear No. 2 seat reclining cover LH. |
|
.png)
21. INSTALL REAR SEAT CUSHION CARPET (for LH Side)
| (a) Engage the claw to install the rear seat cushion carpet. |
|
.png)
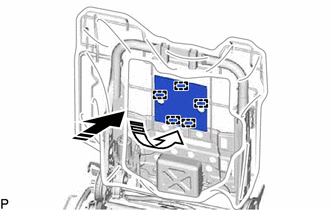
22. INSTALL NO. 2 SEATBACK BOARD SUB-ASSEMBLY LH
(a) Engage the 3 guides and 6 claws as indicated by the arrows, in the order shown in the illustration.

| | Install in this Direction (1) |
| | Install in this Direction (2) |
| (b) Engage the 2 clips to install the No. 2 seatback board sub-assembly LH. |
|
.png)
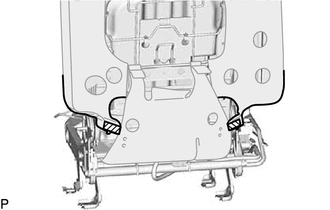
23. INSTALL ROPE HOOK ASSEMBLY (for LH Side)
| (a) Install the rope hook assembly with the bolt. Torque: 6.0 N·m {61 kgf·cm, 53 in·lbf} |
|
.png)
| (b) Engage the 2 claws as shown in the illustration. |
|
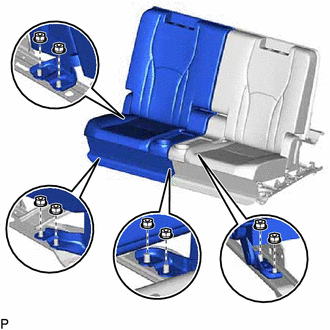
24. INSTALL REAR NO. 2 SEAT ASSEMBLY LH
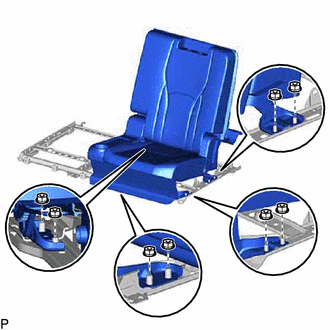
| (a) Install the rear No. 2 seat assembly LH with the 8 nuts. Torque: 25 N·m {255 kgf·cm, 18 ft·lbf} |
|
25. INSTALL REAR NO. 2 SEAT INNER BELT ASSEMBLY LH
Click here
26. INSTALL REAR NO. 2 SEAT WIRE LH
| (a) Engage the 4 clamps to install the rear No. 2 seat wire LH. |
|
.png)
(b) Connect the connector.
27. INSTALL NO. 3 SEAT NO. 2 LEG COVER (for LH Side)
| (a) Engage the 2 clips to install the No. 3 seat No. 2 leg cover. |
|
.png)
(b) Engage the 3 fasteners.
.png)
| | Fastener |
28. INSTALL NO. 2 SEATBACK FRAME SUB-ASSEMBLY RH
HINT:
Use the same procedure as for the LH side.
29. INSTALL FOLD SEAT CONTROL ECU (for RH Side)
| (a) Engage the 2 guides to install the fold seat control ECU. |
|
.png)
30. INSTALL REAR NO. 2 SEAT WIRE RH
| (a) Engage the 2 clamps to install the rear No. 2 seat wire RH. |
|
.png)
(b) Connect the 4 connectors.
31. INSTALL REAR SEATBACK PROTECTOR (for RH Side)
| (a) Install the rear seatback protector with the 2 nuts. Torque: 5.5 N·m {56 kgf·cm, 49 in·lbf} |
|
.png)
32. INSTALL RECLINING ADJUSTER INSIDE COVER RH
HINT:
Use the same procedure as for the LH side.
33. INSTALL REAR NO. 2 SEAT RECLINING ADJUSTER INSIDE COVER (for RH Side)
HINT:
Use the same procedure as for the LH side.
34. INSTALL NO. 3 REAR SEAT PROTECTOR RH
HINT:
Use the same procedure as for the LH side.
35. INSTALL SEAT COVER WIRE (for RH Side)
HINT:
Use the same procedure as for the LH side.
36. INSTALL NO. 2 SEATBACK COVER SUB-ASSEMBLY RH
HINT:
Use the same procedure as for the LH side.
37. INSTALL SEPARATE TYPE REAR SEATBACK COVER WITH PAD RH
HINT:
Use the same procedure as for the LH side.
38. INSTALL OUTER REAR SEAT CUSHION EDGE PROTECTOR RH
HINT:
Use the same procedure as for the LH side.
39. INSTALL SEAT COVER WIRE (for RH Side)
HINT:
Use the same procedure as for the LH side.
40. INSTALL NO. 2 SEAT CUSHION COVER SUB-ASSEMBLY RH
HINT:
Use the same procedure as for the LH side.
41. INSTALL SEPARATE TYPE REAR SEAT CUSHION COVER WITH PAD RH
HINT:
Use the same procedure as for the LH side.
42. INSTALL REAR NO. 2 SEAT OUTER RECLINING COVER RH
HINT:
Use the same procedure as for the LH side.
43. INSTALL NO. 2 REAR SEAT RECLINING COVER RH
HINT:
Use the same procedure as for the LH side.
44. INSTALL REAR NO. 2 SEAT RECLINING COVER RH
HINT:
Use the same procedure as for the LH side.
45. INSTALL REAR SEAT CUSHION CARPET (for RH Side)
HINT:
Use the same procedure as for the LH side.
46. INSTALL NO. 2 SEATBACK BOARD SUB-ASSEMBLY RH
HINT:
Use the same procedure as for the LH side.
47. INSTALL ROPE HOOK ASSEMBLY (for RH Side)
HINT:
Use the same procedure as for the LH side.
48. INSTALL REAR NO. 2 SEAT ASSEMBLY RH
| (a) Install the rear No. 2 seat assembly RH with the 8 nuts. Torque: 25 N·m {255 kgf·cm, 18 ft·lbf} |
|
49. INSTALL REAR NO. 2 SEAT INNER BELT ASSEMBLY RH
Click here
50. INSTALL REAR NO. 2 SEAT WIRE RH
| (a) Engage the 4 clamps to install the rear No. 2 seat wire RH. |
|
.png)
(b) Connect the 2 connectors.
51. INSTALL NO. 3 SEAT NO. 1 LEG COVER (for RH Side)
| (a) Engage the 4 clips to install the No. 3 seat No. 1 leg cover. |
|
.png)
(b) Engage the 4 fasteners.
.png)
| | Fastener |
52. INSTALL REAR SEAT HEADREST ASSEMBLY
(a) Install the 2 rear seat headrest assemblies.
53. INSTALL SEAT ADJUSTER COVER CAP
| (a) Install the 2 seat adjuster cover caps. |
|
.png)
 Disassembly
DISASSEMBLY CAUTION / NOTICE / HINT CAUTION: Wear protective gloves. Sharp areas on the seat frame may injure your hands. PROCEDURE 1. REMOVE SEAT ADJUSTER COVER CAP (a) Remove the 2 seat adjuster ...

Other materials:
Lexus RX (RX 350L, RX450h) 2016-2026 Repair Manual > Lighting System (w/ Automatic Headlight Beam Level Control System): Automatic High Beam System does not Operate or Operation Indicator does not Illuminate
DESCRIPTION The main body ECU (multiplex network body ECU) controls the automatic high beam system based on signals received from the forward recognition camera. WIRING DIAGRAM CAUTION / NOTICE / HINT NOTICE:
Before replacing the main body ECU (multiplex network body ECU), refer to Registration. ...
Lexus RX (RX 350L, RX450h) 2016-2026 Repair Manual > Maintenance: Outside Vehicle
General MaintenanceGENERAL MAINTENANCE CAUTION / NOTICE / HINT
These are maintenance and inspection items that are considered to be the owner's responsibility.
The owner can do them or they can have them done at a service center. These items include those that should be checked on a daily basis, ...
Lexus RX (RX 350L, RX450h) 2016-{YEAR} Owners Manual
- For your information
- Pictorial index
- For safety and security
- Instrument cluster
- Operation of each component
- Driving
- Lexus Display Audio system
- Interior features
- Maintenance and care
- When trouble arises
- Vehicle specifications
- For owners
Lexus RX (RX 350L, RX450h) 2016-{YEAR} Repair Manual

0.0144