Lexus RX (RX 350L, RX450h) 2016-2026 Repair Manual: Removal
REMOVAL
CAUTION / NOTICE / HINT
The necessary procedures (adjustment, calibration, initialization or registration) that must be performed after parts are removed and installed, or replaced during rear seatback heater removal/installation are shown below.
Necessary Procedure After Parts Removed/Installed/Replaced| Replaced Part or Performed Procedure | Necessary Procedures | Effect/Inoperative Function When Necessary Procedures are not Performed | Link |
|---|---|---|---|
| Disconnect cable from negative battery terminal | Memorize steering angle neutral point | Lane Control System | |
| Pre-collision System | |||
| Intelligent Clearance Sonar System*1 | |||
| Parking Assist Monitor System | | ||
| Panoramic View Monitor System | | ||
| Lighting System (w/ Automatic Headlight Beam Level Control System) | | ||
| Initialize back door lock | Power Door Lock Control System | | |
| Reset back door close position | Power Back Door System (w/ Outside Door Control Switch) | |
*1: When performing learning using the Techstream.
Click here .gif)
CAUTION:
-
Be sure to read Precaution thoroughly before servicing.
Click here
- Wear protective gloves. Sharp areas on the parts may injure your hands.
.png)
PROCEDURE
1. REMOVE REAR SEAT ASSEMBLY RH (w/o Rear No. 2 Seat)
Click here
2. REMOVE REAR SEAT COVER CAP RH (w/o Rear No. 2 Seat)
for Manual Seat:
Click here
3. REMOVE NO. 1 RECLINING ADJUSTER RELEASE HANDLE RH (w/o Rear No. 2 Seat)
for Manual Seat:
Click here
4. REMOVE POWER SEAT SWITCH ASSEMBLY (w/o Rear No. 2 Seat)
for Power Seat:
Click here
5. DISCONNECT SEPARATE TYPE REAR SEAT CUSHION COVER WITH PAD (w/o Rear No. 2 Seat)
Click here
6. REMOVE SEPARATE TYPE REAR SEAT CUSHION COVER WITH PAD (w/o Rear No. 2 Seat)
Click here
7. REMOVE REAR SEATBACK COVER RH (w/o Rear No. 2 Seat)
Click here
8. REMOVE REAR SEATBACK BOARD CARPET ASSEMBLY RH (w/o Rear No. 2 Seat)
Click here
9. DISCONNECT REAR CENTER SEAT OUTER BELT ASSEMBLY (w/o Rear No. 2 Seat)
Click here
10. REMOVE SEAT BELT ANCHOR COVER CAP (w/o Rear No. 2 Seat)
Click here
11. REMOVE REAR SEAT SHOULDER BELT COVER (w/o Rear No. 2 Seat)
Click here
12. REMOVE SEPARATE TYPE REAR SEATBACK COVER WITH PAD (w/o Rear No. 2 Seat)
Click here
13. REMOVE SEPARATE TYPE REAR SEATBACK COVER (w/o Rear No. 2 Seat)
Click here
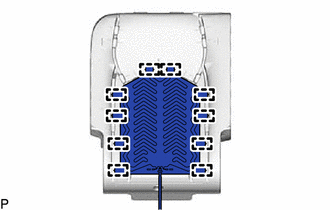
14. REMOVE SEAT HEATER ASSEMBLY (w/o Rear No. 2 Seat)
| (a) Remove the 10 tag pins and seat heater assembly from the separate type rear seatback cover. |
|
15. REMOVE REAR NO. 1 SEAT ASSEMBLY RH (w/ Rear No. 2 Seat)
Click here
16. REMOVE REAR SEAT COVER CAP RH (w/ Rear No. 2 Seat)
Click here
17. REMOVE NO. 1 RECLINING ADJUSTER RELEASE HANDLE RH (w/ Rear No. 2 Seat)
Click here
18. REMOVE REAR SEAT LOCK CONTROL LEVER SUB-ASSEMBLY RH (w/ Rear No. 2 Seat)
Click here
19. REMOVE SEPARATE TYPE REAR SEAT CUSHION COVER WITH PAD (w/ Rear No. 2 Seat)
Click here
20. REMOVE REAR NO. 1 SEAT RECLINING ADJUSTER INSIDE COVER (w/ Rear No. 2 Seat)
Click here
21. DISCONNECT REAR CENTER SEAT OUTER BELT ASSEMBLY (w/ Rear No. 2 Seat)
Click here
22. REMOVE REAR SEATBACK COVER RH (w/ Rear No. 2 Seat)
Click here
23. REMOVE REAR SEATBACK BOARD CARPET ASSEMBLY RH (w/ Rear No. 2 Seat)
Click here
24. REMOVE REAR SEAT UPPER RECLINING COVER RH (w/ Rear No. 2 Seat)
Click here
25. REMOVE RECLINING REMOTE CONTROL LEVER SUB-ASSEMBLY RH (w/ Rear No. 2 Seat)
Click here
26. REMOVE SEAT BELT ANCHOR COVER CAP (w/ Rear No. 2 Seat)
Click here
27. REMOVE REAR SEAT SHOULDER BELT COVER (w/ Rear No. 2 Seat)
Click here
28. REMOVE SEPARATE TYPE REAR SEATBACK COVER WITH PAD (w/ Rear No. 2 Seat)
Click here
29. REMOVE SEPARATE TYPE REAR SEATBACK COVER (w/ Rear No. 2 Seat)
Click here
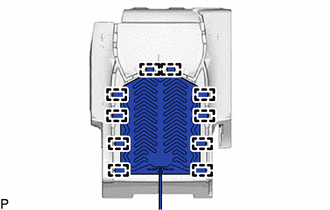
30. REMOVE SEAT HEATER ASSEMBLY (w/ Rear No. 2 Seat)
| (a) Remove the 10 tag pins and seat heater assembly from the separate type rear seatback cover. |
|
 Inspection
INSPECTION PROCEDURE 1. INSPECT SEAT HEATER ASSEMBLY (a) Measure the resistance according to the value(s) in the table below. Standard Resistance: Tester Connection Condition Specified Cond ...
 Installation
INSTALLATION CAUTION / NOTICE / HINT CAUTION: Wear protective gloves. Sharp areas on the seat frame may injure your hands. PROCEDURE 1. INSTALL SEAT HEATER ASSEMBLY (w/o Rear No. 2 Seat) (a) Install t ...
Other materials:
Lexus RX (RX 350L, RX450h) 2016-2026 Repair Manual > Steering Column: Tilt And Telescopic Manual Switch
InspectionINSPECTION PROCEDURE 1. INSPECT TILT AND TELESCOPIC SWITCH (a) Remove the tilt and telescopic switch. Click here *a Component without harness connected (Tilt and Telescopic Switch) (b) Measure the resistance according to the value(s) in the table below. Standar ...
Lexus RX (RX 350L, RX450h) 2016-2026 Repair Manual > Charging System: Dtc Check / Clear
DTC CHECK / CLEAR CHECK DTC (a) Connect the Techstream to the DLC3. (b) Turn the engine switch on (IG). (c) Turn the Techstream on. (d) Enter the following menus: Powertrain / Engine / Trouble Codes. (e) Check for DTCs, and then write them down. (f) Check the details of the DTCs. Click here Power ...
Lexus RX (RX 350L, RX450h) 2016-{YEAR} Owners Manual
- For your information
- Pictorial index
- For safety and security
- Instrument cluster
- Operation of each component
- Driving
- Lexus Display Audio system
- Interior features
- Maintenance and care
- When trouble arises
- Vehicle specifications
- For owners
Lexus RX (RX 350L, RX450h) 2016-{YEAR} Repair Manual

0.0098