Lexus RX (RX 350L, RX450h) 2016-2026 Repair Manual: Seat Heater for Front Left Seat does not Operate
DESCRIPTION
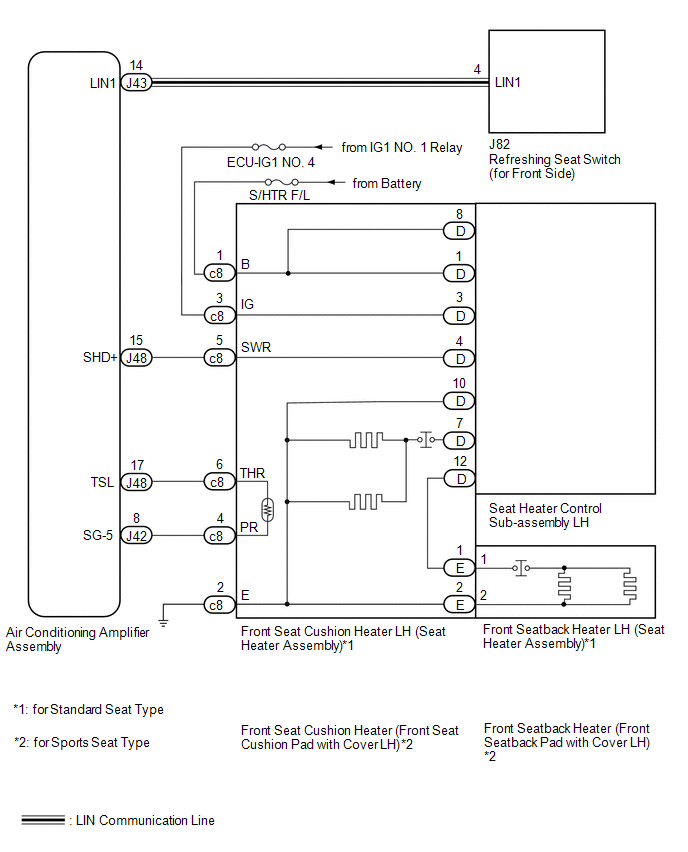
When the refreshing seat switch (for front side) is operated, the air conditioning amplifier assembly receives the signal. The air conditioning amplifier assembly receives the signal and operates the front seat heater.
WIRING DIAGRAM
CAUTION / NOTICE / HINT
NOTICE:
-
If the battery voltage is low, the seat heater system may not operate. When "Operation of Electrical Items Restricted." is displayed on the multi-information display in the combination meter assembly, inspect the battery, referring to On-vehicle Inspection for the charging system.
Click here
.gif)
-
If the battery voltage is low, the seat heater system may not operate. When "Operation of Electrical Items Restricted." is not displayed on the multi-information display in the combination meter assembly, check the Data List item "Battery Control Count (Body ECU)".
Click here
- Inspect the fuses for circuits related to this system before performing the following procedure.
PROCEDURE
| 1. | CLEAR DTC |
(a) Clear the DTCs.
Click here
|
.gif)
| 2. | CHECK FOR DTC |
(a) Check for DTCs.
Click here
OK:
DTC B14B5 or B14C1 is not output.
| Result | Proceed to |
|---|---|
| OK (for Standard Seat Type) | A |
| OK (for Sports Seat Type) | B |
| NG | C |
| B | .gif) | GO TO STEP 7 |
| C | | GO TO DIAGNOSTIC TROUBLE CODE CHART |
|
| 3. | CHECK HARNESS AND CONNECTOR (IG POWER SUPPLY - FRONT SEAT CUSHION HEATER LH (SEAT HEATER ASSEMBLY) - BODY GROUND) |
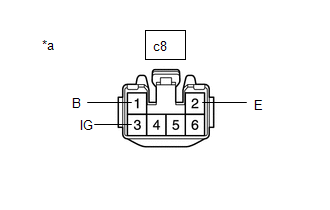
| (a) Disconnect the c8 front seat cushion heater LH (seat heater assembly) connector. |
|
(b) Measure the voltage and resistance according to the value(s) in the table below.
Standard Voltage:
| Tester Connection | Condition | Specified Condition |
|---|---|---|
| c8-3 (IG) - Body ground | Engine switch on (IG) | 11 to 14 V |
| c8-3 (IG) - Body ground | Engine switch off | Below 1 V |
| c8-1 (B) - Body ground | Always | 11 to 14 V |
Standard Resistance:
| Tester Connection | Condition | Specified Condition |
|---|---|---|
| c8-2 (E) - Body ground | Always | Below 1 Ω |
| NG | | REPAIR OR REPLACE HARNESS OR CONNECTOR |
|
| 4. | INSPECT FRONT SEAT CUSHION HEATER LH (SEAT HEATER ASSEMBLY) |
(a) Remove the front seat cushion heater LH (seat heater assembly).
Click here
(b) Inspect the front seat cushion heater LH (seat heater assembly).
Click here
| NG | | REPLACE FRONT SEAT CUSHION HEATER LH (SEAT HEATER ASSEMBLY) |
|
| 5. | INSPECT FRONT SEATBACK HEATER LH (SEAT HEATER ASSEMBLY) |
(a) Remove the front seatback heater LH (seat heater assembly).
Click here
(b) Inspect the front seatback heater LH (seat heater assembly).
Click here
| NG | | REPLACE FRONT SEATBACK HEATER LH (SEAT HEATER ASSEMBLY) |
|
| 6. | CHECK HARNESS AND CONNECTOR (AIR CONDITIONING AMPLIFIER ASSEMBLY - FRONT SEAT CUSHION HEATER LH (SEAT HEATER ASSEMBLY)) |
(a) Disconnect the J42 and J48 air conditioning amplifier assembly connectors.
(b) Measure the resistance according to the value(s) in the table below.
Standard Resistance:
| Tester Connection | Condition | Specified Condition |
|---|---|---|
| J48-15 (SHD+) - c8-5 (SWR) | Always | Below 1 Ω |
| J48-15 (SHD+) or c8-5 (SWR) - Body ground | Always | 10 kΩ or higher |
| J48-17 (TSL) - c8-6 (THR) | Always | Below 1 Ω |
| J48-17 (TSL) or c8-6 (THR) - Body ground | Always | 10 kΩ or higher |
| J42-8 (SG-5) - c8-4 (PR) | Always | Below 1 Ω |
| J42-8 (SG-5) or c8-4 (PR) - Body ground | Always | 10 kΩ or higher |
| OK | | GO TO STEP 11 |
| NG | | REPAIR OR REPLACE HARNESS OR CONNECTOR |
| 7. | CHECK HARNESS AND CONNECTOR (IG POWER SUPPLY - FRONT SEAT CUSHION HEATER (FRONT SEAT CUSHION PAD WITH COVER LH) - BODY GROUND) |
| (a) Disconnect the c8 front seat cushion heater (front seat cushion pad with cover LH) connector. |
|

(b) Measure the voltage and resistance according to the value(s) in the table below.
Standard Voltage:
| Tester Connection | Condition | Specified Condition |
|---|---|---|
| c8-3 (IG) - Body ground | Engine switch on (IG) | 11 to 14 V |
| c8-3 (IG) - Body ground | Engine switch off | Below 1 V |
| c8-1 (B) - Body ground | Always | 11 to 14 V |
Standard Resistance:
| Tester Connection | Condition | Specified Condition |
|---|---|---|
| c8-2 (E) - Body ground | Always | Below 1 Ω |
| NG | | REPAIR OR REPLACE HARNESS OR CONNECTOR |
|
| 8. | INSPECT FRONT SEAT CUSHION HEATER (FRONT SEAT CUSHION PAD WITH COVER LH) |
(a) Remove the front seat cushion heater (front seat cushion pad with cover LH).
Click here
(b) Inspect the front seat cushion heater (front seat cushion pad with cover LH).
Click here
| NG | | REPAIR OR REPLACE HARNESS OR CONNECTOR |
|
| 9. | INSPECT FRONT SEATBACK HEATER (FRONT SEATBACK PAD WITH COVER LH) |
(a) Remove the front seatback heater (front seatback pad with cover LH).
Click here
(b) Inspect the front seatback heater (front seatback pad with cover LH).
Click here
| NG | | REPLACE FRONT SEATBACK HEATER (FRONT SEATBACK PAD WITH COVER LH) |
|
| 10. | CHECK HARNESS AND CONNECTOR (AIR CONDITIONING AMPLIFIER ASSEMBLY - FRONT SEAT CUSHION HEATER (FRONT SEAT CUSHION PAD WITH COVER LH)) |
(a) Disconnect the J42 and J48 air conditioning amplifier assembly connectors.
(b) Measure the resistance according to the value(s) in the table below.
Standard Resistance:
| Tester Connection | Condition | Specified Condition |
|---|---|---|
| J48-15 (SHD+) - c8-5 (SWR) | Always | Below 1 Ω |
| J48-15 (SHD+) or c8-5 (SWR) - Body ground | Always | 10 kΩ or higher |
| J48-17 (TSL) - c8-6 (THR) | Always | Below 1 Ω |
| J48-17 (TSL) or c8-6 (THR) - Body ground | Always | 10 kΩ or higher |
| J42-8 (SG-5) - c8-4 (PR) | Always | Below 1 Ω |
| J42-8 (SG-5) or c8-4 (PR) - Body ground | Always | 10 kΩ or higher |
| NG | | REPAIR OR REPLACE HARNESS OR CONNECTOR |
|
| 11. | REPLACE SEAT HEATER CONTROL SUB-ASSEMBLY LH |
(a) Temporarily replace the seat heater control sub-assembly LH with a new or known good one.
Click here
|
| 12. | CHECK SEAT HEATER OPERATION |
(a) Check the seat heater.
Click here
OK:
The seat heater operates normally.
| OK | | END (SEAT HEATER CONTROL SUB-ASSEMBLY LH WAS DEFECTIVE) |
|
| 13. | REPLACE REFRESHING SEAT SWITCH (FOR FRONT SIDE) |
(a) Temporarily replace the refreshing seat switch (for front side) with a new or known good one.
Click here
|
| 14. | CHECK SEAT HEATER OPERATION |
(a) Check the seat heater.
Click here
OK:
The seat heater operates normally.
| OK | | END (REFRESHING SEAT SWITCH (FOR FRONT SIDE) WAS DEFECTIVE) |
| NG | | REPLACE AIR CONDITIONING AMPLIFIER ASSEMBLY |
 Seat Heater for Front Right Seat does not Operate
DESCRIPTION When the refreshing seat switch (for front side) is operated, the air conditioning amplifier assembly receives the signal. The air conditioning amplifier assembly receives the signal and o ...

Other materials:
Lexus RX (RX 350L, RX450h) 2016-2026 Repair Manual > Rear No. 1 Seat Inner Belt Assembly(for Captain Seat Type): Components
COMPONENTS ILLUSTRATION *1 CUP HOLDER ASSEMBLY *2 NO. 1 RECLINING ADJUSTER RELEASE HANDLE LH *3 REAR NO. 1 SEAT RECLINING ADJUSTER INSIDE COVER *4 REAR SEAT COVER CAP LH *5 REAR SEAT INNER BELT ASSEMBLY LH *6 REAR SEAT INNER RECLINING COVER LH *7 REAR SEAT LOCK CO ...
Lexus RX (RX 350L, RX450h) 2016-2026 Repair Manual > Power Steering System: Customize Parameters
CUSTOMIZE PARAMETERS DRIVE MODE CUSTOMIZATION "CUSTOMIZE" settings can be changed on the screen of the multi-display. HINT: "CUSTOMIZE" mode can be selected by using the drive mode select switch (combination switch assembly). (a) Turn the engine switch on (IG). (b) Select the following menus on the ...
Lexus RX (RX 350L, RX450h) 2016-{YEAR} Owners Manual
- For your information
- Pictorial index
- For safety and security
- Instrument cluster
- Operation of each component
- Driving
- Lexus Display Audio system
- Interior features
- Maintenance and care
- When trouble arises
- Vehicle specifications
- For owners
Lexus RX (RX 350L, RX450h) 2016-{YEAR} Repair Manual

0.0155