Lexus RX (RX 350L, RX450h) 2016-2026 Repair Manual: Inspection
INSPECTION
PROCEDURE
1. INSPECT FRONT SEAT OUTER BELT ASSEMBLY
(a) Check the seat belt tension reducer operation.
CAUTION:
Do not apply battery voltage to the pretensioner connector.
| (1) Connect a positive (+) lead from the battery to terminal 1 of the seat belt tension reducer connector and a negative (-) lead to terminal 2. |
|
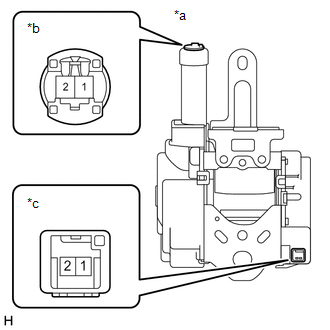
(2) Check that an operating sound is heard when the magnetized solenoid is attracting the plunger.
(3) Pull out the seat belt and allow it to retract. Listen to the operating sound.
(4) Pull out the seat belt again, disconnect the negative (-) lead of the battery and allow the seat belt to retract. Listen to the operating sound again and check that the operating sound volume has increased.
If the result is not as specified, replace the front seat outer belt assembly.
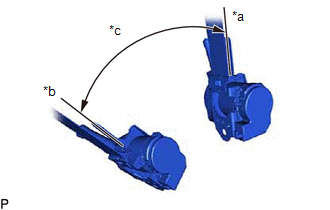
| (b) Before installing the front seat outer belt assembly, check the ELR function. NOTICE: Do not disassemble the retractor. (1) When the inclination of the retractor is 15° or less, check that the belt can be pulled from the retractor. When the inclination of the retractor is over 45°, check that the belt locks. If the result is not as specified, replace the front seat outer belt assembly. |
|
 Removal
REMOVAL CAUTION / NOTICE / HINT The necessary procedures (adjustment, calibration, initialization or registration) that must be performed after parts are removed and installed, or replaced during fron ...
 Installation
INSTALLATION CAUTION / NOTICE / HINT HINT:
Use the same procedure for the RH side and LH side.
The following procedure is for the LH side.
PROCEDURE 1. INSTALL FRONT SHOULDER BELT ANCHOR ADJUS ...
Other materials:
Lexus RX (RX 350L, RX450h) 2016-2026 Repair Manual > Intuitive Parking Assist System (w/ Intelligent Clearance Sonar System): Dtc Check / Clear
DTC CHECK / CLEAR CHECK DTC (a) Connect the Techstream to the DLC3. (b) Turn the engine switch on (IG). (c) Turn the intuitive parking assist system on. (d) Turn the Techstream on. (e) Enter the following menus: Body Electrical / Advanced Parking Guidance/ICS/Intuitive P/A / Trouble Codes. (f) Check ...
Lexus RX (RX 350L, RX450h) 2016-2026 Repair Manual > Automatic Transaxle System: System Description
SYSTEM DESCRIPTION SYSTEM DESCRIPTION (a) The Electronic Controlled Automatic Transaxle (ECT) is an automatic transaxle that electronically controls shift timing using the ECM. The ECM detects electrical signals that indicate engine and driving conditions, and controls shift points based on driver h ...
Lexus RX (RX 350L, RX450h) 2016-{YEAR} Owners Manual
- For your information
- Pictorial index
- For safety and security
- Instrument cluster
- Operation of each component
- Driving
- Lexus Display Audio system
- Interior features
- Maintenance and care
- When trouble arises
- Vehicle specifications
- For owners
Lexus RX (RX 350L, RX450h) 2016-{YEAR} Repair Manual

0.0103