Lexus RX (RX 350L, RX450h) 2016-2026 Repair Manual: Installation
INSTALLATION
CAUTION / NOTICE / HINT
HINT:
- Use the same procedure for the RH side and LH side.
- The following procedure is for the LH side.
PROCEDURE
1. INSTALL FRONT SHOULDER BELT ANCHOR ADJUSTER ASSEMBLY
| (a) Engage the guide and temporarily install the front shoulder belt anchor adjuster assembly with the 2 bolts. |
|
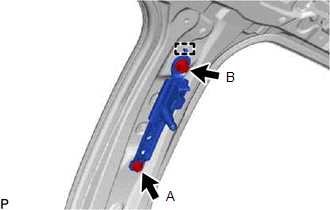
(b) Fully tighten the bolt (A), and then the bolt (B) to install the front shoulder belt anchor adjuster assembly.
Torque:
42 N·m {428 kgf·cm, 31 ft·lbf}
2. INSPECT FRONT SEAT OUTER BELT ASSEMBLY
Click here .gif)
3. INSTALL FRONT SEAT OUTER BELT ASSEMBLY
| (a) Engage the 2 guides and temporarily install the front seat outer belt assembly with the 2 bolts. |
|
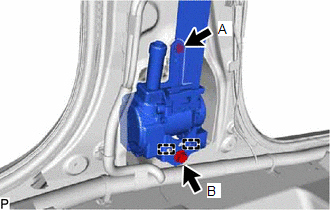
(b) Fully tighten the bolt (A), and then the bolt (B) to install front seat outer belt assembly.
Torque:
Bolt (A) :
12.5 N·m {127 kgf·cm, 9 ft·lbf}
Bolt (B) :
42 N·m {428 kgf·cm, 31 ft·lbf}
| (c) Connect the pretensioner connector and lock the locking button as shown in the illustration. NOTICE: Securely lock the locking button. |
|
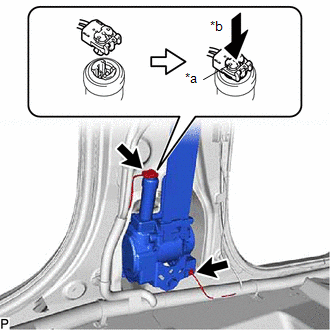
(d) Connect the connector.
(e) Connect the shoulder anchor of the front seat outer belt assembly with the nut.
Torque:
42 N·m {428 kgf·cm, 31 ft·lbf}
(f) Check that the ELR locks.
NOTICE:
This check should be performed with the front seat outer belt assembly installed to the vehicle.
(1) With the front seat outer belt assembly installed to the vehicle, check that the belt locks when it is pulled out quickly.
4. INSTALL CENTER PILLAR GARNISH ASSEMBLY
Click here
5. CONNECT FRONT SEAT OUTER BELT ASSEMBLY
| (a) Connect the floor anchor of the front seat outer belt assembly with the bolt. Torque: 42 N·m {428 kgf·cm, 31 ft·lbf} |
|
.png)
6. INSTALL LOWER CENTER PILLAR GARNISH
Click here
7. INSTALL REAR DOOR SCUFF PLATE (w/o Rear No. 2 Seat)
Click here
8. INSTALL REAR DOOR INSIDE SCUFF PLATE (w/ Rear No. 2 Seat)
Click here
9. INSTALL REAR DOOR SCUFF PLATE (w/ Rear No. 2 Seat)
Click here
10. INSTALL FRONT DOOR SCUFF PLATE
Click here
11. CONNECT CABLE TO NEGATIVE BATTERY TERMINAL
NOTICE:
When disconnecting the cable, some systems need to be initialized after the cable is reconnected.
Click here
12. INSPECT SRS WARNING LIGHT
Click here
 Inspection
INSPECTION PROCEDURE 1. INSPECT FRONT SEAT OUTER BELT ASSEMBLY (a) Check the seat belt tension reducer operation. CAUTION: Do not apply battery voltage to the pretensioner connector. (1) Connect a ...
 Disposal
DISPOSAL CAUTION / NOTICE / HINT CAUTION: Before performing pre-disposal deployment of any SRS part, review and closely follow all applicable environmental and hazardous material regulations. Pre-disp ...
Other materials:
Lexus RX (RX 350L, RX450h) 2016-2026 Repair Manual > Power Steering System: Data List / Active Test
DATA LIST / ACTIVE TEST DATA LIST HINT: Using the Techstream to read the Data List allows the values or states of switches, sensors, actuators and other items to be read without removing any parts. This non-intrusive inspection can be very useful because intermittent conditions or signals may be dis ...
Lexus RX (RX 350L, RX450h) 2016-2026 Repair Manual > Footwell Light: Removal
REMOVAL PROCEDURE 1. REMOVE FRONT DOOR SCUFF PLATE LH (for Driver Side) Click here 2. REMOVE COWL SIDE TRIM BOARD LH (for Driver Side) Click here 3. REMOVE NO. 1 INSTRUMENT PANEL UNDER COVER SUB-ASSEMBLY (for Driver Side) Click here 4. REMOVE NO. 1 INTERIOR ILLUMINATION LIGHT ASSEMBLY ...
Lexus RX (RX 350L, RX450h) 2016-{YEAR} Owners Manual
- For your information
- Pictorial index
- For safety and security
- Instrument cluster
- Operation of each component
- Driving
- Lexus Display Audio system
- Interior features
- Maintenance and care
- When trouble arises
- Vehicle specifications
- For owners
Lexus RX (RX 350L, RX450h) 2016-{YEAR} Repair Manual

0.0103