Lexus RX (RX 350L, RX450h) 2016-2026 Repair Manual: Tongue Plate Stopper
Components
COMPONENTS
ILLUSTRATION
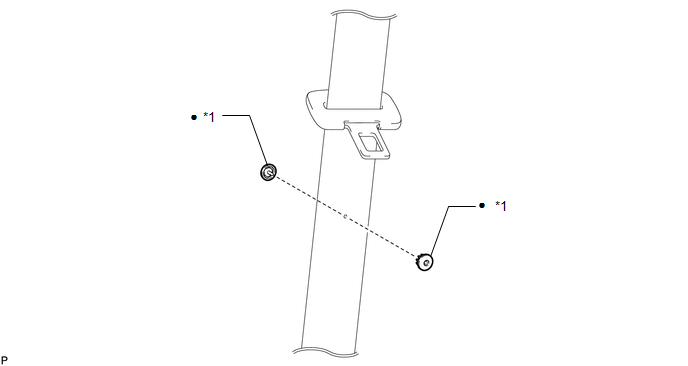
| *1 | TONGUE PLATE STOPPER | - | - |
| ● | Non-reusable part | - | - |
Replacement
REPLACEMENT
PROCEDURE
1. REMOVE TONGUE PLATE STOPPER
| (a) Slide the tongue plate above the installation position of the tongue plate stopper, and temporarily hold it with adhesive tape. |
|
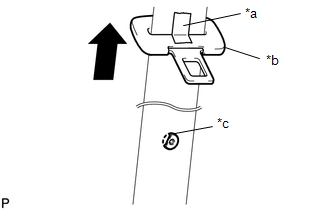
(b) Remove any pieces of the original tongue plate stopper in the belt webbing with a pair of pliers.
NOTICE:
Be careful not to damage the belt webbing during repair.
2. INSTALL TONGUE PLATE STOPPER
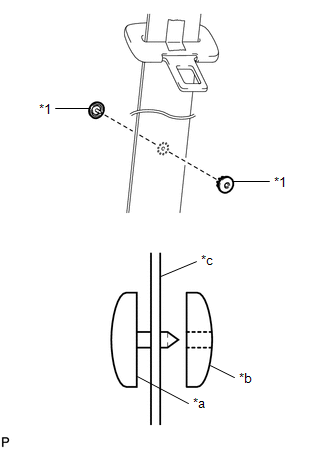
| (a) Position a new tongue plate stopper in the hole of the belt webbing. HINT: Make sure that the installation direction of the tongue plate stopper is as shown in the illustration. |
|
(b) Hold the tongue plate stopper in the hole of the belt webbing using an adjustable wrench, and turn the adjustment screw of the adjustable wrench by hand to compress the tongue plate stopper.
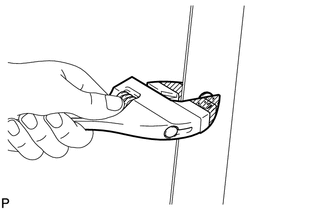
.png) | Protective Tape |
NOTICE:
- When using the adjustable wrench, make sure to position the male and female parts of the tongue plate stopper parallel to each other.
- Do not use pliers to compress the pin of the tongue plate stopper. They may damage the tongue plate stopper and belt webbing.
HINT:
Tape the jaws of the adjustable wrench before use.
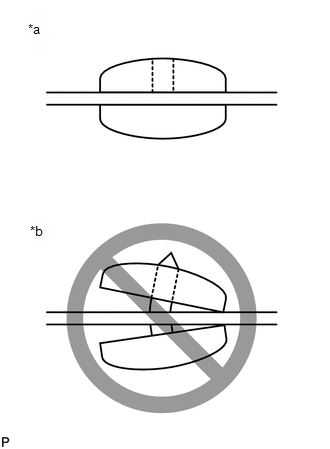
| (c) When the adjustment screw of the adjustable wrench can no longer be turned by hand, tighten the adjustment screw using a pair of adjustable joint pliers until the tongue plate stopper thickness is 4.5 to 5.0 mm (0.177 to 0.197 in.). (Refer to the illustrations.) Standard Clearance
|
|

| (d) Make sure that the pin of male side of the tongue plate stopper has expanded evenly in the hole of the female part and is firmly held to the belt webbing. (Refer to the illustrations.) |
|
 Rear Seat Belt Warning Light Malfunction
DESCRIPTION The main body ECU (multiplex network body ECU) detects whether either rear door is open or closed based on the condition of the left and right courtesy light switches and then sends the re ...

Other materials:
Lexus RX (RX 350L, RX450h) 2016-2026 Owners Manual > Using the air conditioning
system and defogger: Rear automatic air
conditioning system (RX450hL)
Air outlets and fan speed are automatically adjusted according to the
temperature
setting.
Control panel
■ Adjusting the temperature setting
Press
to increase the temperature and to
decrease the temperature.
■ Adjusting the fan speed setting
Press
to increase the fan speed and
to ...
Lexus RX (RX 350L, RX450h) 2016-2026 Repair Manual > Steering Pad Switch: Components
COMPONENTS ILLUSTRATION *1 STEERING PAD SWITCH ASSEMBLY - - N*m (kgf*cm, ft.*lbf): Specified torque - - ...
Lexus RX (RX 350L, RX450h) 2016-{YEAR} Owners Manual
- For your information
- Pictorial index
- For safety and security
- Instrument cluster
- Operation of each component
- Driving
- Lexus Display Audio system
- Interior features
- Maintenance and care
- When trouble arises
- Vehicle specifications
- For owners
Lexus RX (RX 350L, RX450h) 2016-{YEAR} Repair Manual

0.0106