Lexus RX (RX 350L, RX450h) 2016-2026 Repair Manual: Installation
INSTALLATION
CAUTION / NOTICE / HINT
HINT:
- Use the same procedure for the RH side and LH side.
- The following procedure is for the LH side.
PROCEDURE
1. INSTALL REAR AIRBAG SENSOR
(a) Check that the engine switch is off.
(b) Check that the cable is disconnected from the negative (-) battery terminal.
CAUTION:
Wait at least 90 seconds after disconnecting the cable from the negative (-) battery terminal to disable the SRS system.
.png)
(c) Before connecting the connector, check that the position of the white housing lock is as shown in the illustration.
.png)
| *a | Correct | *b | Incorrect |
(d) Engage the claw and install the rear airbag sensor with the bolt.
Torque:
9.0 N·m {92 kgf·cm, 80 in·lbf}
NOTICE:
- If the rear airbag sensor has been dropped, or there are any cracks, dents or other defects in the case or connector, replace it with a new one.
- When installing the rear airbag sensor, make sure that the SRS wiring does not interfere with or is not pinched between other parts.
- Make sure that the rear airbag sensor claw is securely inserted into the body hole.
(e) Connect the connector to the rear airbag sensor.
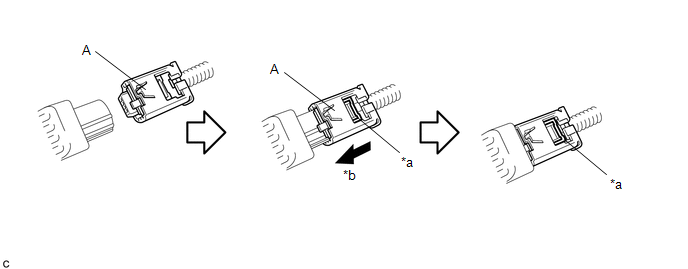
| *a | White Housing Lock | *b | Connect |
NOTICE:
When connecting any airbag connector, take care not to damage the airbag wire harness.
HINT:
- Be sure to connect the connector until it is locked (when locking, make sure that a click sound can be heard).
- When the connector is locked, the white housing lock will slide. Do not hold the white housing lock or the part (A) as it may result in an insecure connection.
(f) Check that there is no looseness in the installed parts of the rear airbag sensor.
2. INSTALL REAR SEAT SIDE GARNISH
Click here .gif)
3. INSTALL FRONT DECK SIDE TRIM COVER
Click here
4. INSTALL REAR SEAT OUTER TRACK BRACKET COVER
Click here
5. INSTALL REAR DOOR INSIDE SCUFF PLATE
Click here
6. INSTALL REAR DOOR SCUFF PLATE
Click here
7. CONNECT CABLE TO NEGATIVE BATTERY TERMINAL
NOTICE:
When disconnecting the cable, some systems need to be initialized after the cable is reconnected.
Click here
8. INSTALL REAR NO. 2 SEAT ASSEMBLY
Click here
9. PERFORM DIAGNOSTIC SYSTEM CHECK
Click here
10. INSPECT SRS WARNING LIGHT
Click here
 Removal
REMOVAL CAUTION / NOTICE / HINT The necessary procedures (adjustment, calibration, initialization, or registration) that must be performed after parts are removed, installed, or replaced during the re ...

Other materials:
Lexus RX (RX 350L, RX450h) 2016-2026 Repair Manual > Smart Access System With Push-button Start (for Entry Function): Customize Parameters
CUSTOMIZE PARAMETERS CUSTOMIZE SMART ACCESS SYSTEM WITH PUSH-BUTTON START (for Entry Function) HINT: The following items can be customized. NOTICE:
When the customer requests a change in a function, first make sure that the function can be customized.
Record the current settings before customiz ...
Lexus RX (RX 350L, RX450h) 2016-2026 Repair Manual > Electric Parking Brake System: Diagnostic Trouble Code Chart
DIAGNOSTIC TROUBLE CODE CHART Electric Parking Brake System DTC No. Detection Item Memory Note Link C059704 Brake System Control Module "A" System Internal Failure DTC stored An electric parking brake system malfunction is displayed on the multi-information display. C05 ...
Lexus RX (RX 350L, RX450h) 2016-{YEAR} Owners Manual
- For your information
- Pictorial index
- For safety and security
- Instrument cluster
- Operation of each component
- Driving
- Lexus Display Audio system
- Interior features
- Maintenance and care
- When trouble arises
- Vehicle specifications
- For owners
Lexus RX (RX 350L, RX450h) 2016-{YEAR} Repair Manual

0.0085