Lexus RX (RX 350L, RX450h) 2016-2026 Repair Manual: Electrical Key Oscillator (for Center Floor)
Components
COMPONENTS
ILLUSTRATION
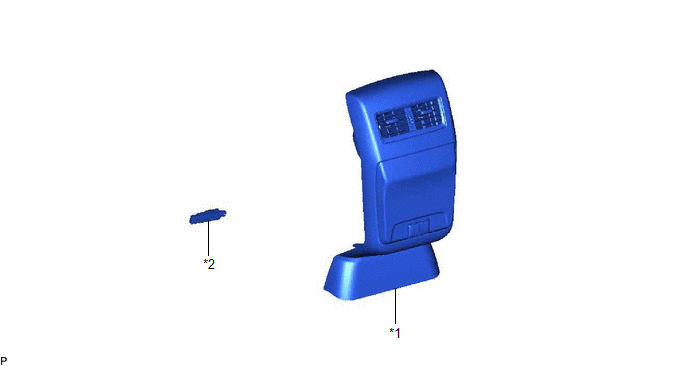
| *1 | CONSOLE REAR END PANEL SUB-ASSEMBLY | *2 | NO. 2 INDOOR ELECTRICAL KEY ANTENNA ASSEMBLY |
Removal
REMOVAL
PROCEDURE
1. REMOVE CONSOLE REAR END PANEL SUB-ASSEMBLY
Click here .gif)
2. REMOVE NO. 2 INDOOR ELECTRICAL KEY ANTENNA ASSEMBLY
(a) Disconnect the connector.
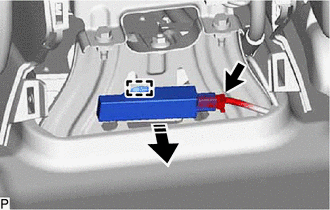
.png) | Remove in this Direction |
(b) Disengage the clamp to remove the No. 2 indoor electrical key antenna assembly as shown in the illustration.
NOTICE:
Be careful when removing the No. 2 indoor electrical key antenna assembly. If the No. 2 indoor electrical key antenna assembly is dropped, replace it with a new one.
Installation
INSTALLATION
PROCEDURE
1. INSTALL NO. 2 INDOOR ELECTRICAL KEY ANTENNA ASSEMBLY
(a) Engage the clamp to install the No. 2 indoor electrical key antenna assembly as shown in the illustration.
NOTICE:
Be careful when installing the No. 2 indoor electrical key antenna assembly. If the No. 2 indoor electrical key antenna assembly is dropped, replace it with a new one.
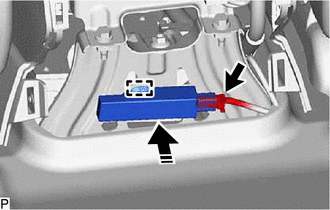
.png) | Install in this Direction |
(b) Connect the connector.
2. INSTALL CONSOLE REAR END PANEL SUB-ASSEMBLY
Click here .gif)
 Installation
INSTALLATION CAUTION / NOTICE / HINT NOTICE: Before replacing the certification ECU (smart key ECU assembly), refer to Registration. Click here PROCEDURE 1. INSTALL CERTIFICATION ECU (SMART KEY EC ...

Other materials:
Lexus RX (RX 350L, RX450h) 2016-2026 Repair Manual > Mass Air Flow Meter: Components
COMPONENTS ILLUSTRATION *1 AIR CLEANER CAP WITH AIR CLEANER HOSE *2 MASS AIR FLOW METER SUB-ASSEMBLY *3 NO. 1 FUEL VAPOR FEED HOSE *4 NO. 2 VENTILATION HOSE ...
Lexus RX (RX 350L, RX450h) 2016-2026 Repair Manual > Rear Door: Reassembly
REASSEMBLY CAUTION / NOTICE / HINT HINT:
Use the same procedure for the RH side and LH side.
The following procedure is for the LH side.
PROCEDURE 1. PRECAUTION NOTICE: After turning the engine switch off, waiting time may be required before disconnecting the cable from the negative (-) batt ...
Lexus RX (RX 350L, RX450h) 2016-{YEAR} Owners Manual
- For your information
- Pictorial index
- For safety and security
- Instrument cluster
- Operation of each component
- Driving
- Lexus Display Audio system
- Interior features
- Maintenance and care
- When trouble arises
- Vehicle specifications
- For owners
Lexus RX (RX 350L, RX450h) 2016-{YEAR} Repair Manual

0.009