Lexus RX (RX 350L, RX450h) 2016-2026 Repair Manual: Removal
REMOVAL
PROCEDURE
1. REMOVE TRANSMISSION FLOOR SHIFT ASSEMBLY
for U881E Automatic Transmission / Transaxle:
Click here .gif)
for U881F Automatic Transmission / Transaxle:
Click here
2. REMOVE FRONT NO. 2 CONSOLE BOX INSERT
Click here
3. REMOVE DCM (TELEMATICS TRANSCEIVER) WITH BRACKET (w/ Telematics Transceiver)
Click here
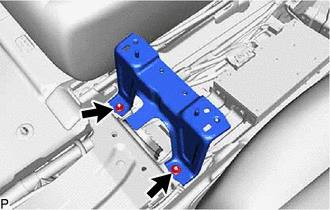
4. REMOVE NO. 3 CONSOLE BOX MOUNTING BRACKET
| (a) Remove the 2 nuts and No. 3 console box mounting bracket. |
|
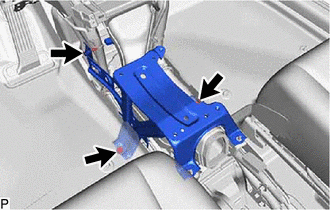
5. REMOVE SHIFT AND SELECT LEVER SUPPORT
| (a) Remove the 3 bolts and shift and select lever support. |
|
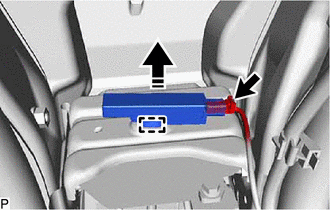
6. REMOVE NO. 1 CONSOLE BOX DUCT
| (a) Remove the clip. |
|
.png)
(b) Remove the No. 1 console box duct.
7. REMOVE NO. 1 INDOOR ELECTRICAL KEY ANTENNA ASSEMBLY
(a) Disconnect the connector.
.png) | Remove in this Direction |
(b) Disengage the clamp to remove the No. 1 indoor electrical key antenna assembly as shown in the illustration.
NOTICE:
Be careful when removing the No. 1 indoor electrical key antenna assembly. If the No. 1 indoor electrical key antenna assembly is dropped, replace it with a new one.
 Installation
INSTALLATION PROCEDURE 1. INSTALL NO. 1 INDOOR ELECTRICAL KEY ANTENNA ASSEMBLY (a) Engage the clamp to install the No. 1 indoor electrical key antenna assembly as shown in the illustration. NOTICE: Be ...

Other materials:
Lexus RX (RX 350L, RX450h) 2016-2026 Repair Manual > Power Seat Switch(w/o Seat Position Memory System): Removal
REMOVAL CAUTION / NOTICE / HINT The necessary procedures (adjustment, calibration, initialization or registration) that must be performed after parts are removed and installed, or replaced during front power seat switch removal/installation are shown below. Necessary Procedures After Parts Removed/I ...
Lexus RX (RX 350L, RX450h) 2016-2026 Repair Manual > Smart Access System With Push-button Start (for Start Function): Power Source Mode does not Change to ON (IG and ACC)
DESCRIPTION If any of the following operations are performed, the certification ECU (smart key ECU assembly) receives a signal, and changes the power source mode.
With the electrical key transmitter sub-assembly in the cabin, the engine switch is pressed.
When the transmitter battery of the ele ...
Lexus RX (RX 350L, RX450h) 2016-{YEAR} Owners Manual
- For your information
- Pictorial index
- For safety and security
- Instrument cluster
- Operation of each component
- Driving
- Lexus Display Audio system
- Interior features
- Maintenance and care
- When trouble arises
- Vehicle specifications
- For owners
Lexus RX (RX 350L, RX450h) 2016-{YEAR} Repair Manual

0.0118