Lexus RX (RX 350L, RX450h) 2016-2026 Repair Manual: Installation
INSTALLATION
PROCEDURE
1. INSTALL NO. 1 INDOOR ELECTRICAL KEY ANTENNA ASSEMBLY
(a) Engage the clamp to install the No. 1 indoor electrical key antenna assembly as shown in the illustration.
NOTICE:
Be careful when installing the No. 1 indoor electrical key antenna assembly. If the No. 1 indoor electrical key antenna assembly is dropped, replace it with a new one.
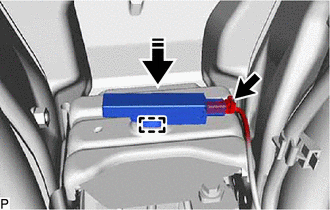
.png) | Install in this Direction |
(b) Connect the connector.
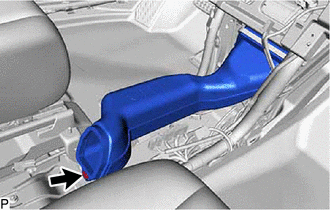
2. INSTALL NO. 1 CONSOLE BOX DUCT
| (a) Install the No. 1 console box duct with the clip. |
|
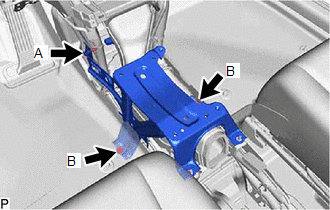
3. INSTALL SHIFT AND SELECT LEVER SUPPORT
| (a) Install the shift and select lever support with the bolt (A) and 2 bolts (B). Torque: Bolt (A) : 22 N·m {224 kgf·cm, 16 ft·lbf} |
|
4. INSTALL NO. 3 CONSOLE BOX MOUNTING BRACKET
(a) Install the No. 3 console box mounting bracket with the 2 nuts.
5. INSTALL DCM (TELEMATICS TRANSCEIVER) WITH BRACKET (w/ Telematics Transceiver)
Click here .gif)
6. INSTALL FRONT NO. 2 CONSOLE BOX INSERT
Click here
7. INSTALL TRANSMISSION FLOOR SHIFT ASSEMBLY
for U881E Automatic Transmission / Transaxle:
Click here
for U881F Automatic Transmission / Transaxle:
Click here
 Components
COMPONENTS ILLUSTRATION *A w/ Telematics Transceiver - - *1 DCM (TELEMATICS TRANSCEIVER) WITH BRACKET *2 FRONT NO. 2 CONSOLE BOX INSERT *3 NO. 1 CONSOLE BOX DUCT *4 NO. 1 ...
 Removal
REMOVAL PROCEDURE 1. REMOVE TRANSMISSION FLOOR SHIFT ASSEMBLY for U881E Automatic Transmission / Transaxle: Click here for U881F Automatic Transmission / Transaxle: Click here 2. REMOVE FRONT NO. ...
Other materials:
Lexus RX (RX 350L, RX450h) 2016-2026 Repair Manual > Instrument Panel Safety Pad: Disassembly
DISASSEMBLY PROCEDURE 1. REMOVE HEADUP DISPLAY (METER MIRROR SUB-ASSEMBLY) (w/ Headup Display) Click here 2. REMOVE INSTRUMENT PANEL PASSENGER AIRBAG ASSEMBLY Click here 3. REMOVE NO. 1 HEATER TO REGISTER DUCT (a) Remove the 3 screws <D> or <F> and No. 1 heater to register duct. ...
Lexus RX (RX 350L, RX450h) 2016-2026 Repair Manual > Navigation System: Steering Pad Switch Circuit
DESCRIPTION This circuit sends an operation signal from the steering pad switch assembly to the radio receiver assembly. If there is an open in the circuit, the navigation system cannot be operated using the steering pad switch assembly. If there is a short in the circuit, the same condition as when ...
Lexus RX (RX 350L, RX450h) 2016-{YEAR} Owners Manual
- For your information
- Pictorial index
- For safety and security
- Instrument cluster
- Operation of each component
- Driving
- Lexus Display Audio system
- Interior features
- Maintenance and care
- When trouble arises
- Vehicle specifications
- For owners
Lexus RX (RX 350L, RX450h) 2016-{YEAR} Repair Manual

0.0091