Lexus RX (RX 350L, RX450h) 2016-2026 Repair Manual: Installation
INSTALLATION
CAUTION / NOTICE / HINT
HINT:
- Use the same procedure for the RH side and LH side.
- The following procedure is for the LH side.
PROCEDURE
1. INSTALL REAR SPEAKER ASSEMBLY
NOTICE:
Do not touch the speaker cone.
(a) Connect the connector.
(b) Engage the 2 guides to temporarily install the rear speaker assembly.
(c) Install the rear speaker assembly with the 3 screws.
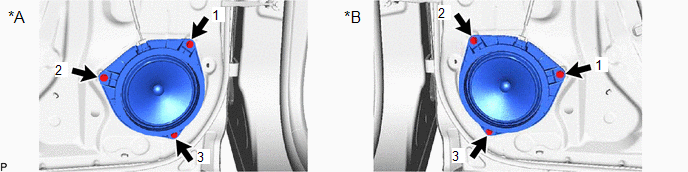
| *A | for LH Side | *B | for RH Side |
HINT:
Install the screws in the order shown in the illustration.
2. INSTALL REAR NO. 2 SPEAKER ASSEMBLY
NOTICE:
Do not touch the speaker cone.
(a) Connect the connector.
(b) Engage the clip to temporarily install the rear No. 2 speaker assembly.
(c) Install the rear No. 2 speaker assembly with the screw.
3. INSTALL REAR DOOR TRIM BOARD SUB-ASSEMBLY
Click here .gif)
4. INSTALL COURTESY LIGHT ASSEMBLY
Click here
5. INSTALL REAR DOOR ARMREST COVER
Click here
6. INSTALL REAR POWER WINDOW REGULATOR SWITCH ASSEMBLY WITH REAR DOOR UPPER ARMREST BASE PANEL
Click here
7. INSTALL REAR DOOR INSIDE HANDLE BEZEL PLUG
Click here
8. INSPECT POWER WINDOW OPERATION
Click here
 Inspection
INSPECTION PROCEDURE 1. INSPECT REAR SPEAKER ASSEMBLY (a) With the speaker installed, check that there is no looseness or other abnormalities. (b) Check that there is no foreign matter in the speaker, ...
 Roof Antenna
...
Other materials:
Lexus RX (RX 350L, RX450h) 2016-2026 Repair Manual > Lighting System: Interior Light Circuit
DESCRIPTION The main body ECU (multiplex network body ECU) controls the operation of the following lights:
Map Light Assembly (Front Dome Light)
Spot Light Assembly (Rear Dome Light)
Front Door Scuff Plate LH (Scuff Light LH)(w/ Scuff Light)
Front Door Scuff Plate RH (Scuff Light RH)(w/ Scu ...
Lexus RX (RX 350L, RX450h) 2016-2026 Repair Manual > Vsc Off Switch: Inspection
INSPECTION PROCEDURE 1. INSPECT VSC OFF SWITCH (COMBINATION SWITCH ASSEMBLY) (a) Make sure that there is no looseness at the locking part and the connecting part of the connector. *a Component without harness connected (VSC OFF switch (Combination Switch Assembly)) (b) Dis ...
Lexus RX (RX 350L, RX450h) 2016-{YEAR} Owners Manual
- For your information
- Pictorial index
- For safety and security
- Instrument cluster
- Operation of each component
- Driving
- Lexus Display Audio system
- Interior features
- Maintenance and care
- When trouble arises
- Vehicle specifications
- For owners
Lexus RX (RX 350L, RX450h) 2016-{YEAR} Repair Manual

0.0106