Lexus RX (RX 350L, RX450h) 2016-2026 Repair Manual: Installation
INSTALLATION
PROCEDURE
1. INSTALL TELEPHONE ANTENNA ASSEMBLY
(a) When reusing the telephone antenna assembly:
(1) Install a new seal.
(b) Push the telephone antenna assembly in the direction indicated by the arrow (1) shown in the illustration to engage the guide.
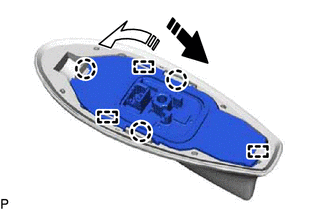
.png) | Install in this Direction (1) |
.png) | Install in this Direction (2) |
(c) Push the telephone antenna assembly in the direction indicated by the arrow (2) shown in the illustration to engage the 2 guides and 3 claws and install the telephone antenna assembly.
2. INSTALL TELEPHONE ANTENNA ASSEMBLY WITH COVER
(a) Install a new washer and holder as shown in the illustration.
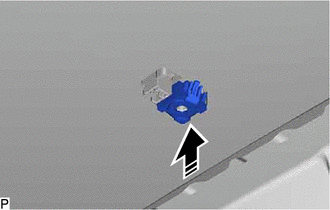
| | Install in this Direction |
(b) Install the telephone antenna assembly with cover with the bolt.
Torque:
9.5 N·m {97 kgf·cm, 84 in·lbf}
(c) Connect the connector
3. INSTALL ROOF HEADLINING ASSEMBLY (w/o Rear No. 2 Seat)
Click here .gif)
4. INSTALL ROOF HEADLINING ASSEMBLY (w/ Rear No. 2 Seat)
Click here
 Removal
REMOVAL CAUTION / NOTICE / HINT The necessary procedures (adjustment, calibration, initialization, or registration) that must be performed after parts are removed and installed, or replaced during tel ...

Other materials:
Lexus RX (RX 350L, RX450h) 2016-2026 Repair Manual > Window / Glass: Power Window Master Switch
ComponentsCOMPONENTS ILLUSTRATION *1 MULTIPLEX NETWORK MASTER SWITCH ASSEMBLY *2 MULTIPLEX NETWORK MASTER SWITCH ASSEMBLY WITH FRONT DOOR UPPER ARMREST BASE PANEL RemovalREMOVAL PROCEDURE 1. REMOVE MULTIPLEX NETWORK MASTER SWITCH ASSEMBLY WITH FRONT DOOR UPPER ARMREST BASE PANEL Click h ...
Lexus RX (RX 350L, RX450h) 2016-2026 Repair Manual > Combination Meter: Disassembly
DISASSEMBLY PROCEDURE 1. REMOVE COMBINATION METER GLASS (for Optitron Meter Type) (a) Disengage the 8 claws to remove the combination meter glass. 2. REMOVE COMBINATION METER GLASS (for TFT Meter Type) (a) Disengage the 9 claws to remove the combination meter glass. ...
Lexus RX (RX 350L, RX450h) 2016-{YEAR} Owners Manual
- For your information
- Pictorial index
- For safety and security
- Instrument cluster
- Operation of each component
- Driving
- Lexus Display Audio system
- Interior features
- Maintenance and care
- When trouble arises
- Vehicle specifications
- For owners
Lexus RX (RX 350L, RX450h) 2016-{YEAR} Repair Manual

0.015