Lexus RX (RX 350L, RX450h) 2016-2026 Repair Manual: Removal
REMOVAL
CAUTION / NOTICE / HINT
The necessary procedures (adjustment, calibration, initialization, or registration) that must be performed after parts are removed and installed, or replaced during DCM (telematics transceiver) removal/installation are shown below.
Necessary Procedure After Parts Removed/Installed/Replaced| Replaced Part or Performed Procedure | Necessary Procedure | Effect/Inoperative Function when Necessary Procedure not Performed | Link |
|---|---|---|---|
| *: for Lexus Enform Remote Compatible Type | |||
| Replacement of DCM (telematics transceiver) | DCM activation | Safety connect system | |
| Replacement of DCM (telematics transceiver)* | Perform code registration (Immobiliser system) | Telematics system | |
PROCEDURE
1. REMOVE CONSOLE BOX ASSEMBLY
Click here .gif)
2. REMOVE FRONT NO. 2 CONSOLE BOX INSERT
Click here
3. REMOVE DCM (TELEMATICS TRANSCEIVER) WITH BRACKET
| (a) Disconnect each connector. |
|
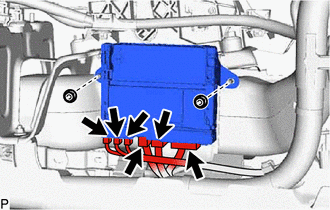
(b) Remove the 2 nuts and DCM (telematics transceiver) with bracket.
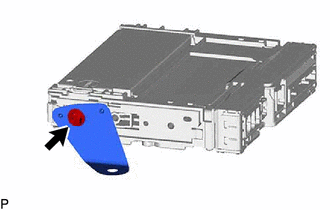
4. REMOVE NO. 3 TELEPHONE BRACKET
| (a) Remove the screw and No. 3 telephone bracket. |
|
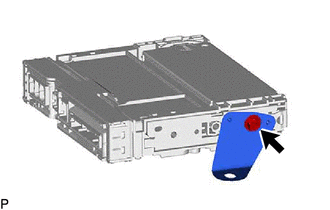
5. REMOVE NO. 4 TELEPHONE BRACKET
| (a) Remove the screw and No. 4 telephone bracket. |
|
6. REMOVE DCM (TELEMATICS TRANSCEIVER)
 Components
COMPONENTS ILLUSTRATION *1 DCM (TELEMATICS TRANSCEIVER) *2 DCM (TELEMATICS TRANSCEIVER) WITH BRACKET *3 FRONT NO. 2 CONSOLE BOX INSERT *4 NO. 3 TELEPHONE BRACKET *5 NO. 4 TEL ...
 Installation
INSTALLATION PROCEDURE 1. INSTALL DCM (TELEMATICS TRANSCEIVER) 2. INSTALL NO. 4 TELEPHONE BRACKET (a) Install the No. 4 telephone bracket with the screw. 3. INSTALL NO. 3 TELEPHONE BRACKET (a) Install ...
Other materials:
Lexus RX (RX 350L, RX450h) 2016-2026 Repair Manual > Lane Control System: Customize Parameters
CUSTOMIZE PARAMETERS CUSTOMIZE LTA NOTICE:
When the customer requests a change in a function, first make sure that the function can be customized.
Be sure to make a note of the current settings before customizing.
When troubleshooting a function, first make sure that the function is set to th ...
Lexus RX (RX 350L, RX450h) 2016-2026 Repair Manual > Front Brake Flexible Hose: Components
COMPONENTS ILLUSTRATION *1 FRONT FLEXIBLE HOSE *2 UNION BOLT *3 GASKET *4 BRAKE LINE *5 FRONT SPEED SENSOR - - Tightening torque for "Major areas involving basic vehicle performance such as moving/turning/stopping" : N*m (kgf*cm, ft.*lbf) N*m (kgf*cm, ft.*lb ...
Lexus RX (RX 350L, RX450h) 2016-{YEAR} Owners Manual
- For your information
- Pictorial index
- For safety and security
- Instrument cluster
- Operation of each component
- Driving
- Lexus Display Audio system
- Interior features
- Maintenance and care
- When trouble arises
- Vehicle specifications
- For owners
Lexus RX (RX 350L, RX450h) 2016-{YEAR} Repair Manual

0.0097